How to Add or Edit Game Authors on an Existing Game Shell

System administrators in Knowledge Guru can add and remove game authors from a game shell at any time. Each Knowledge Guru game must have at least one, but up to 10, Game Author(s) associated with it.  

To create a game author: 

  1. Log into your Knowledge Guru account at:  theknowledgeguru.com/login/ 
  2. Select your company from the game list. If you have no games, you will automatically be logged into your system administrator account. 
  3. Select  GAME AUTHORS/CREATE GAME AUTHOR  from the left-hand menu. 
  4. Enter the game author information and click  CREATE GAME AUTHOR. 

Once you have the game author in your system, you can associate them to existing game shells. To add a Game Author to an existing game shell: 

  1. Select GAME SHELLS/EDIT GAME SHELL from the left-hand menu. 
  2. Select EDIT GAME SHELL for the game shell you wish to edit.  
  3. Enter names of additional game authors, up to 10, in the Additional Game Authors box. Names should appear as you type if you have already added the authors to your account.  
  4. Click the X for any additional game authors you want to remove, or use the dropdown to change the Primary Game Author. 
  5. Click SAVE. 

How to Add, Edit, Remove, and View Players in the System Admin Tool

When you are logged in as a system administrator in your Knowledge Guru account, you can add, edit and remove players from all your game shells. The Player Management tool also allows you to view reports on how well your players are doing in each of the games.

Manage Players Tool

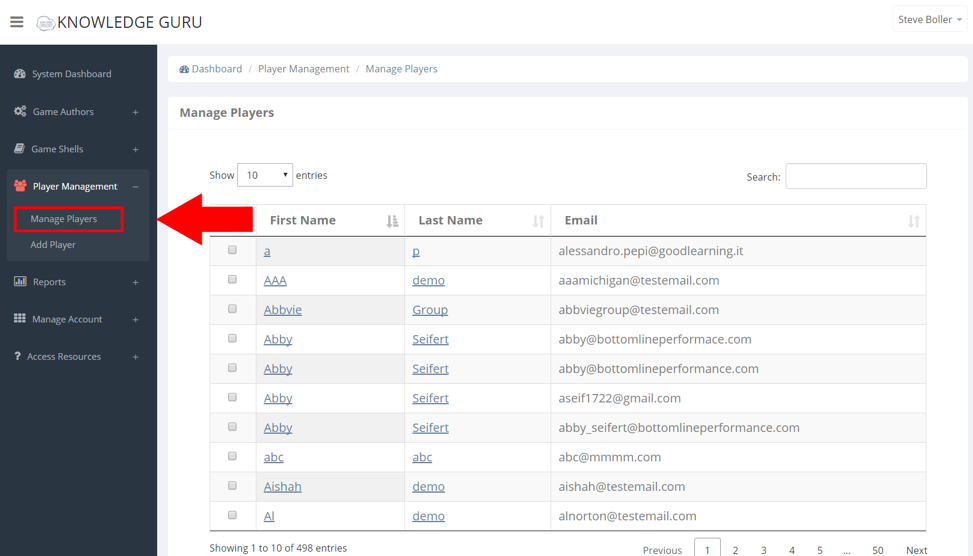
Expand the Player Management option within left-hand navigation pane, and select Manage Players.

The Player Management tool allows you to do all of the following:

  • Sort players by First Name, Last Name or Email
  • Search by First Name, Last Name or Email
  • Display 10, 25, 50, 100 players at a time on screen
  • Add multiple players to different games
  • Remove players from different games
  • Remove multiple players from all game shells

How to Sort Players

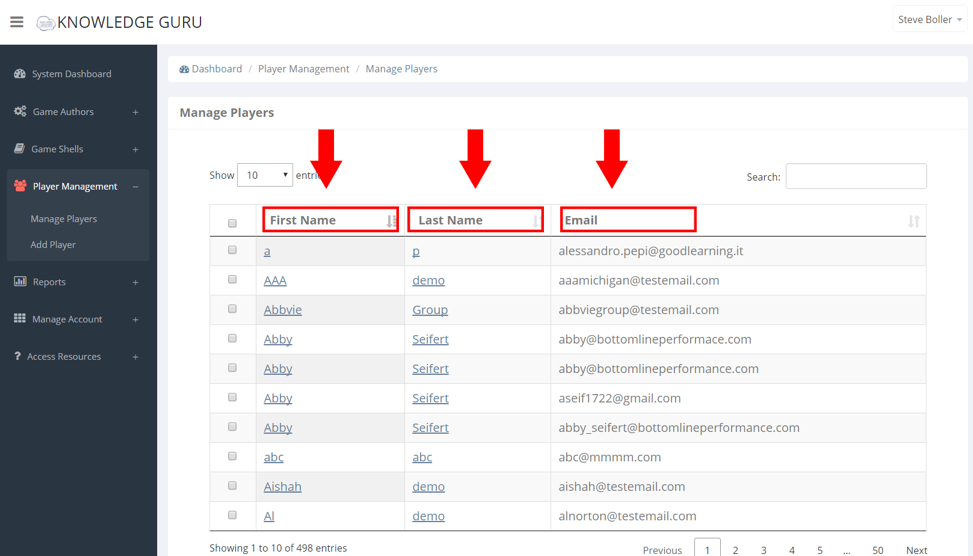
You can sort players alphabetically by First Name, Last Name or Email. Click one of the three headers to sort players by that header.

How to Display More Players on the Screen

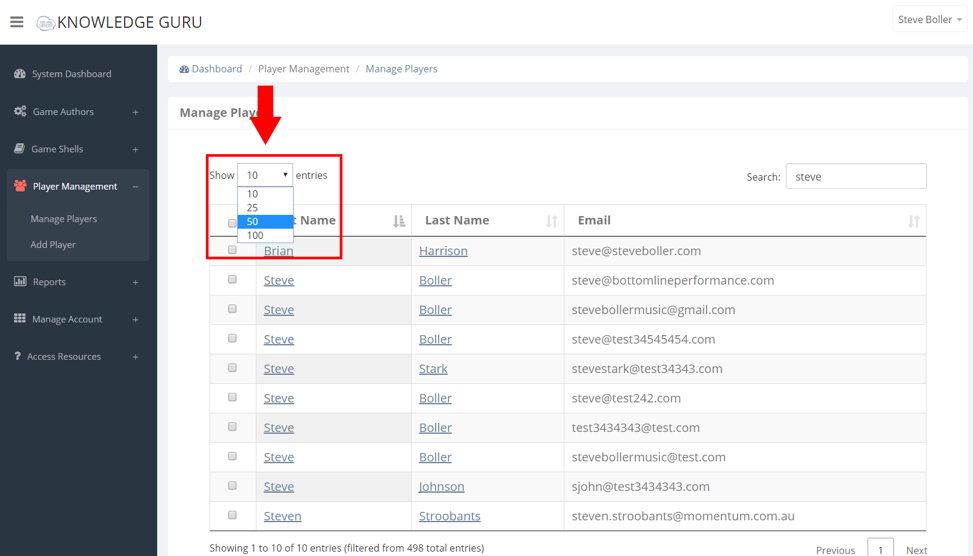
Click the drop-down menu between Show entries to select different numbers of players to be displayed on the screen at once.

How to Search for Players

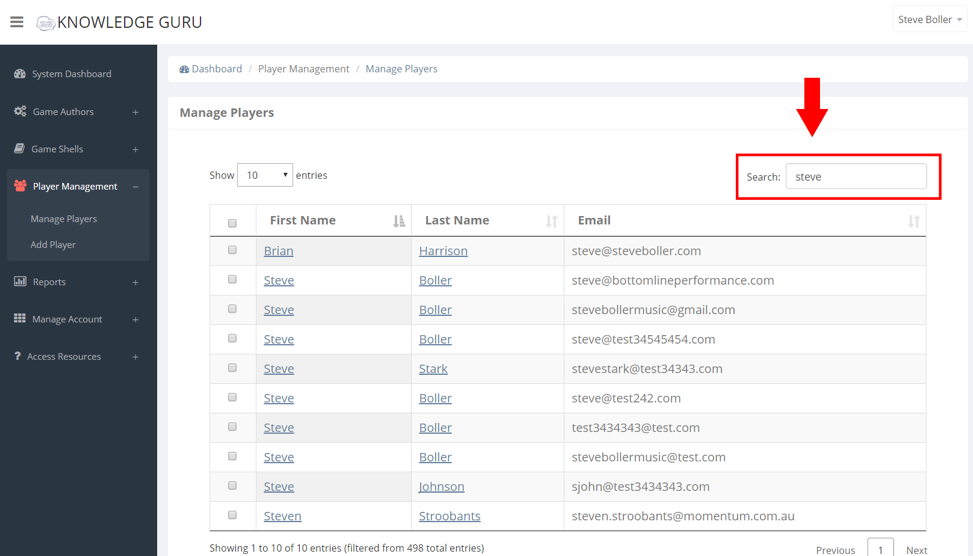
Click on the Search input box to type in a first name, last name or email. It will dynamically search as you type.

How to Add Multiple Players to Multiple Games

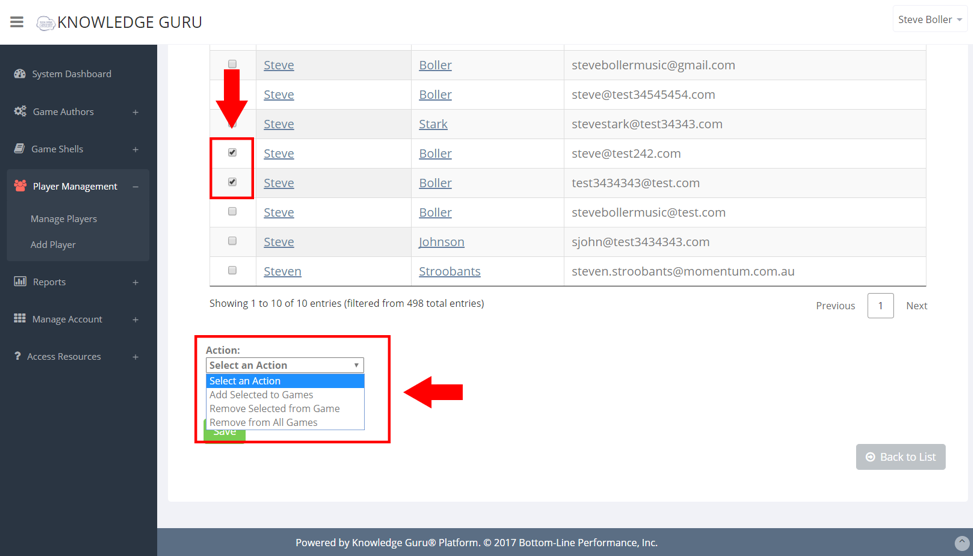
After you select the players you want to add to a game, click the Action drop-down menu and select Add Selected to Games.

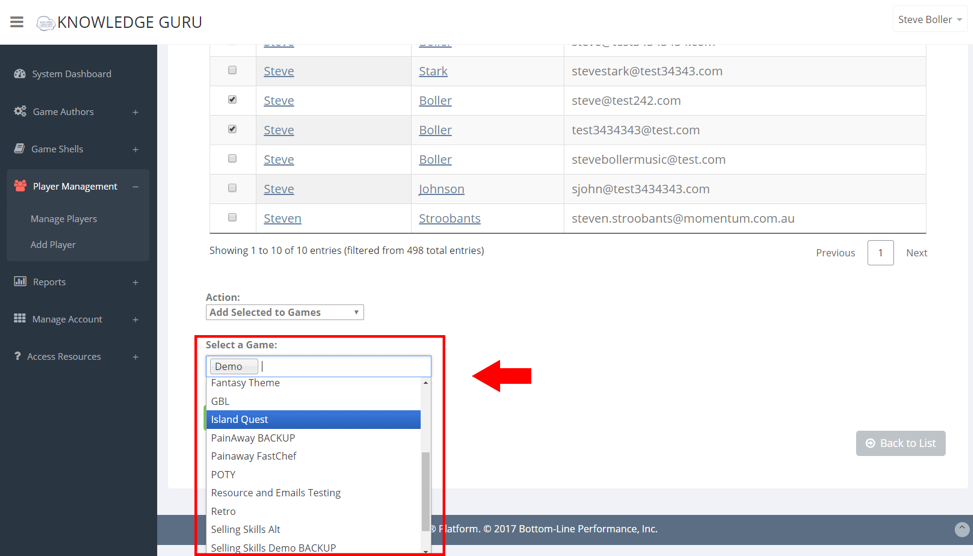
Click the drop-down menu that appears. This drop-down menu shows all the game shells in your company account. Click on a game name to select that game. (You can also search for a particular game by typing the game name.)

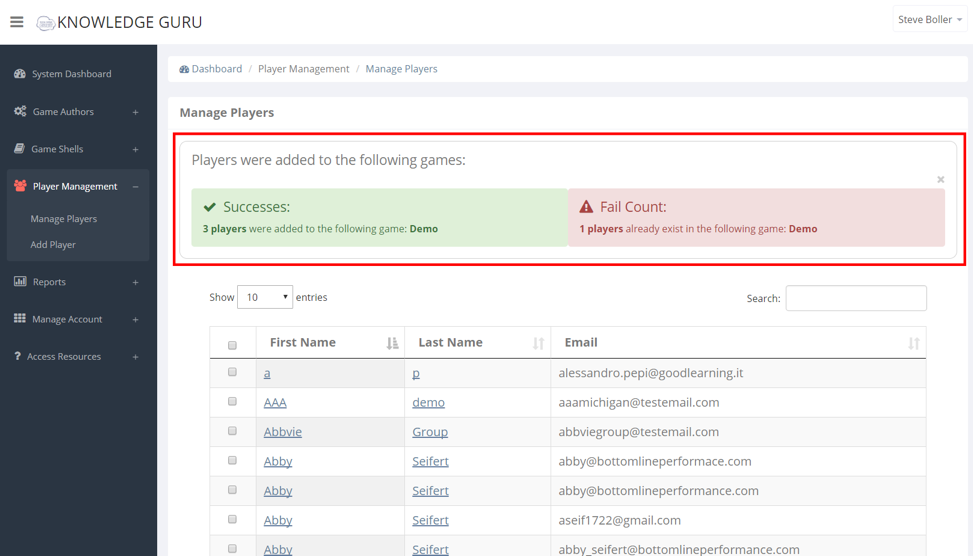
Click SAVE. After you save, the authoring tool will tell you how many players were added to the games and if there were any failures.

How to Remove Multiple Players from Multiple Games

After you select the players you want to remove from a game, click the Action drop-down menu and select Remove Selected from Games.

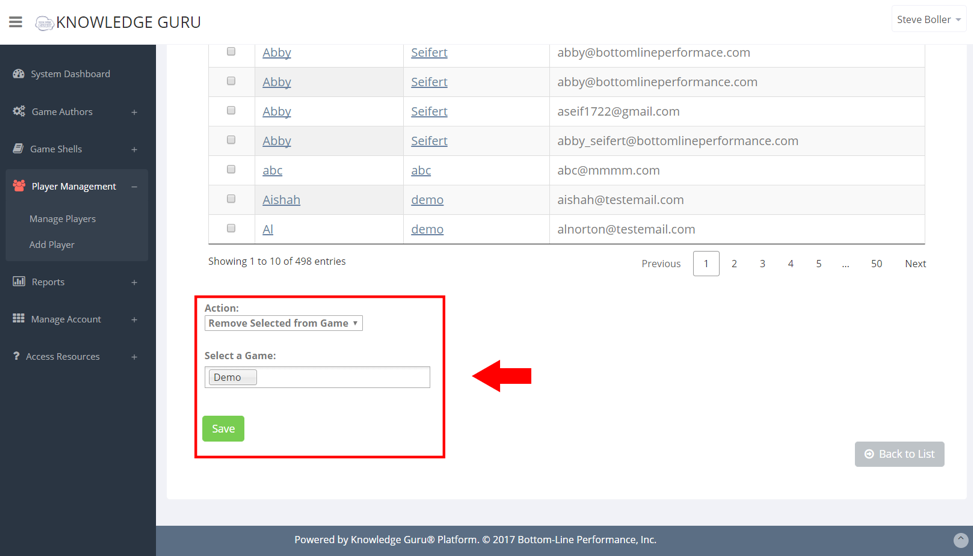
Click the drop-down menu that appears. This drop-down menu shows all the game shells you own. Click on a game name to select that game. (You can also search for a particular game by typing the game name.)

Click SAVE. After you save, the authoring tool will tell you how many players were removed from the games and if there were any failures.

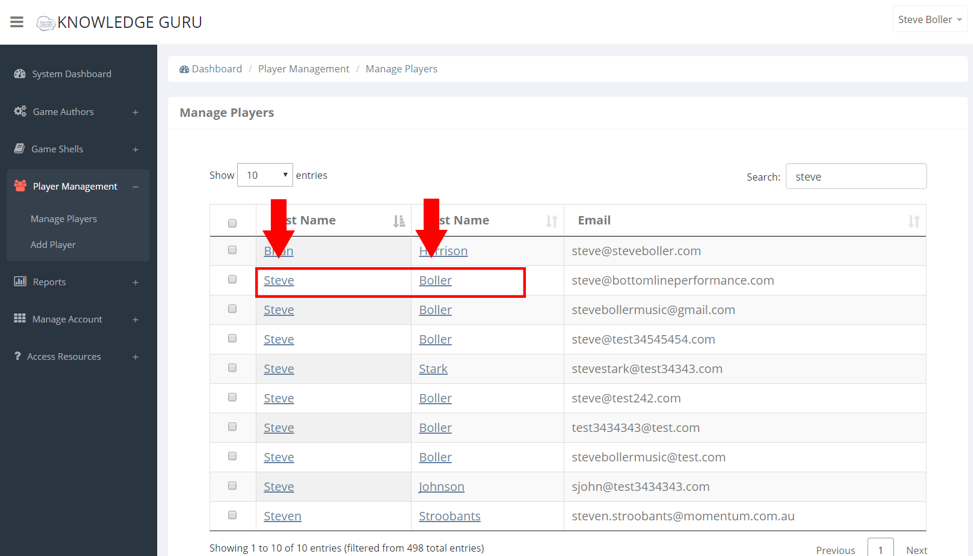
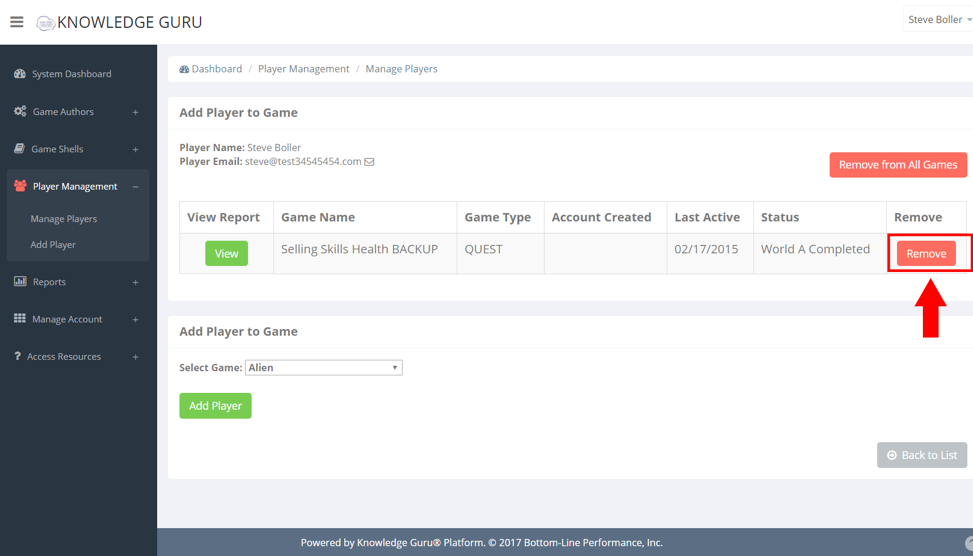
How to View an Individual Player

Click on a person’s first or last name to view their individual status.

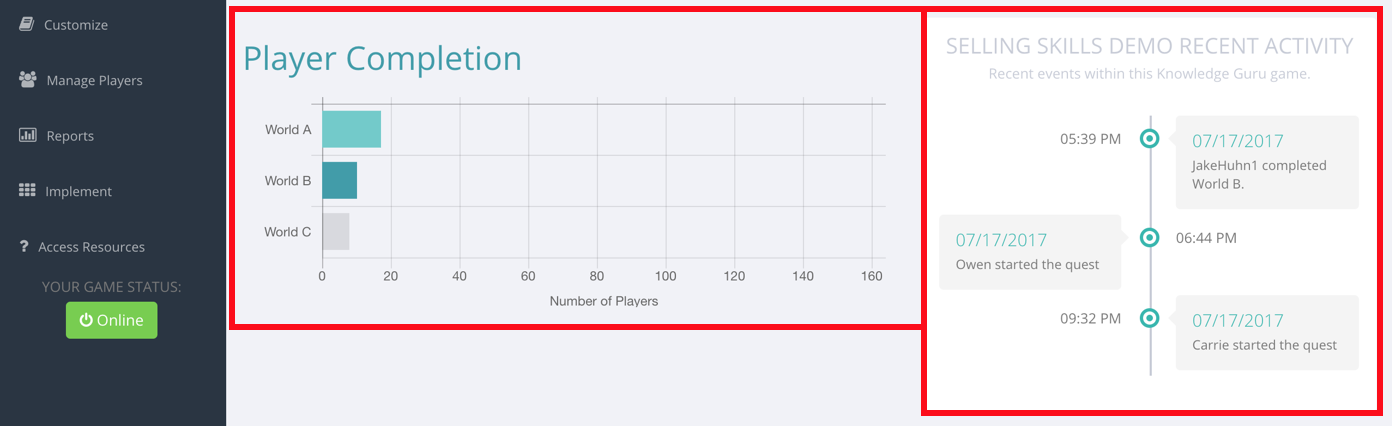
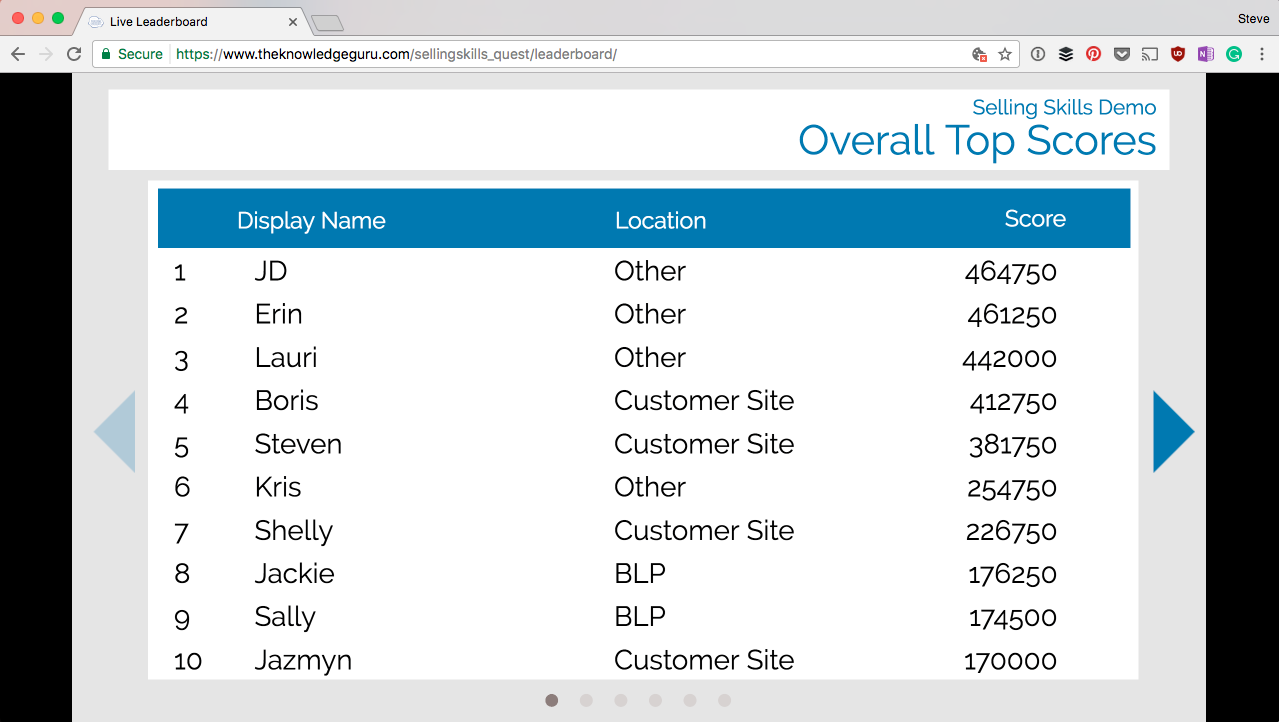
Here you get a comprehensive profile of the player. You can quickly see which games they are in, how far they have progressed, and when they were last active in the game.

If you want more details on how well they are doing in a game, click View under the Reports header.

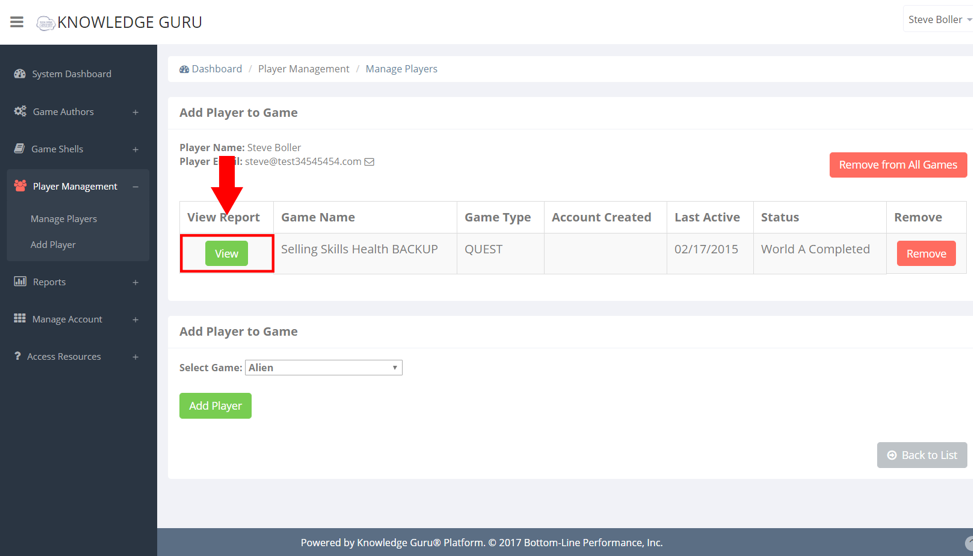
To remove a player from a single game, click the Remove button that correlates with the game row.

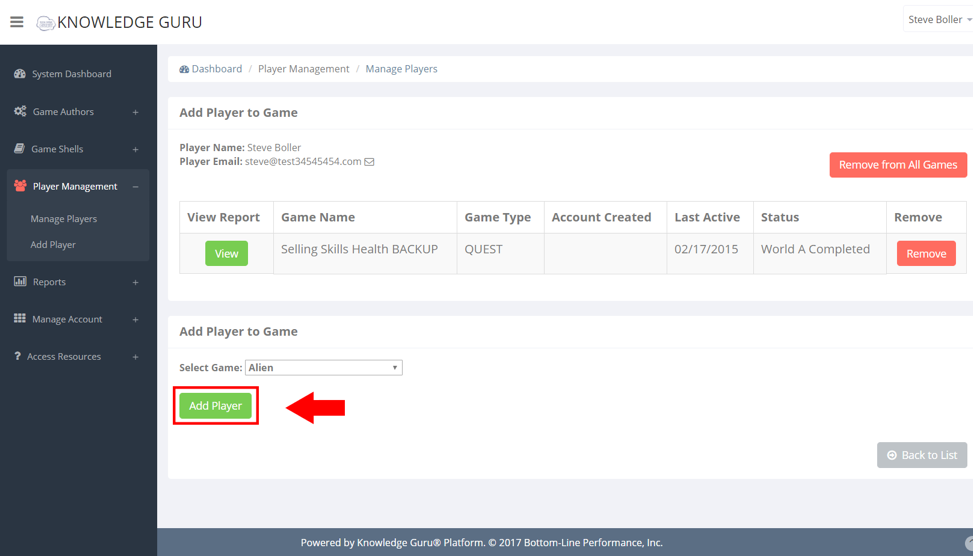
To add a player to any game shell you have created, open the Select Game drop-down menu and click Add Player.

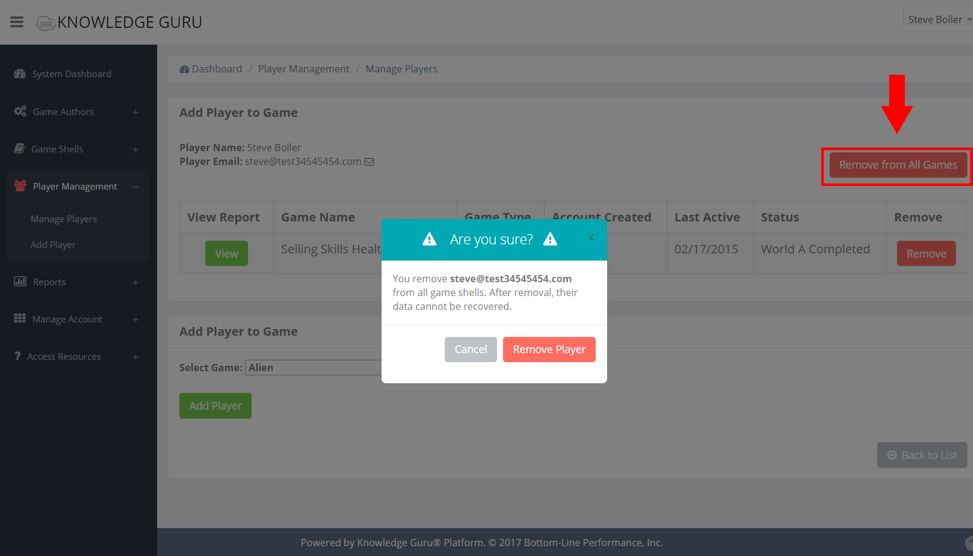
If you need to remove a player completely from all your game shells, click Remove from All Games. A prompt will appear to confirm this action as you will not be able to recover any of this player’s data after you remove them.

Add Player Tool

Expand the Player Management option within left-hand navigation pane, and select Add Player.

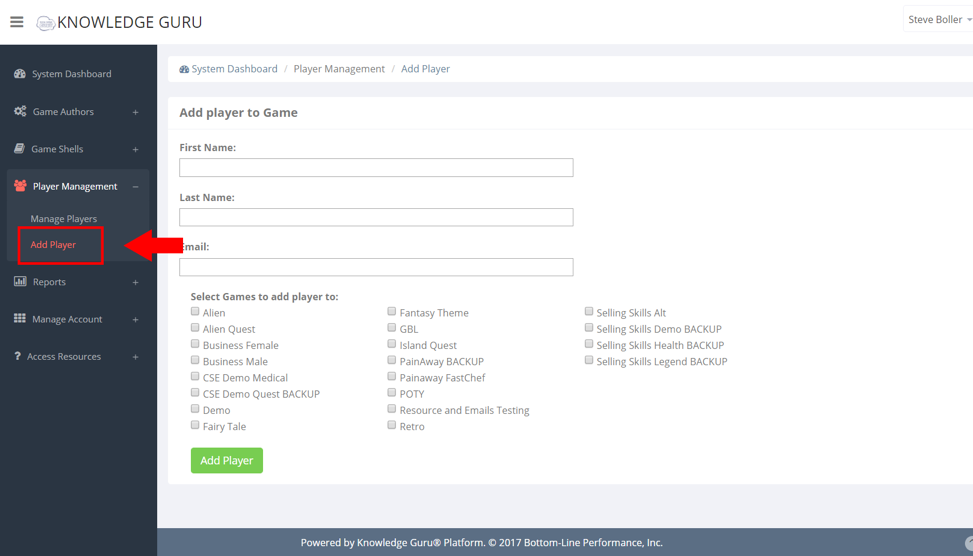
Type in the first name, last name and email address of the player you want to add. Check the boxes next the game shells you wish to add the player to, then click the green Add Player button.

How to Manually Lock and Unlock Levels and Worlds in Quest

Manual spacing allows the game author to control what levels and worlds are available to their players. This is particularly useful when implementing your game as a daily or weekly competition. Authors have the option of immediately adjusting level availability or they can schedule an entire world to unlock at a future date.

Quick Steps to Adjust Level Availability

  1. Expand Customize option within left-hand navigation pane, and select Game Spacing.
  2. Select the “Manual” option. A new interface appears.
  3. Click the furthest level a player should be able to access. (Note that levels still need to be unlocked in order and once a player completes a level, that level will remain unlocked for them.)
  4. Click SUBMIT. The availability is immediately updated. (You can change this anytime.)

Quick Steps to Schedule a World to Unlock

  1. Expand Customize option within left-hand navigation pane, and select Game Spacing.
  2. Select the “Manual” option. A new interface appears.
  3. There are three date-picker fields (one for each World). Select a date for each World to unlock. (Note that by unlocking a World that every level prior to that world will also be unlocked. In other words, setting World B to unlock will also unlock every level in World A.)
  4. Click SUBMIT. The unlocking is scheduled. (You can change this anytime.)

This is the email Knowledge Guru sends to players when a new level or world is unlocked if manual spacing is used and automatic emails are turned ON.

How to use Automated Emails to Motivate, Remind, and Engage

Knowledge Guru administrators can choose to turn on a carefully crafted series of emails that players trigger with various in-game activities. These auto emails are designed to foster repeat play, acknowledge significant accomplishments, and gently nudge inactive users.

Motivate Players

Motivational emails are designed to engage players who have gone at least a week without playing. They may need a reminder to come back and continue their adventure. A player won’t receive the same motivational message twice, and won’t receive them less than seven days apart. Once a player has completed their game or has received six motivational messages, the system will stop automatically sending them to that player.

Players also receive a motivational email the first time they are passed on the leaderboard.

Reward Players

Knowledge Guru will also send out unique reward and progress emails when a player has achieved a milestone. Depending on the game type, these could include the following:

  • The completion of a World (Quest)
  • Finishing the first Daily 3 mini-games (Drive)
  • Achieving the top spot on the global leaderboards

How to Enable Automatic Email Reminders

We encourage using automated emails to help keep players engaged with your learning objectives. This is something you can easily enable or disable as the Game Author.

Follow the steps below to enable automatic email reminders:

1. Expand the Implement option within left-hand navigation pane, and select Automated Emails.

2. Select REMINDERS ENABLED from the drop-down menu.

How to Add Reference Materials to a Knowledge Guru Game

Knowledge Guru is specifically designed to provide you with a lot of flexibility to achieve your learning objectives. One way we offer this flexibility is through “Resources” support. Resources allow you to add content that your learners can access and review anytime, anywhere. A resource can be as simple as a term and a description, or it can include a URL link to a website or PDF.

Let’s say for example you are creating a Knowledge Guru game for onboarding new employees to your organization. The game itself may be created with references to material they have been exposed to in your company handbook, as well as opportunities for them to apply the knowledge they have learned.

With Resources, you could also include a link to your handbook, which would enable learners to view it directly while they play Knowledge Guru. And since Knowledge Guru allows your learners to play at their desks or on their go on their mobile device, they will always have it with them.

How to Add Resources

Follow the steps below to add a resource to your Knowledge Guru game:

1. Expand the Develop option within left-hand navigation pane, and select Create or Edit Resources.

2. Fill in your resource name, description, and optional URL.

3. Click SAVE.

Dashboard Overview

When you log in to a Quest or Legend game as a game author, you land on the main dashboard. This dashboard is your launching point for anywhere else you want to go within the authoring tool. It is also a source of summary information about your game and its players. Let’s look at how this dashboard is organized.

Menus/Navigation

The “hamburger” icon in the top left corner lets you expand and collapse the sidebar menu located on the left side of your screen. Your game’s name is located next to this menu icon. Once you expand the navigation, you will see options that help you:

  • Develop your game
  • Customize your game
  • Manage players
  • Access reports
  • Implement your game
  • Access Knowledge Base resources

Each of these menu options can also be expanded to reveal sub-menu choices within each main area of the authoring tool.

Summary Statistics

The top of your dashboard gives you a quick snapshot of your players and how they are doing. As the image shows, four icons are always visible. These icons let you see how many players you have, how many are active, how many have reached mastery, and the average mastery value.

Pre-launch Checklist

dashboard-3

If your game has not yet launched, a Knowledge Guru Checklist to Launch will be displayed. This checklist outlines the six steps you need to execute to get your game created. Clicking any of the six steps provides you with a detailed explanation of each one.

As you complete tasks, the checklist automatically marks the tasks off your list and changes the box from red to green. By clicking within a step, you can see a more detailed explanation of it.

Post-Launch Statistics and Recent Activity Log

Once you make your game live, your pre-launch checklist gets replaced with additional player statistics. These statistics are dynamic. You can click within them to access full reports. You can also hover over the bars in the graph or the pie pieces in the pie chart to see specific data points.

The bottom left portion of your screen will change to a timeline labeled KG Recent Activity. This activity log can help you see how long it took to create and put your game online as well as the most recent activities of the game’s players.

Your Profile and Logging Out

The drop-down menu at the far-most upper right corner of your screen contains links to your profile settings as well as a log out option. Your profile shows the date your Knowledge Guru subscription expires and allows you to change your email and password.

Knowledge Base Help and Support

The Knowledge Guru Knowledge Base is always available to you via Access Resources in your navigation pane. This menu option contains a link to the Knowledge Base as well as to Support.

How to Let Learners Log In With Salesforce.com

Knowledge Guru allows your learners to log into their games with their Salesforce.com account. Once learners validate their account credentials, they can log in with Salesforce and see all games registered to their Salesforce email address.

Desktop

From the main login page

  1. Players go to kguru.co/login or theknowledgeguru.com/login and click LOGIN WITH SALESFORCE.
  2. Players enter their Salesforce username and password.
  3. If it is their first time accessing Knowledge Guru from Salesforce, they will authenticate the connection.
  4. After authenticating, players see a list of their assigned games.

From an individual game login page

  1. Players go to their game link (kguru.co/GAMENAME or theknowledgeguru.com/GAMENAME) and click LOGIN WITH SALESFORCE.
  2. Players enter their Salesforce username and password
  3. If it is their first time accessing Knowledge Guru from Salesforce, they will authenticate the connection.
  4. After authenticating, players see a list of their assigned games.

Mobile

From the app login page

  1. Players open the Quest or Drive app
  2. Players tap LOGIN WITH SALESFORCE on the login page.
  3. Players enter their Salesforce username and password
  4. If it is their first time accessing Knowledge Guru from Salesforce, they will authenticate the connection.
  5. After authenticating, players see a list of their assigned games.

How to Invite Learners to Play on Mobile Devices

Are you launching a Knowledge Guru game that learners will play on their smartphones? If so, using these two links will make the process easier: kguru.co/GAMENAME and kguru.co/apps.

1. If players will type the game link into their mobile browser, use the kguru.co short link

All Knowledge Guru games can be accessed using either the full link (Example: theknowledgeguru.com/sellingskills_quest) or the short link (Example: kguru.co/sellingskills_quest). If players must type the link in themselves, sending the send the short link so it is easy for them to do so. This is especially useful when you display the link on a PowerPoint slide in a live event.

The mobile registration pages for Quest and Drive games automatically direct players to download the appropriate app after registering.

2. If you’d like players to download the app BEFORE attending a live event but do not yet want them to register for or log into the game, use the kguru.co/apps page

The mobile-first page kguru.co/apps has links to download the Quest and Drive apps from iOS or Google Play. You can send this link out prior to a live training event so that players have already downloaded the app before they arrive.

If you will pre-register players before they play:
  1. Instruct players to download the appropriate app (Quest or Drive) at kguru.co/apps.
  2. Instruct players to log in with their email address and the default password that you set for them.
If players will self-register:
  1. Instruct players to visit your game URL on their mobile device: kguru.co/GAMENAME.
  2. Players fill out the form to register.
  3. After registration, Knowledge Guru will provide a link to download the appropriate mobile app.
  4. Players download the app, open it and login with their credentials.

For implementation tips tailored to your needs, speak to your Knowledge Guru Specialist.


How to Use the Live Leaderboard in Knowledge Guru

Every Knowledge Guru game has a Live Leaderboard. You can display this leaderboard on-screen in a live event or send it out to players via email so they can check scores without logging in. The live leaderboard refreshes automatically as people play.

The Live Leaderboard includes between four and seven unique leaderboards, depending on the number of custom registration fields you have created. They appear in the following order:

  1. Overall Top Scores
  2. Top Scores Since X Date (use the instructions below to set a date)
  3. Registration Field 1, if applicable (For example, Location vs Location)
  4. Registration Field 2, if applicable (For example, Supervisor vs Supervisor)
  5. Registration Field 3, if applicable (For example, Job Title vs Job Title)
  6. Today’s Top Scores
  7. Perfect Scores

You can view the Live Leaderboard for any Knowledge Guru game using the following link structure:

www.theknowledgeguru.com/<GAMENAME>/leaderboard

To customize your “Top Scores Since X Date” leaderboard, do the following:

  1. Log into the Knowledge Guru game shell you wish to edit: theknowledgeguru.com/login/
  2. Select IMPLEMENT from the left-hand menu, then click LIVE LEADERBOARDS 
  3. Enter the date when your player group will start playing into the text box. The format is mm-dd-yyyy.
  4. Click UPDATE.

Usage Suggestions

  1. If learners are playing Knowledge Guru in a classroom setting, display the live leaderboard on-screen as they play and give a prize to the top performer.
  2. Include the live leaderboard link in promotional emails to learners so they can quickly see the top scores.
  3. Use the “Top Scores Since X Date” leaderboard when you plan to take multiple groups of players through a game over a long period of time. This way, players can see how they compare to other players in their group and not everyone who has ever played the game.

Implementation Tips for Quest and Legend

Our implementation pack includes timelines, tips, templates and images you can use to implement and promote your game.

To maximize the playing – and learning – experience of Knowledge Guru’s Quest and Legend games, you need to do two things well:

  • Spark learners’ interest so they take action to login or register to Knowledge Guru and get started. If learners will play Quest on a mobile device, they will also need to download the mobile app.
  • Provide clear directions on how to access Knowledge Guru and get started with Quest or Legend.

How to Spark Interest

Think about your target audience. How many of these are true for them?

  • The game is “required” by someone, and someone will be verifying their completion.
  • They enjoy games and are intrigued by playing.
  • They are competitive – and like visible evidence of a competition, such as a leaderboard.
  • They love anything that gives them more information about themselves and how they are improving over time.
  • They want quick hits that reinforce key knowledge or skills that improve selling abilities.

Take time to assess players’ starting motivation – and be honest about what that motivation is likely to be. Your answers can help guide you in planning your implementation and choosing the best strategies for your audience. If the sole motivation to play is “because we have to,” you need to put more thought into your strategy. If Motivators 2-5 above exist for them, you need only make sure you provide clear directions on how to access Knowledge Guru – and make sure you repeat those directions so everyone “hears” you. If most of these motivators are absent, your strategy will need to go further.

Pre-launch message ideas

  • Plan a series of three to four provocative emails to serve as teasers. Use short, creative subject lines that will appeal to your targets. Teaser subject lines could include:
    • Complete your Quest and unlock knowledge.
    • Are you a Guru?
    • Join the ranks of the masters.
    • Climb to the top of the leaderboards
  • Include visuals of the Quest or Legend app in your messaging, particularly leaderboards or the dashboard. People respond better to visuals than to lots of text. Keep text portion of your message short and provocative.
  • If game-based solutions are new to your organization and people are skeptical, consider offering prizes to underscore the significance of playing. The leaderboard makes it easy for you to award prizes for various things such as top scorer over a given time period, best department or another custom grouping. This keeps players on their toes throughout your play period. Prizes do not have to be big ones.

Once the game launches

Send a clear message that explains how to gain access to Quest or Legend. Here’s a sample you can modify:

Subject: Start your quest for knowledge on <Your topic here>

Dear Learner,

You’ve heard about it; today it’s available! Begin your Quest for knowledge on <insert topic> now. Get started in three easy steps:

Step 1: Use the URL provided to register for the Quest game and create a Knowledge Guru account. Knowledge Guru is the platform that powers the Quest game. Here’s the URL:

·       <Insert game URL here.> It will be something like: kguru.co/YourGameName/

Step 2: After registering, you will be automatically directed to a link where you can download the mobile app to your phone. This app lets you access Quest on your phone for maximum ease of use.

Step 3: Start playing to build mastery. Replay levels as often as you like to earn a three-star rating and move up on the leaderboards.

Be prepared to resend a variation of the message 1 or 2 more times to ensure all learners see the email. Monitor Knowledge Guru’s analytics to verify that players are getting registered and playing.

Throughout the active play period, monitor player progress. Acknowledge players’ efforts and recognize top scores and engaged players.

Share out final results. Use the reporting capabilities within the Game Administration tool to share relevant results, including the learning objectives your group did best and worst at.

If you have some form of regular learning communication tool, use it to profile top performers and acknowledge their efforts.