How to Add Reference Materials to a Knowledge Guru Game

Knowledge Guru is specifically designed to provide you with a lot of flexibility to achieve your learning objectives. One way we offer this flexibility is through “Resources” support. Resources allow you to add content that your learners can access and review anytime, anywhere. A resource can be as simple as a term and a description, or it can include a URL link to a website or PDF.

Let’s say for example you are creating a Knowledge Guru game for onboarding new employees to your organization. The game itself may be created with references to material they have been exposed to in your company handbook, as well as opportunities for them to apply the knowledge they have learned.

With Resources, you could also include a link to your handbook, which would enable learners to view it directly while they play Knowledge Guru. And since Knowledge Guru allows your learners to play at their desks or on their go on their mobile device, they will always have it with them.

How to Add Resources

Follow the steps below to add a resource to your Knowledge Guru game:

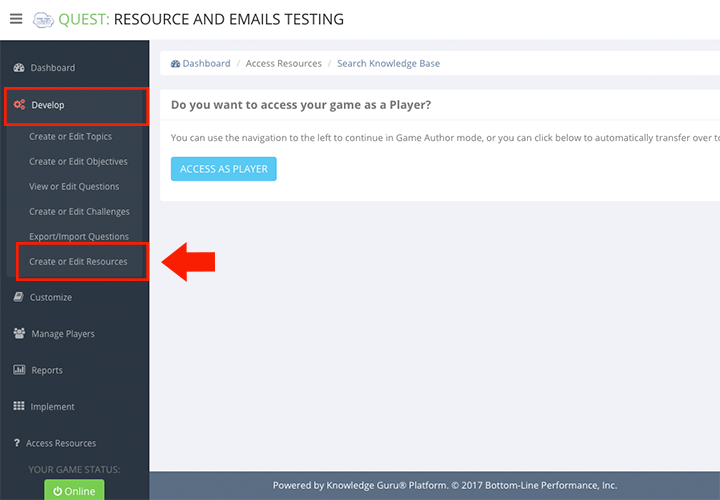
1. Expand the Develop option within left-hand navigation pane, and select Create or Edit Resources.

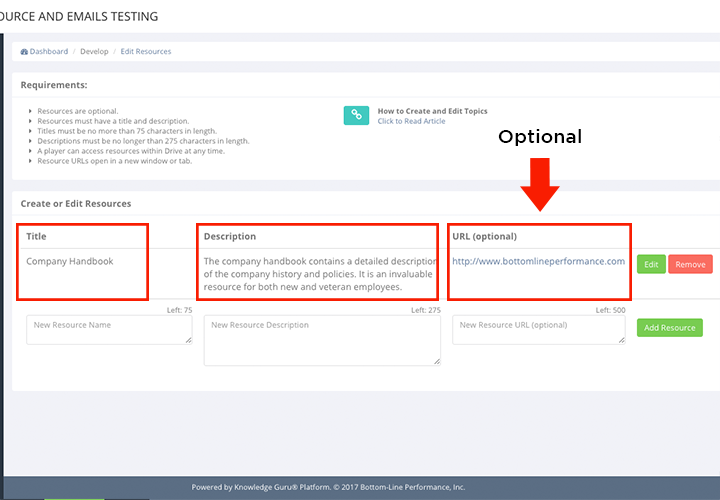
2. Fill in your resource name, description, and optional URL.

3. Click SAVE.

Bloom’s Taxonomy and Learning Games

blooms-taxonomy-and-learning-games

You have a clear business problem, a related instructional goal, and a desire to incorporate learning games to help you achieve your instructional goal. But which games are best? To answer the question, focus on crafting relevant learning objectives. These objectives should outline what learners need to know, do, or believe/feel to achieve whatever instructional goal you have defined.

Use Bloom’s Taxonomy to help you craft your objectives and accurately assess what level of cognitive skill learners need to use to produce your goal. Bloom’s levels don’t function in isolation of one another, even though we tend to think of them as doing so. Most complex tasks require us to use multiple levels within the taxonomy. However, Bloom’s provides a reasonable way of organizing the learning experience so learners can build skills in steps.

Bloom’s Taxonomy categorizes learning into six levels of thinking, with each level adding complexity. The original taxonomy is from 1956, with a revised taxonomy developed in 2001. The revised version flips the final two levels and uses different synonyms to describe the lowest level of cognition.


Building a Knowledge Guru Drive game? The Drive authoring tool uses Bloom’s Taxonomy to ensure good objectives. Read the full tutorial in our Knowledge Base.


Your task as the learning game designer is to choose a game type that enables the player to achieve the cognitive skill required. Most of all, make sure your learning objectives map to your instructional goal, and your game type enables players to achieve the objectives.

Once you know the skill level you want players to achieve, you can choose a game type that can best help them achieve targeted skills. Table 4-4 summarizes the original taxonomy and offers suggestions on game types appropriate for each level. The left column defines the cognitive skill. The middle column lists examples of behaviors you might include in a learning objective that targets that level. The right column identifies game types that work well for that level. The list is not comprehensive; it merely provides starting ideas.

You’ll also see that some game types can work for multiple levels. In addition, the content within your game can dictate what level of cognitive skill is required to play it successfully. A quiz-style game such as Knowledge Guru’s Legend or Quest game types can focus primarily on recall, or it can require higher-level skills in analysis, synthesis, or evaluation, depending on how you structure the game questions and what content you include. Knowledge Guru’s Drive game type includes different mini-games that each work for different levels of Bloom’s Taxonomy. Learn more here.

 Bloom’s Taxonomy and Game Types
Cognitive Skill Sample Verbs for Learning Objectives at This Level (Barton 1997) Game Types to Consider
Level 1: Knowledge

Know and remember facts or ideas.

List, identify, recognize, name, match, select, recite Quiz-style, arcade-style, matching, game-show styles
Level 2: Comprehension

Understand the facts or ideas; be able to explain them accurately.

Explain, describe, compare, contrast, distinguish, summarize, rephrase, tell Quiz-style, collection and classification games, exploration games, storytelling games
Level 3: Application

Use facts or ideas to solve problems or respond to situations.

Use, demonstrate, choose, solve, organize, develop, build, make use of Story- or scenario-based quiz games, matching games, role-playing games, decision games involving scenarios, simulations
Level 4: Analysis

Break information into parts and identify causes; make inferences and form generalizations based on examination of facts.

Analyze, compare, infer, categorize, classify, distinguish, conclude, describe relationships Strategy games
Level 5: Synthesis

Organize and combine information to form alternative solutions.

Compile, create, estimate, invent, choose, design, predict, combine, develop Building games, simulations
Level 6: Evaluation

Judge information and facts against a set of criteria. Form opinions and ideas based on this judgment and be able to defend them.

Determine, critique, decide, prioritize, assess, evaluate, deduce, justify Simulations, role-playing games

Examples

The instructional goal targets level 3 skills (application), but to be effective the sales rep may also need to use some level 4 skills (analysis). We identified each objective’s skill level. You might create a game for one of these objectives or craft multiple games targeted to several. Or, you might formulate a single complex simulation that requires the learner to demonstrate all these objectives.

Instructional Goal: Account managers can fluently communicate the right product value propositions to customers using stories.

The learning objectives learners need to master to achieve the goal include:

  • Select the appropriate tools to support the system. (Level 1)
  • Explain the features, associated benefits, and stories. (Level 2)
  • Given a customer need, choose the right features and articulate the associated benefit. (Level 3)
  • Ask the right questions to uncover the customer’s needs. (Level 3)
  • Tailor the value proposition and stories to the customer’s needs. (Level 3)
  • Contrast the [product name] methods with other methods of the past. (Level 4)
  • Given a real customer, put together an appropriate story. (Level 5)
  • Overcome customer objections. (Level 6)

The bottom line? Formulate your learning objectives first, and then consider what types of games best support the objectives.

How Big Should a Knowledge Guru Game Be?

Customers frequently ask us, “How big should my Knowledge Guru game be?”

We respond back with “It depends.” Game “size” really means the number of topics you include in the game and the amount of content you include in terms of learning objectives, questions (Quest) or content for each mini-game (Drive).  The biggest two factors influencing game size are: 1) the way you intend for players to interact with the game, 2) the number of learning objectives you intend for the game to support.

There are three possible ways you can plan for learners to interact with your game:

  • Play through the entire game in a single session at a time of their choosing. This scenario automatically means you are using a Quest or Drive (with Custom minigame delivery enabled) game type. It should also trigger you to design a shorter game with a maximum of five topics (Quest allows up to 7 and Drive allows up to 7). Plan to keep each topic small: 4 to 6 question sets per topic for Quest and 1-2 learning objectives per topic for Drive. This will give players about 15 to 30 minutes of gameplay time and enable you to introduce or reinforce the most essential content.
  • Space play over time. Both Drive and Quest are designed for spaced play. With Quest it is an option. With Drive, it is required for Daily 3 minigame delivery and an option with Custom minigame delivery. With spaced play, your game can have more content within it because players only see a portion of it at a time. A Drive game that uses Daily 3 controls the interaction, limiting it to about 5 minutes per day so your larger question is how many days do you want them to have to play to see all of your game’s content. With Custom minigame delivery, you can space play in a few ways: by date, by score, in sequential order (one game won’t unlock until the previous game has been played), or by context (players must play all contexts of a game before the next unlocks). With Quest, you can space play two ways: a level per day (1 topic and 1 set of questions associated with that topic) or a world per week (all topics and one set of the questions associated with all those topics).
  • Play a Quest, or Drive game with Custom minigame delivery as part of a live event. In this scenario, you are going to specify a certain amount of time be spent in game play. This absolutely dictates the amount of content you can include. You cannot have more questions or minigames within a topic than someone can reasonably complete in the time you are allocating for game play.

Be very aware that learners read and process information at different speeds. Learners spend widely varying amounts of time to complete the same game. Their processing speed depend on reading proficiency, education level, their native language, and their familiarity with the content. Factor these things into your judgment of how much content to include.

Use the links provided below to get specific guidance by game type.

Drive

Drive has two minigame delivery methods: Daily 3 and Custom.

  • The Daily 3 minigame delivery method is approximately 5 minutes and provides players with three different mini-games to play each time. A meaningful Daily 3 minigame delivery experience means that each of the mini-games you create contains sufficient content so that players will encounter unique content in that game over at least three instances (daily games) of play. This ensures you are giving players sufficient “retrieval practice” for every learning objective you have. (Remember – each mini-game you create is associated with a single learning objective.)
  • Custom minigame delivery allows game authors to customize how much content players encounter at one time. With Custom minigame delivery, you can space play in a few ways: by date, by score, in sequential order (one game won’t unlock until the previous game has been played), or by context (players must play all contexts of a game before the next unlocks).

Guidelines for Drive vary by use case.

  • For Drive games played over time, target seven to nine days of game play. This should allow players to play all the games multiple times and equates to about 45 minutes spent with the app over a period of two to three weeks’ time with a goal of playing three times per week.
  • For Drive games meant to be played in a single sitting, target 15-30 minutes of game play. This is a realistic amount of time for most players to spend in one sitting.

There are six unique mini-games you can create within Drive. The guidelines below will help you create games.

Balloon Burst

Balloon Burst enables you to identify a minimum of two categories to as many as six. For each category you include you must create statements that a player can associate with that category. The minimum number of statements required for a category is three. For an optimal game, provide at least six statements for each category if you only have two categories or five statements per category if you have three or more categories.

For additional Balloon Burst best practices, click here.

Fish Finder

Fish Finder, like Balloon Burst, lets players associate facts with categories. The minimum number of categories you can include in a game is two; the maximum is seven (which could create a very large game!). The same guidelines apply: if you have only two categories, make sure each one has at least six statements. If you have three to four categories, make sure each one has four or five statements. If you have more than five categories, then you may want to limit the number of statements per category to three or four.

A single instance of Fish Finder will require players to respond to a minimum of 4 statements and a maximum of 8 statements.

For more details on Fish Finder, click here.

Forest Flight

For an optimal player experience, you will want to create three unique branched scenarios. Each scenario requires that you have at least two branches associated with it; you can have three. Each branch can include up to three choices; you must have at least two.

Branched scenarios take time to write, which is why Drive allows authors to only create two for a valid game. However, if you truly want to provide sufficient practice for a player, you will take the time to create three unique scenarios.

For complete information on how to create a Forest Flight game as well as best practices, click here.

#Happy

Include three contexts/scenarios within a game to provide ample practice. You can create a #Happy game with only one context/scenario, but to maximize practice, try for three.

Consider going beyond six statements for better re-playability of contexts/scenarios. You can reword a good or bad response to encourage the learner to focus on the feedback and to prevent them from doing well on future play-throughs simply because they memorized responses. Here’s an example of two ways to phrase a response that achieves the same aim.

  • Example: “What safety data have you already seen?” (Question) “Here is our safety data.” (Statement)

For additional #Happy best practices, click here.

Knowledge Knight

Games require at least six questions to ensure a minimum of two play-throughs of the game. We recommend creating nine questions. This ensures variety, but keeps the number of playthroughs required for mastery to a reasonable amount.

An ideal series of three questions includes one question that encourages recall of knowledge coupled with two questions that require application of that knowledge in a job context the learner will encounter in the job.

For additional Knowledge Knight best practices, click here.

Safecracker

For an optimal player experience, include at least three needs (aka scenarios), which results in three unique rounds of the game. The maximum number of unique needs is five.

Each time the game is played, it will display two distractors along with the correct responses for each benefit and feature. When you create your game, re-use distractors across benefits and across features to verify that your learners can truly associate correct benefits with needs and correct features with benefits.

For additional Safecracker best practices, click here.

Quest Game Size

Like Drive, Quest is designed to maximize learner retention of content. However, if you overload your game with too much content, you will hurt your players’ ability to remember. Novice authors can go a bit crazy on crafting questions and suddenly find themselves with 8, 9, 10 or even 11 question sets within a single topic. The result is player fatigue and overload. They end up remembering very little.

Quest requires you create a minimum of three topics with a maximum of seven topics. We recommend creating a minimum of three question sets per topic. Consider whether spacing is applied when deciding on the maximum number of questions within a level. Also assume players need 30 to 45 seconds to respond to a question when calculating how long play will take.

Player perspective: If I am playing a level per day, then eight or nine questions doesn’t seem like a big deal. If I play an entire game all at once, then eight or nine questions in a level is too many. In such cases, limit the number of questions within a level to four to six questions and vary the number from level to level.


Question Types Available in Quest

The kinds of questions you can create in Knowledge Guru’s Quest app include “Multiple Choice,” “Select All That Apply,” and “Answer in Order” questions (aka ranking questions). These question types enable you to provide learners with variety and increase the learning power of a Quest game.

We have created a short game called QType Guru that contains questions about Bloom’s Taxonomy of Learning.


Here is an example of each question type and how it looks in the game:

Multiple Choice

This is an example of a Multiple Choice question type in Quest. Learners click one of the rectangles to select an item.

Select All That Apply

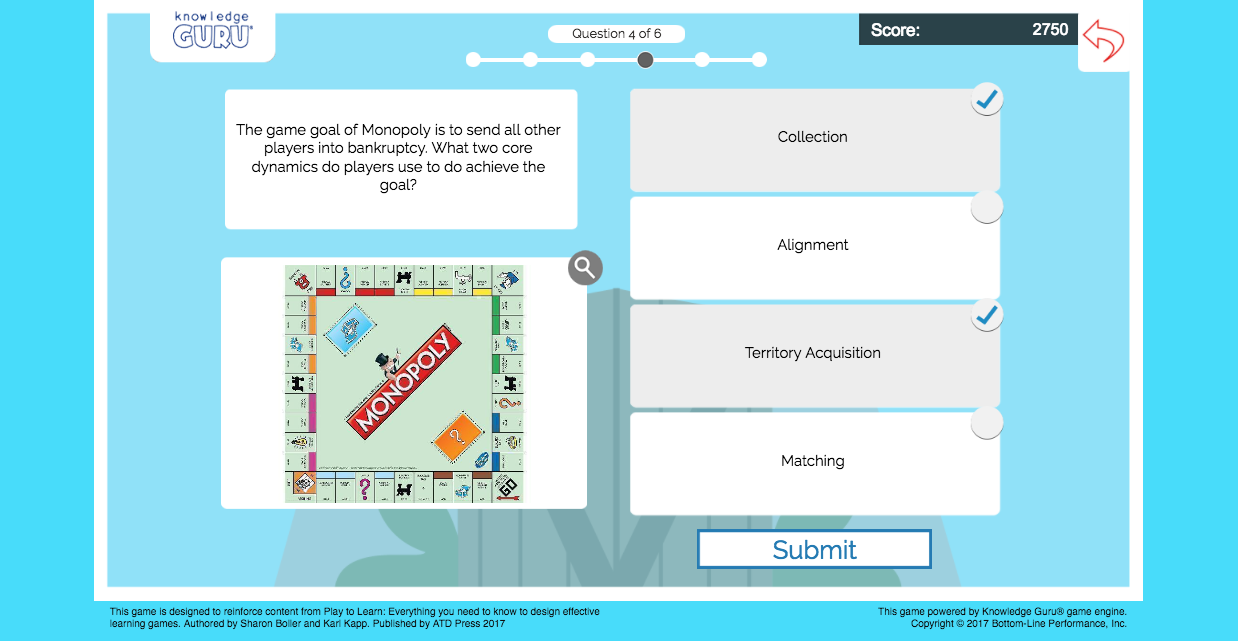
This is an example of a Select All That Apply question type in Quest. Learners click in the circle to select an item.

Ranking/Answer in Order

This is an example of an Answer in Order question type. Learners move the response choices around to reflect the appropriate order.

Using Select All That Apply questions

Select All That Apply questions can be easier or harder for learners to do, depending on what cognitive skill the question requires. A simpler question merely asks the learner to recall a set of facts from memory. A harder question forces them to apply a rule or use judgement. The examples below show how you can use this question type to address different cognitive skills that range from “comprehension” all the way up to “evaluation” on Bloom’s Taxonomy of Learning.

Knowledge/Comprehension (lowest level of Bloom’s taxonomy)

You want learners to be able to identify or recognize something or distinguish one thing from another thing – and you want them to do this with multiple examples. Here are two examples of questions that match this description. To be successful in answering either of these examples, the learner must distinguish the good examples from the poor or irrelevant ones:

  • Select all the questions that might be appropriate to ask a customer who is focused on quality.
  • Select the cues that might indicate a customer’s need is quality versus price.

Perhaps you need for learners to identify multiple attributes that are all associated with a single item or category. Features versus benefits is a terrific example of when this might be true. Product benefits often are supported by two or more product features. A sales model typically contains multiple steps. A Select All That Apply question helps you verify that learners at least recognize the things that are part of a whole. Here are two examples:

  • Select the features that support “ease of use” of ACME’s product.
  • Identify the three steps of the ACME sales model.

Higher Levels of Thinking: Application and Evaluation

You can also write Select All That Apply questions that move higher up on Bloom’s taxonomy to let learners apply something (a policy or a rule, for example). Here are two examples that fall into this category:

  • Click the Resource link to review ACME’s personal leave policy. Then review the four leave requests and select those that fall within the policy guidelines. (Learners must be able to correctly apply the leave policy to specific situations as opposed to only recalling facts about the leave policy.)
  • “It’s” is a contraction. “Its” is a possessive. Review the sentences and select the ones that correctly use “it’s.” (Learners must be able to apply the grammar rules related to “it’s” versus “its”.)

You can also use Select All That Apply questions to push learners to the highest level of Bloom’s taxonomy. Imagine that you need learners to be skillful in interpreting data and using it appropriately in a sales situation. Or imagine that you want to help a sales manager build coaching skills. Here’s how you might write a question to support those skills:

  • Review the chart comparing Customer X’s sales to Customer Z’s. Then select all the conclusions you can reasonably discuss with Customer X about how they compare to Customer Z.
  • Watch the video and decide which areas of the sales model the sales rep needs coaching on to improve performance. 

Using Answer in Order questions

What’s most important versus what’s least important? Quest’s Answer in Order (aka ranking question type) pushes learners to decide. Ranking questions are good ones to use when you want learners to apply judgment to a particular situation based on the specifics of that situation. Here’s an example:

  • Watch the video. Your sales rep mishandles several areas of the sales call. However, you know you have to focus your coaching on one or two areas at a time. Given that, prioritize the coaching needs listed below from most important to least important.

An Answer in Order question can also be useful to verify that learners can recall the correct sequence of action within a process or procedure. For example, if you are verifying that employees understand safety procedures, you may want them to demonstrate recall of the sequence in which emergency steps need to occur. You might craft a question like this:

  • You find your co-worker unconscious in her cubicle. No one is around to help you. Put the following emergency responses into the correct sequence you need to follow.

Creating Question Types in Quest

As part of question creation in Quest, game authors can select which question type they want to create. The default type will be “Multiple Choice,” but authors can click the drop-down to reveal the other two options.


If you opt to create a Select All That Apply question, you’ll see the screen adjust to allow you to identify which response options a learner should select.


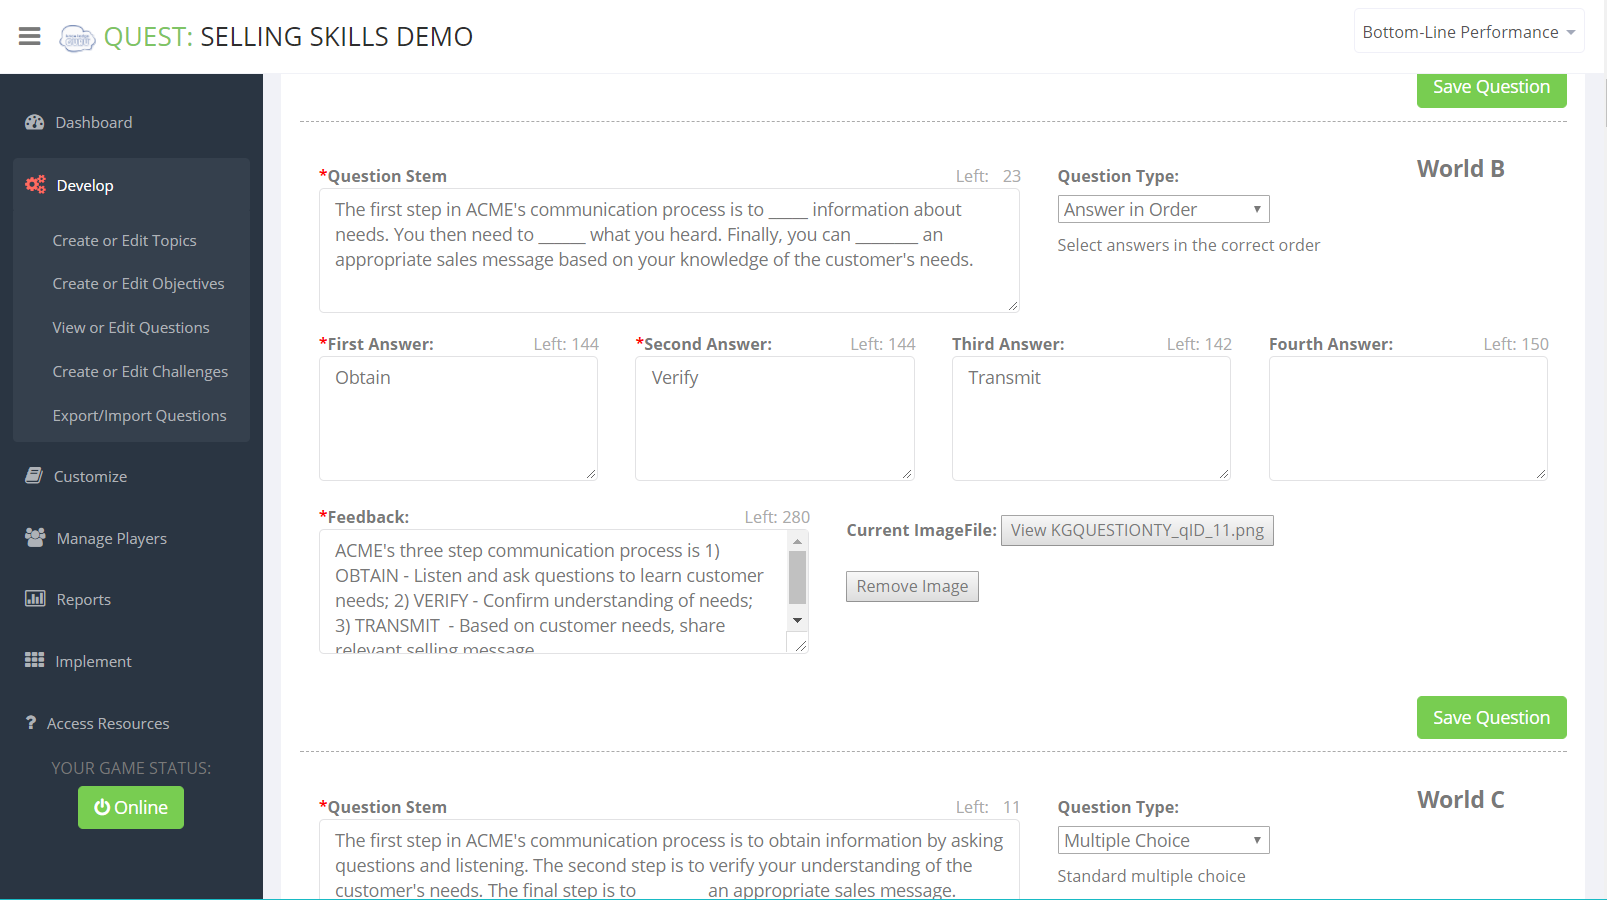
If you select Answer in Order question type, you’ll see that the ranking order is specified as shown below:


Things to know:

  1. You can have a maximum of four items for learners to evaluate in a question type.
  2. You can have as few as two items for a question type, but we recommend that you always have four.
  3. Knowledge Guru’s engine randomizes responses on your behalf each time the learner sees the question. So if learners make a mistake the first time they respond to either of these question types, they will see the response options in a different order when they go back to re-try answering the question.

How to Export and Re-Import Questions and Responses in a Legend or Quest Game

Often you will create Knowledge Guru games by partnering with subject matter experts (SMEs). These SMEs want to review the game content after you create it. Legend and Quest give you an easy way to facilitate this review by letting you export the game questions after you create them so SMEs can edit question content, response choices, or the feedback players receive when they make mistakes.

How to Export your Game Questions

  1. Click the DEVELOP option in the left-hand menu within the authoring tool.
  2. Select Export/Import Questions.
  3. Follow directions to export a .CSV file. (Note: If you are using Safari browser, you need to right-click the download button to export. Otherwise, you will open a new tab instead.)
  4. When you open the downloaded file, select “Save-As” within Excel.   Give the .CSV a name such as “GuruGameQuestions.” Do not save as an Excel file. Keep file in .CSV format.
  5. Reformat as desired to alter column widths or text alignment for easier reading. Do NOT delete or rename any of the columns. You may add a temporary column labeled “Comments” for your SME to type comments into. This column needs to be deleted before you re-import the .CSV file.
  6. Provide your SME with a link to the game and have him/her register to play. Provide the .CSV file with instructions to make edits, as desired, to the game question stems, responses, or feedback columns. Ideally, have the SME use a different colored font for changes so you can easily spot the edits.

How to re-import after the .CSV is edited

  1. When you get the .CSV back from your SME, rename it again (e.g. “GuruGameQuestions_SMEVersion.csv) so you can retain the original questions as well as a version with the SME’s edits.
  2. Click the DEVELOP option in the left-hand menu within the authoring tool. Locate the Export/Import Questions sub-menu item.
  3. Follow the directions to import the .CSV. The new content will appear.

Notes

  • If your SME inserts more characters than a field allows, the authoring tool will simply cut off the item when the character limit is reached. You will need to review each item to make sure the SME hasn’t added too much text.
  • You may want to do a spell-check before you import the .CSV to catch spelling errors or typos before importing.
  • You may choose to add a “comments” column if you want to insert questions for the SME to consider in his/her review. (e.g.”Did we accurately describe this concept with this question?) If you do so, be sure you delete the Comments column before you import the .CSV file with the edited questions.

Click through the images below to see the steps in action.


Incorporating a Video, Photo, or Link into Quest Feedback

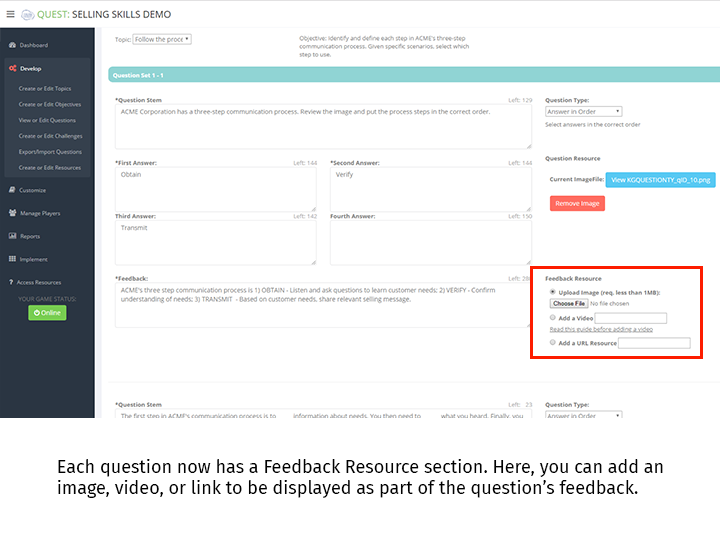
Media is the first place most people turn when they need to quickly learn something, whether it’s to watch a video to see someone do something, look at a photo to see what good looks like, or click a link for a deep dive into a topic. Quest games support adding videos, photos, and links into feedback. The process for adding media to Quest feedback is like adding media to the question stem.  

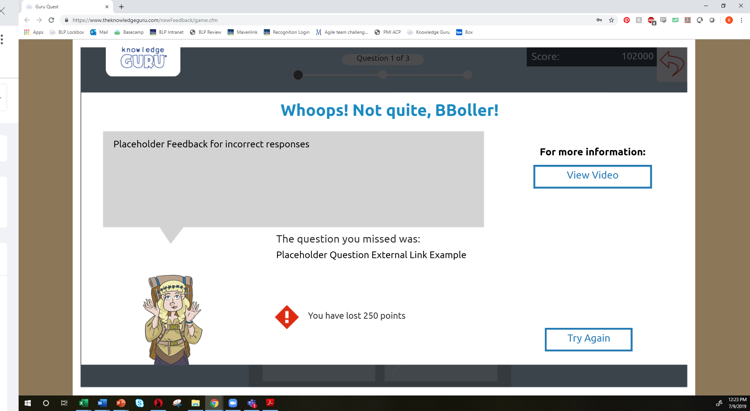
From the player side, learners see the resource alongside the text of the feedback, shown here:

Helpful Tip: 

We officially support links from Youtube and Vimeo. However, you may try links from other video services. If you choose to link videos from an alternate source, always be sure to preview your video questions before sending your game out to players. 

Click through this slideshow to view a quick visual tutorial. 

Creating an HTML link in a Legend game type

Want to link to an external website from within a Legend game? Here are your steps:

1) Locate the URL you want to incorporate into the game question.

If your URL is long, shorten it. The characters in the code string count against the total number of characters you can have in the question. Free services exist that enable you to shorten the URL address. TinyURL.com is one to try. You enter your URL and it spits out a shortened code for you to use. In the example below, our original URL was 105 characters. By using tinyurl.com, we shortened it to 26 characters – a big difference.

2) Use the code we provide below, inserting your URL and any unique direction to your users. The portions shown in red are where you insert your unique information. The blue portions remain the same for any hyperlink you create. Pay attention to where quotations marks are used and where spaces are used.

<U><a href=”YOURURLADDRESS” target=”_blank”>YOUR ONSCREEN TEXT FOR USERS TO SEE </a></U>

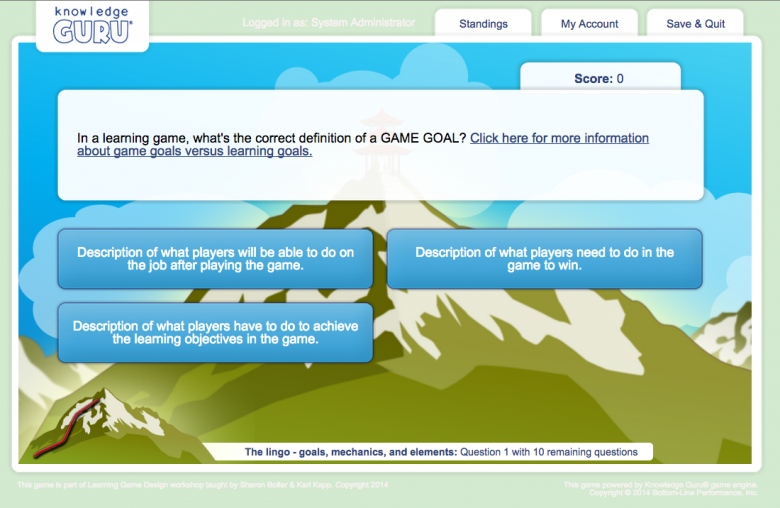
Here’s an example of a question I wrote in the authoring tool. I included blue and red fonts to make it easier for you to see the code string and my unique information:

In a learning game, what’s the correct definition of a game goal?
<U><a href=”http://tinyurl.com/q2onwgv” target=”_blank”>Click here for more information about game goals versus learning goals. </a></U>

Here’s an image of how it looks to the player in the game:

Screen Shot 2014-11-21 at 12.16.08 PM


If you get an error message, you may have unintentionally inserted hidden characters into your code string. Here’s how to check:

  1. Open up an empty Word document and paste your string of text into it.
  2. Select the “Paragraph” button in Word (looks like a backwards P with a second line).
    • This makes all non-printable characters show up on the screen.
    • Remove any extraneous characters you see and then copy the code string back into Knowledge Guru.

Developing a Quest or Legend Game: Overview of the Steps

A good game is distinguished from a bad game in these ways:

  1. Concise game topics that link to whatever game name you created. (Example: Product Guru should have topics relevant to the products your company sells. Safety Guru should have topics related to safety.)
  2. Measurable, specific topic objectives that link to the topic.
  3. Well-written game questions that assess a learner’s ability to meet the topic objective.

For Quest games, you also need relevant performance challenges that give the learner an opportunity to do something that furthers their learning or builds their skill.

This post outlines the basic process of designing a game, whether you are doing it yourself or involving another subject matter expert (SME) who will help you with game content.

Note: for help developing a Drive game, click here.

Step 1: Decide which game type is best: Quest, Drive, or Legend

Quest games can have up to 7 topics (but must have at least 3). They typically include “performance challenges” as well as game questions. They are often used as part of a multi-day or multi-week learning initiative. Drive games can have an unlimited number of minigames, but they are designed to be played for 5 minutes at a time.

Legend games can have up to 4 topics. They tend to be played in a single play session, though players can play across several sessions if they want. They leverage leader boards to focus on competing against other teams or individuals.

Let’s assume I decide on a Quest game to go with my product launch of a new pharma product called PainAway.

Step 2: Give Your Game a Name.

Decide on an appropriate game title so you can generate a “game shell” to use in creating your game. The game’s title should be a cue to learners as to what they are going to become a Guru on – a product, a process, a concept, a company, etc.

I’m going to call my game PainAway. My players will see it as “PainAway Guru” when they log in to play as the software automatically puts the word “Guru” onto whatever title I give the game.

NOTE: The System Administrator is the individual who generates game shells that are used to create a game. If you do not have system administrator privileges you will have to discuss the game name with the system administrator before they create your game shell.

Step 3: Create Your Game Topics

Figure out the topics that should be part of your game. You enter these topics in the Develop menu item within the Create or Edit Topics submenu item. Your topics should be concise and organize the game’s content into categories of knowledge related to the game title.

Brainstorm topics by asking yourself: “What do I need for people to KNOW or DO related to the game’s title (safety, product, process, etc.)?” Categorize your ideas into topic titles. For a Legend game type, you can have up to 4 topics. For a Quest game, you can have up to 7 topics.

Example: For “PainAway Guru” I ask myself what I need for people to know or be able to do related to the product. My target players are the sales reps who will sell this product to doctors. I need sales reps to know: 1) what the product does, 2) the research data that show it works, 3) who the product can benefit, 4) the sales messages for it, and 5) possible customer objections. I want them to practice doing these things: 1) selecting the right sales message for a specific customer type, 2) correctly linking clinical trial data results to a specific product feature or benefit, and 3) choosing the best way to respond to an objection. Based on that list, these become PainAway Guru’s 5 topics: “How It Works,” “Who It Is For,” “Clinical Trial Results,” “Selling Messages and Markets,” and “Objections and Answers.”

Step 4: Create the objectives for each game topic.

Repeat the exercise you did in Step 2, but this time think more narrowly. Ask yourself: Within a topic…what do learners need to KNOW or DO related to that specific topic? Be very specific. Here’s some examples from PainAway Guru’s final topic, Objections and Answers:

  • Identify the three most common objections doctors may make to PainAway.
  • For each objection, provide an accurate answer to the objection using clinical trial results where appropriate.

To input your topic objectives, go to Develop menu item in the authoring tool and select the Create or Edit Objectives submenu item.  Type in an objective and click Submit New Objective. If you want to re-do an objective, simply type over it and click Save.

Realistically, a game topic should limit itself to 1-5 objectives, depending on how specific you make them. You need at least 1 question set for every objective you create.

Step 5: Create your question set(s) for a given objective in a topic.

For any topic, you want no fewer than 3 question sets in it and no more than 10 question sets in it. Learners become fatigued at game play if you include too many questions in a topic. Their ability for good recall also goes down. If you average 7 question sets per topic, you generally have a reasonable number without making the game too arduous or difficult to complete. Keeping within limits sometimes means eliminating topic objectives or narrowing objectives down. 

After you create an objective for a topic, the authoring tool automatically sends you to a question creation screen. This automation is great for novice game developers since it ensures that you craft at least one question set for each objective you include in a topic. More experienced game developers may prefer to write all the topic’s objectives before writing question sets. To do this, use the left-hand menu to navigate back to the Create or Edit Objectives submenu item under the Develop section.

How many question sets do I write for each objective? 

The answer depends on how specific you made your objective. Sometimes you may use up to 6 question sets to fully meet an objective you wrote. Other times you may only need a single question set.

  • In the PainAway Guru game, I can satisfy the objective of Identify the three most common customer objections with a single question set if I creatively use fill-in-the-blank and other approaches. Within three iterations, I will have learners able to state the three objections customers may make.

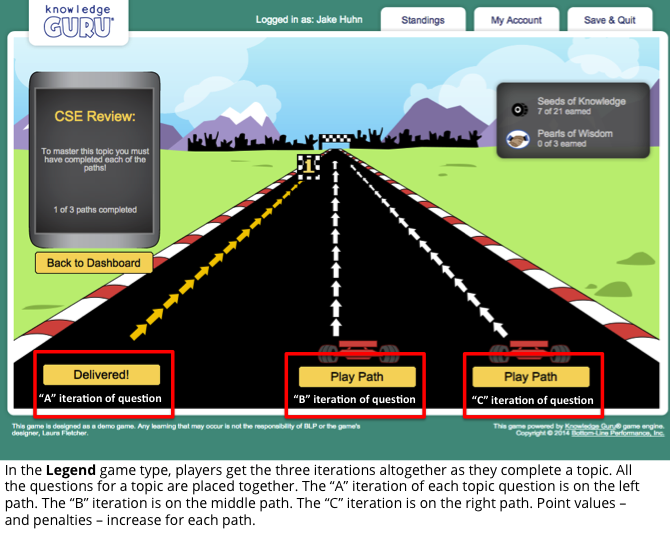
Always remember that your player does not see your three iterations back-to-back. These iterations are spread across paths in a Legend game type and across Worlds in a Quest game type. This repetition is a very good thing for reinforcing content and helping long-term retention of the information.

Step 6: Create Performance Challenges (Quest) or End-of-Topic Questions (Legend).

In a Quest game type, you can include up to six performance challenges in each game World (A, B, C).  Learn How to Create Performance Challenges.

In a Legend game type, players get a fun “End-of-Topic” question after they finish the final path in a game topic. The “End-of-Topic” question is NOT included in the database of all your game questions. Players do not encounter these questions when they play the “Grab Bag” or “Elite Champion” level of game play after they achieve Guru status in your game.

You create “End-of-Topic” questions under the Develop section by selecting the Edit End-of-Topic Questions submenu item.

Step 7: Customize Your Game Shell.

You can change the background color, theme, logos, and footer in your game. You can also add customized registration fields. In a Quest game type, you can also select game spacing options. These customizations are all easy to do within the Customize section of the left-hand menu. This Tutorial Explains the Game Customization Process.

Step 8: Select the Right Security Level.

Do you want open registration where anyone who has your game’s URL can play or do you want to restrict access? You can review the security options here and see a tutorial here.

Step 9: Implement Your Game

Making a game live is simple. Go to the Implement section and choose the Game Access submenu item, then change your game access to ONLINE. You may also click the Game Status button in the bottom left-hand corner of the screen for quick access.

Understanding Question Iterations & Writing Good Questions

There are three keys to creating a good game in Knowledge Guru:

  1. Clear, relevant game topics that have importance to the learner (e.g. there’s some reason these matter).
  2. Well-written, specific objectives that link to the game topic they are associated with.
  3. Well-written, relevant question sets that assess a player’s ability to meet the topic’s objectives.

This post focuses on number 3.

Understanding the concept of “question sets”

Creating good Guru questions starts with realizing that you need to create “question sets.” For every topic objective, you need at least one “question set,” which includes 3 iterations of your content. The slides below explain what a “question set” is and how each question in a set appears in a Quest game type and a Legend game type.

12 Tips for Writing Good Questions

Once you grasp the concept of the “question set,” you can start crafting good questions. Follow these 12 tips for success.

  1. Use the topic objectives to help you write the questions. The questions you write should directly assess the player’s ability to achieve the objectives.
  2. Keep sentences short. Break a long sentence into two shorter ones. You typically are not assessing reading comprehension so make sentences easy to read and understand.
  3. Spell out your first use of acronyms unless you are 100% positive that every player will know their meaning.
  4. Avoid making the longest response choice the correct one. This is a common mistake. Learners instinctively will want to pick the longest response because odds are high it is the correct one.
  5. Keep response options short when you can. Again, do not make the game about reading comprehension.
  6. Use images when they can be helpful. Often a chart can help you present a series of steps or terms. An image cal also help you create a scenario that can include details that will not fit into a standard Question Stem box. We created a short demo game that uses lots of images so you can see what we mean. You can register for – and play – this game here. We made the content generic, but it draws on concepts we have seen in client games.
  7. Put the players in the question when it makes sense. “You are at a customer site.” “You just saw a safety incident.” “Your customer just told you he likes your competitor’s product better.” Learners want content that feels personal to them and their jobs.
  8. For times you need a “select all that apply” use an image to show case options. You cannot do a “select all that apply” by inserting options in the response fields. See the demo game to get ideas on how to do “select all that apply.”
  9. Make sure your feedback for a missed question is the same or similar for all three iterations (A, B, C) you create in a question set. It is the easiest way to verify that you have written iterative questions. After you write your learning objective, try writing the feedback for a missed question first and then writing the question itself. This helps verify that you are writing a question that links to your objective – and that your objective is specific enough. You can then copy/paste the feedback into the “B” and “C” feedback fields and write your “B” and “C” questions to match this feedback. You may tweak feedback across iterations, but the core message should be the same.
  10. Do not use a big word or phrase when a smaller one will do. “Use” is better than “utilize.” “To” is better than “in order to,” etc.
  11. Incorporate scenarios. People use factual information in context on their jobs so make the questions contextual as well. Instead of “Review the chart. Which behaviors show active listening?” try “You just finished a meeting with Dr. X. Review the image to get a description of your meeting. How effective were you at active listening?”
  12. Avoid “all of the above” or – even worse “none of the above” as response choices. Do not make a game about figuring out what does not belong. This is a different skill set entirely than figuring out what should be part of something.

Creating Good Topics & Objectives for Quest & Legend Games

There are three keys to a successful Knowledge Guru game:

  1. Relevant topics
  2. Strong, specific objectives that relate to the game topics.
  3. Well-written, relevant questions that link to the objectives.

This post focuses on the objectives you create for a Legend or Quest game, and gives you tips on creating good ones…and avoiding bad ones. Click here for help on creating Objectives in a Drive game.

A well-written objective links tightly to the topic it is associated with. It is also actionable and specific: it focuses on what you want the learner to know or be able to do related to the topic. Check out the image below. The objectives on the left are not good, but frequently mirror what we see game creators use. The ones on the right are much better. Can you figure out the difference?

GoodVsBadObjectives2

The bad objectives tend to use verbs that are impossible to measure or quantify such as “know” or “understand.” (How do you know that someone “knows” a subject? Typically you say someone “knows” something if they can explain, describe, distinguish, analyze, etc….). Know is a very big word. It can mean lots of things.

The good objectives are very specific. They are clear about what the learner should be able to do after playing the game. They limit what the objective covers (define and explain five mobile market terms as opposed to a vague “know mobile marketing terminology.”)

Why does this matter?

The objectives should tie directly to the question sets you create in the game. Your game questions should assess someone’s ability to perform the objectives you have written.

You can easily write 5 question sets related to “define and explain 5 mobile marketing terms: mobile originating messages, mobile terminating messages, SMS, MTA, key word, and FTEU.” It’s far harder to know how many questions you need to write to cover the objective “know mobile marketing terminology.”

If you write a clear, specific objective, you will find it very easy to write corresponding question sets. If you write weak objectives, you will struggle or you will have questions that do not really link to your objective. They are almost random questions and are less about what you want learners to do and more about what you want to tell learners about a topic.

If you need ideas on how to come up with better verbs to use in writing your objectives, check out Bloom’s taxonomy. It will help you think about the cognitive skill you want learners to do and provide verb choices that match.

But do learners ever see the objectives I write?

Yes, they do! In a Legend game type, these objectives are the “Pearls of Wisdom” that players earn on the third path of each topic when they successfully respond to the final question associated with an objective. In a Quest game type, learners get a game summary report  that lists out the objectives they achieved in playing the game.

  1. Use verbs that clarify what the learner is supposed to do: explain, describe, identify, compare, distinguish, choose, etc. (See Bloom’s taxonomy for ideas.)
  2. When appropriate, specify a condition for performance: “Given a selling scenario,…” “Given a specific objection by a customer,…”
  3. Always be specific in stating what the learner has to do. This helps you formulate good questions and set reasonable limits. Examples:
    1. List five steps” rather than “List all the steps.”
    2. Name the three biggest benefits of Product X” rather than “Know all the benefits of Product X.”