How to Add Reference Materials to a Knowledge Guru Game

Knowledge Guru is specifically designed to provide you with a lot of flexibility to achieve your learning objectives. One way we offer this flexibility is through “Resources” support. Resources allow you to add content that your learners can access and review anytime, anywhere. A resource can be as simple as a term and a description, or it can include a URL link to a website or PDF.

Let’s say for example you are creating a Knowledge Guru game for onboarding new employees to your organization. The game itself may be created with references to material they have been exposed to in your company handbook, as well as opportunities for them to apply the knowledge they have learned.

With Resources, you could also include a link to your handbook, which would enable learners to view it directly while they play Knowledge Guru. And since Knowledge Guru allows your learners to play at their desks or on their go on their mobile device, they will always have it with them.

How to Add Resources

Follow the steps below to add a resource to your Knowledge Guru game:

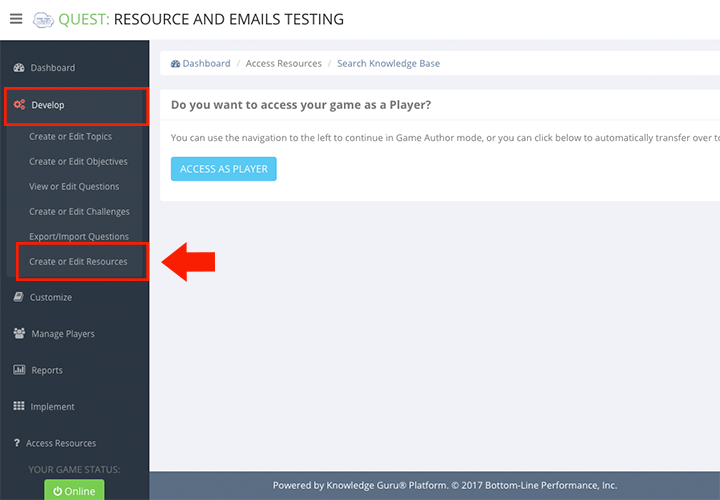
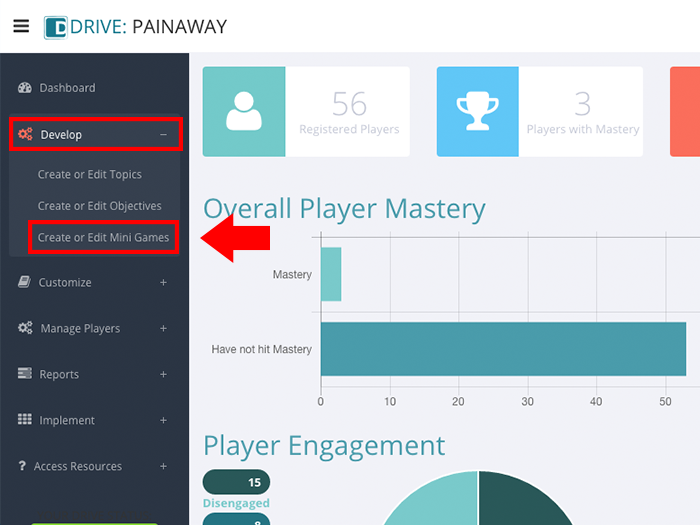
1. Expand the Develop option within left-hand navigation pane, and select Create or Edit Resources.

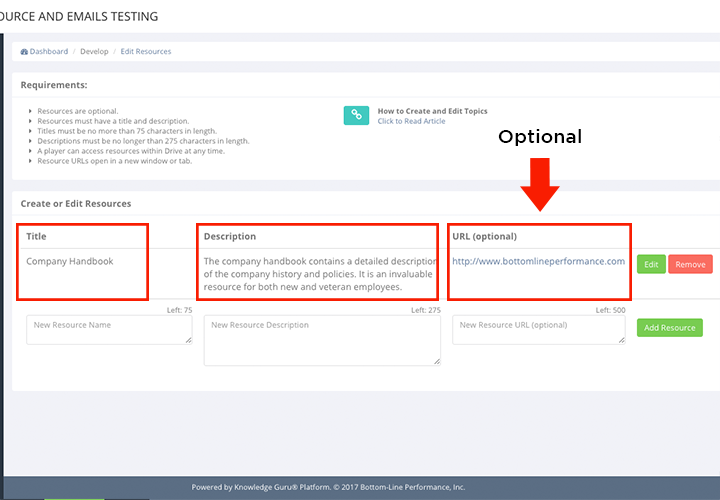
2. Fill in your resource name, description, and optional URL.

3. Click SAVE.

Guidelines for Creating the Fish Finder Minigame

Fish Finder enables learners to compare one fixed item or category to up to seven other items or categories in some fashion. Fish Finder is a great game for comparing your product to competitor products.

  • Example: You have Product A and you want to compare it to Products B and C. In every game, the player will always compare Product A to either Product B or Product C. Players will not compare B to C.

Unlike Balloon Burst, the other mini-game in Drive that lets you set up categories, you do not always have one “fixed” category that gets compared to a second category. This makes Fish Finder a more challenging game to play. Instead of choosing Category A vs Category B, C, or D on each game statement, players have to evaluate a statement and decide whether it fits Category, A, B, C or D (up to seven categories can be used).

For you to be able to use Fish Finder in Drive, you must create a learning objective that uses one of these verbs:

  • Compare
  • Contrast
  • Distinguish
  • Identify
  • Match
  • Name
  • Recognize
  • Rephrase
  • Select

Here’s how to create a game.

Steps to Create a Fish Finder Game

(NOTE: These steps assume you have already created a game topic and an associated learning objective.)

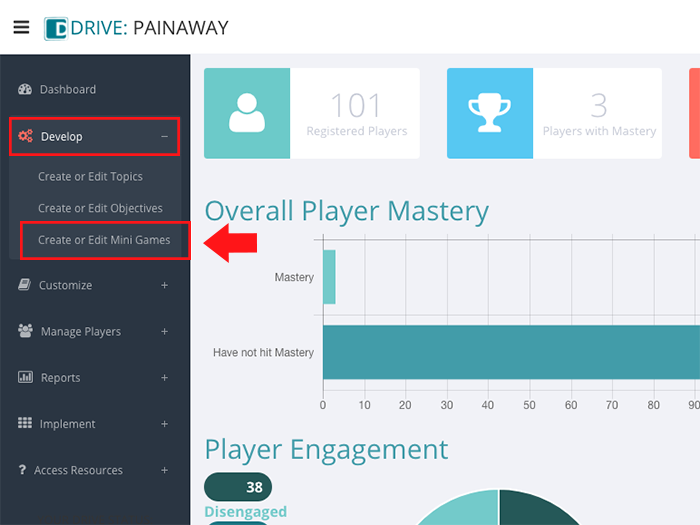
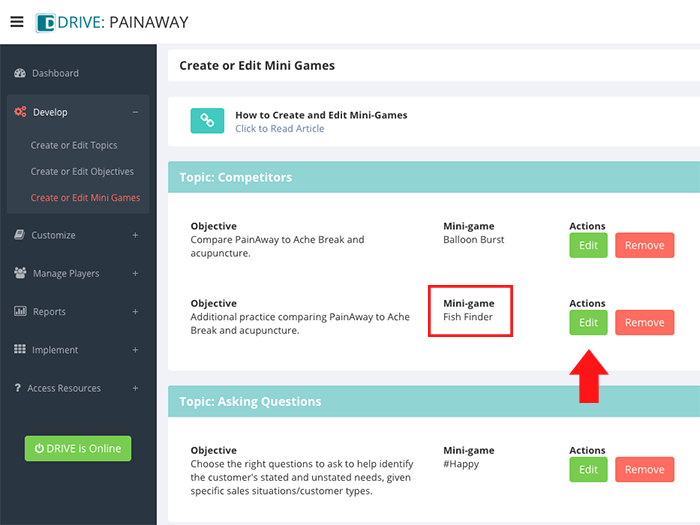
  1. Expand Develop option within left-hand navigation pane, and select Create or Edit Mini Games.
  2. Find a topic that uses Fish Finder as its mini-game and click EDIT.
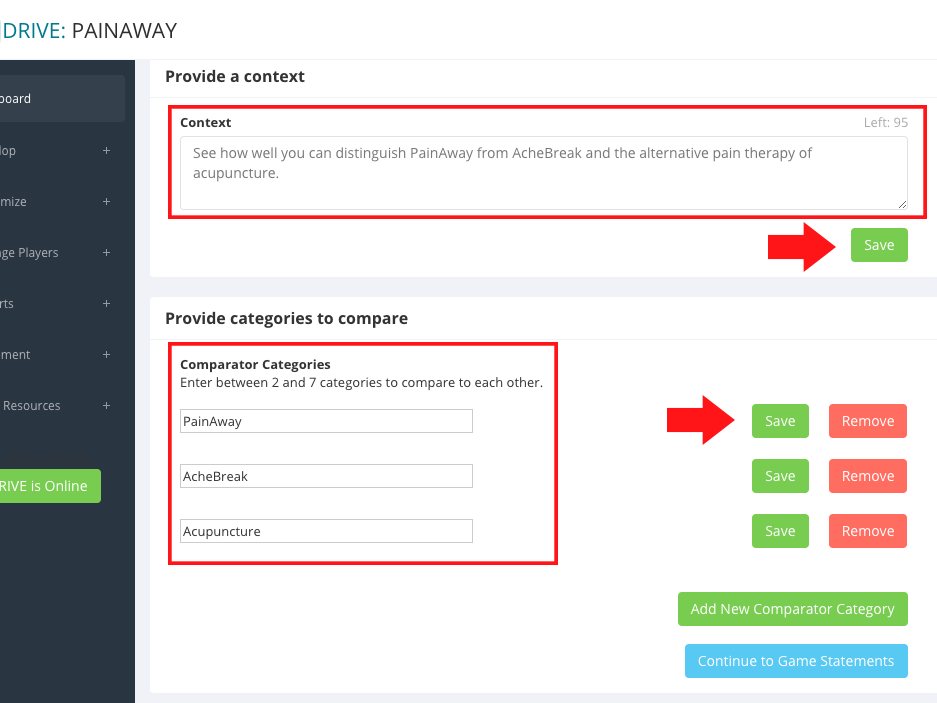
  3. In the Provide a context section, type a description or context for what your learners will be doing. (For example: Compare Product A to Product B.)
  4. Click SAVE. NOTE: It is critical that you click SAVE whenever you see a SAVE button. You will lose content if you proceed without saving it.
  5. In the field labeled Provide categories to compare, enter category names and click SAVE after entering each category.
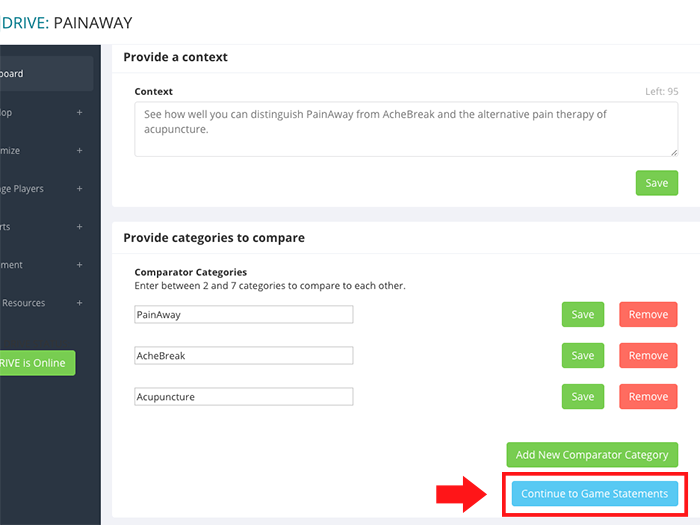
  6. Once you’ve added all your competitor categories, click CONTINUE TO GAME STATEMENTS.
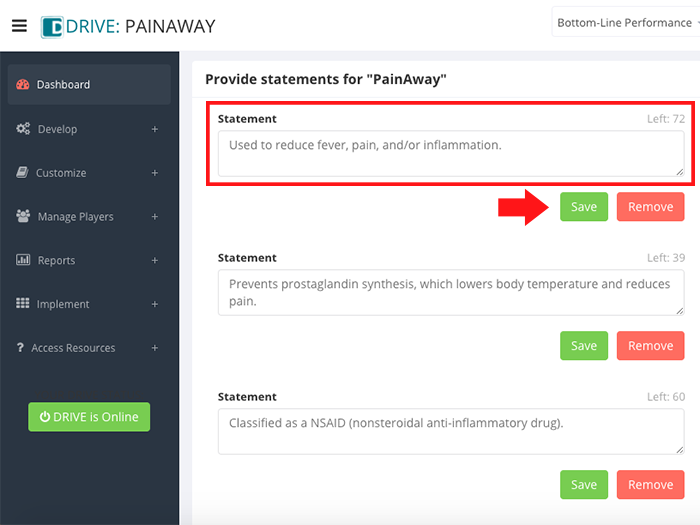
  7. Provide statements for a category by typing in true statements that are unique to that category. You do not want any of the statements to apply to anything other than the Fixed Category.
  8. After you enter a statement, click the SAVE button next to it.
  9. To add additional statements, click ADD NEW STATEMENT.
  10. Repeat steps 7-8 for each game category. The same requirement for your content applies here: the content you include must be unique to the category for which you are creating it.
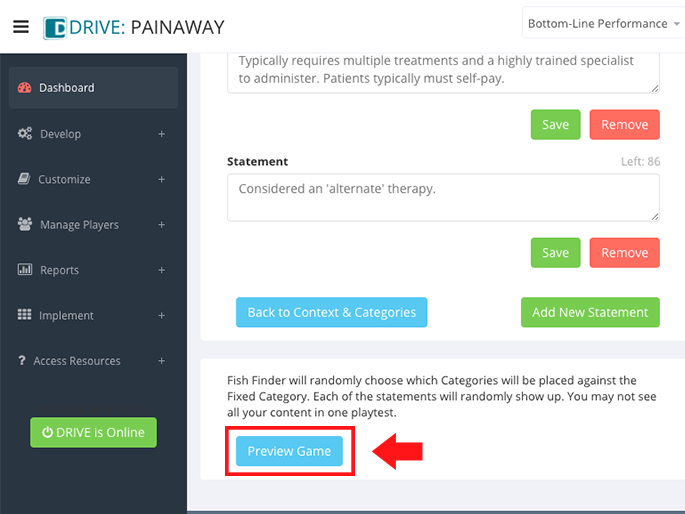
  11. When you finish adding content, preview what your game by clicking PREVIEW GAME at the bottom left of your screen.

Click through the slideshow below to see the steps in action.

Best Practices

Each instance of a Fish Finder game will include a minimum of four statements for players to consider and a maximum of eight statements, depending on the size of the fish they catch. For Fish Finder to be a good game choice, make sure you have sufficient statements associated with your categories to ensure two unique “play-through’s” of a game. Ideally:

  • A game with just two categories should have six unique statements per category.
  • A game with three to four categories, should have between four and five unique statements per category.
  • A game with five or more categories should have between three and four unique statements per category.

Guidelines for Creating the Forest Flight Minigame

Forest Flight enables you to create branching scenarios. It is helps learners practice using judgment and making decisions based on defined criteria.

  • Example: Given a specified customer type, determine the best responses to make to gain commitment from the customer to try Product X.

Forest Flight enables you to create objectives suited to the higher levels of Bloom’s taxonomy. To use it in a Drive experience, you must create a learning objective that uses one of these verbs:

  • Choose
  • Decide
  • Deduce
  • Determine
  • Evaluate
  • Infer

Here’s how to create a game.

Steps to Create a Forest Flight Game

(NOTE: These steps assume you have already created a game topic and an associated learning objective.)

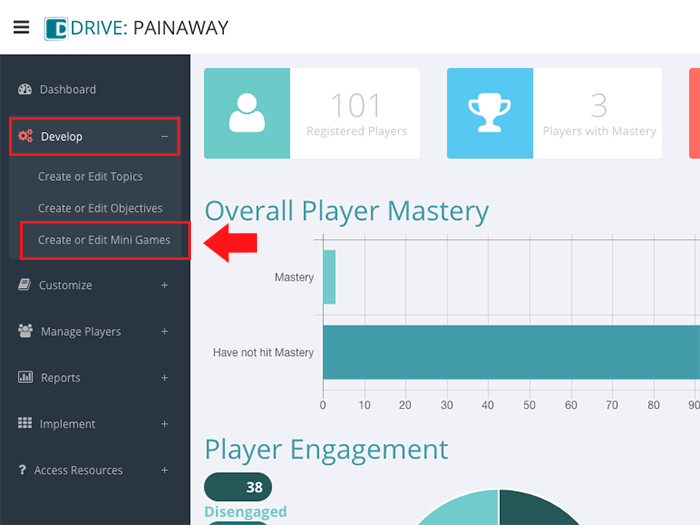
  1. Expand Develop option within left-hand navigation pane, and select Create or Edit Mini Games.
  2. Find a topic that uses Forest Flight as its mini-game and click EDIT.
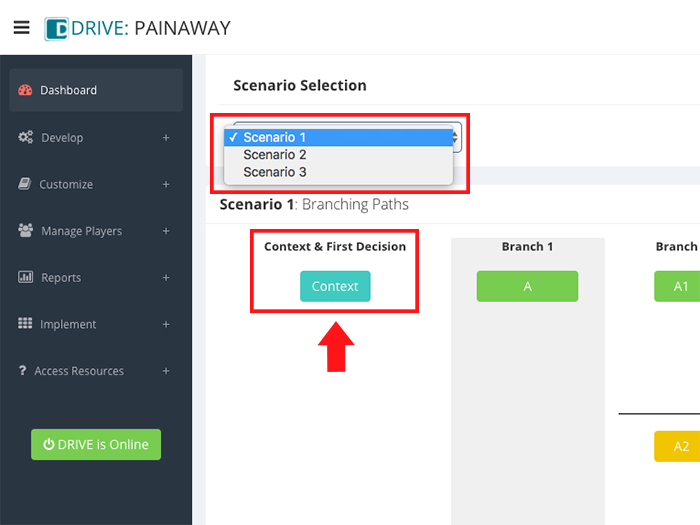
  3. Note the drop-down menu with Scenario One selected as the default. This cues you that you are working on your first scenario for the Forest Flight game. To have a viable game, you will have to create at least two scenarios with a maximum of three scenarios possible.
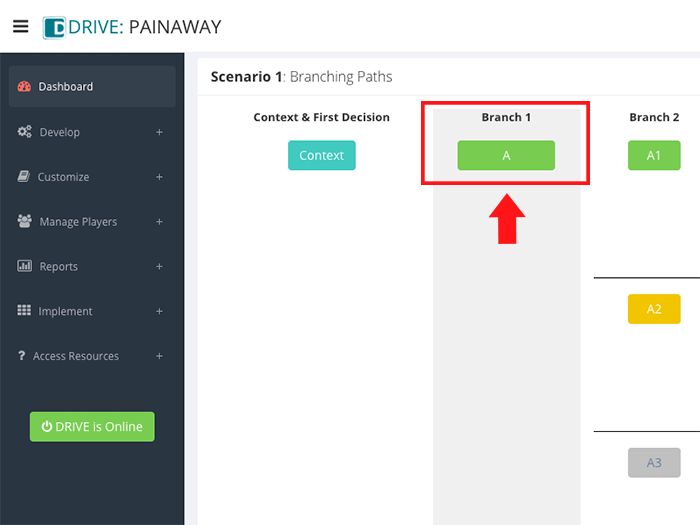
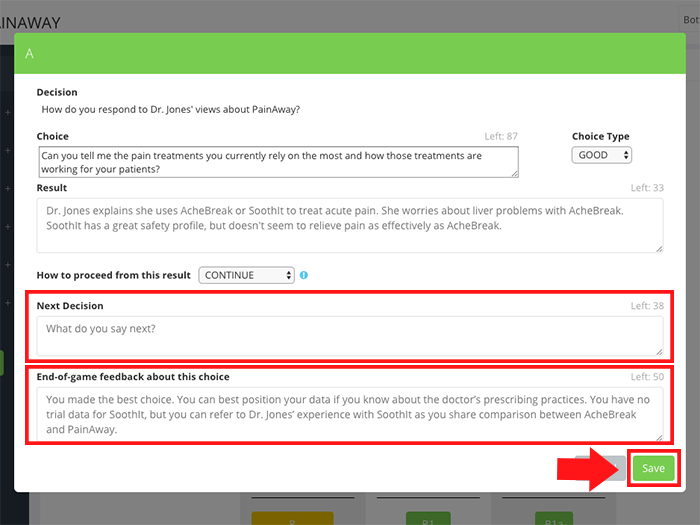
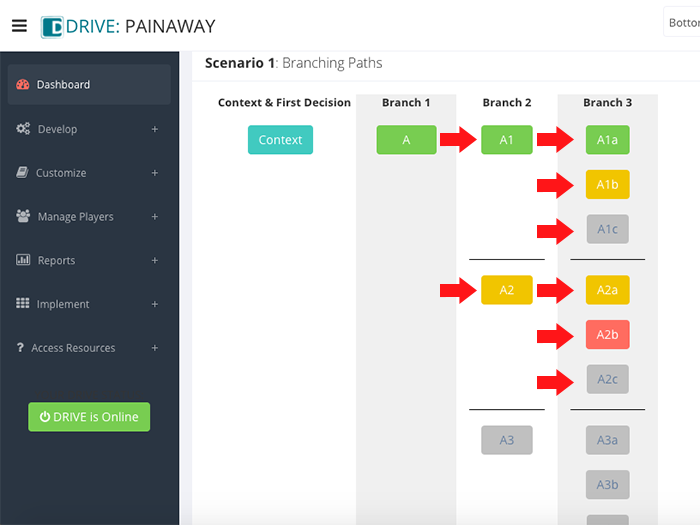
  4. Use the Branching Paths tool to craft your scenario. You will need to supply these items:
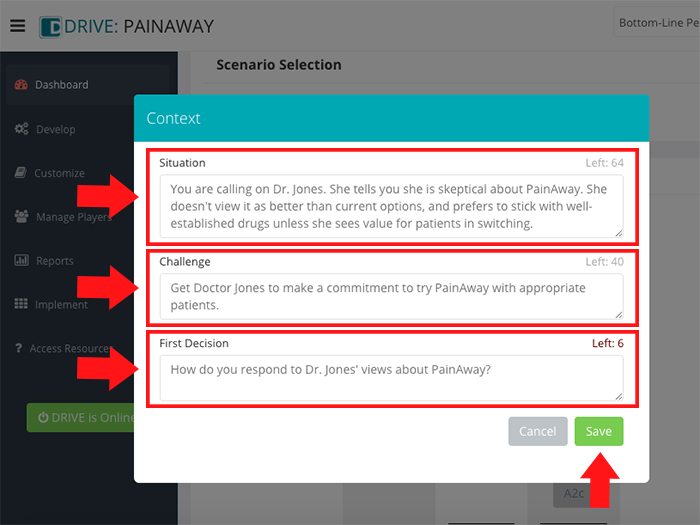
    1. A context: an initial description of the situation that provides relevant background to the player in making decisions. In general, this will be 1) what the situation is, 2) relevant details about the situation, and 3) people involved in the situation.
    2. A challenge: this is a statement of what the player needs to accomplish or resolve.
    3. A starting decision: This is the first decision the player needs to make to start resolution of the challenge. It is always expressed as a question.
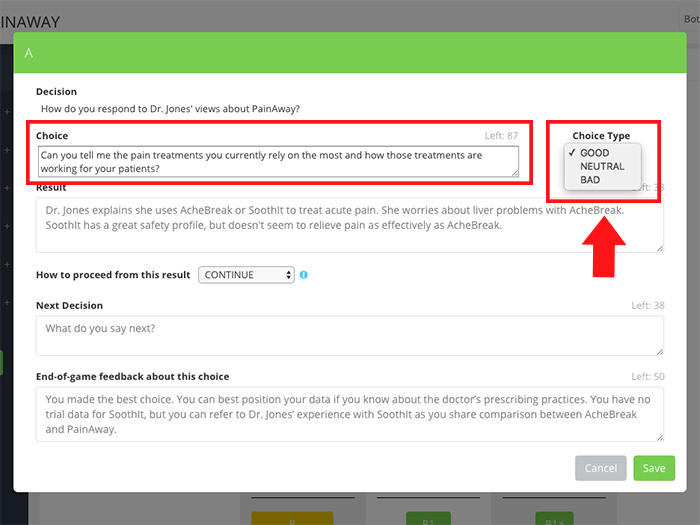
    4. Branch one choices, results of making those choices, the next decision to be made, and post-game feedback that player sees for every choice made.
    5. Branch two choices, results of making those choices, the next decision to be made, and post-game feedback that player sees for every choice made.
    6. Optional: Branch three choices, results of making those choices, the next decision to be made, and post-game feedback that player sees for every choice made.
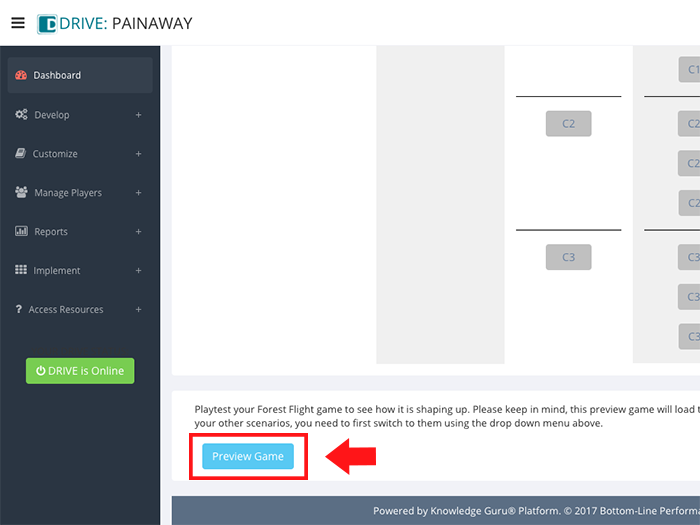
  5. Once you have entered these items for your first scenario, you can preview your game. You will need to repeat these steps to create subsequent scenarios. By choosing Scenario Two from the drop-down menu on the main game creation screen, you can begin a new scenario.

Click through the slideshow below to see the steps in action.

Minimum and Maximum Content:

  • Each game must include two scenarios. Three is recommended. Each scenario must include at least two branches. It can have three.
  • Branch #1 of the scenario must include a GOOD option. If only two choices are included on Branch one, the second option can be either NEUTRAL or BAD.
  • Within any branch, you must provide two choices to players but a maximum of three.

Game Design Recommendations

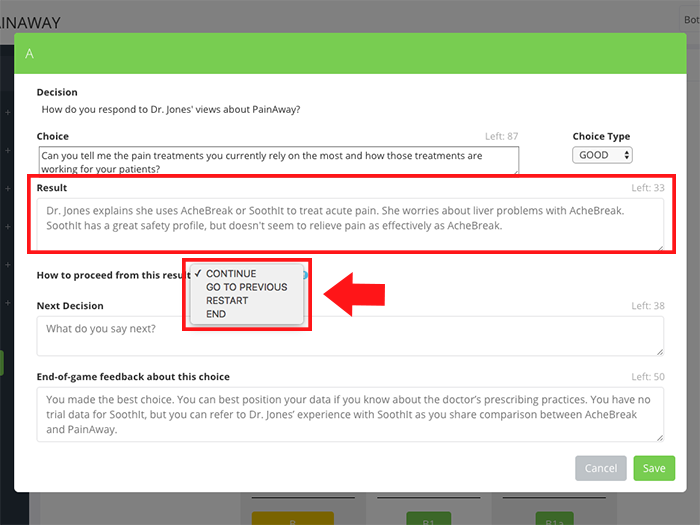
If your game includes a “bad” choice on a branch, we strongly recommend you use the settings below.  This will also prevent your player from earning a score of 0 for the game since he or she will get to redo a decision and gain points by doing so:

  • On Branch 1, use RESTART when prompted to identify “How to proceed from this result.” This enables player to restart the game and try another decision.
  • On Branch 2, use GO TO PREVIOUS when prompted to identify “How to proceed from this result.” This enables player to re-do previous branch.
  • To fully assess a player’s mastery of the content associated with a Forest Flight game, we encourage authors to create three scenarios. This ensures players get multiple practice opportunities using decision-making skills associated with the game.

How Big Should a Knowledge Guru Game Be?

Customers frequently ask us, “How big should my Knowledge Guru game be?”

We respond back with “It depends.” Game “size” really means the number of topics you include in the game and the amount of content you include in terms of learning objectives, questions (Quest) or content for each mini-game (Drive).  The biggest two factors influencing game size are: 1) the way you intend for players to interact with the game, 2) the number of learning objectives you intend for the game to support.

There are three possible ways you can plan for learners to interact with your game:

  • Play through the entire game in a single session at a time of their choosing. This scenario automatically means you are using a Quest or Drive (with Custom minigame delivery enabled) game type. It should also trigger you to design a shorter game with a maximum of five topics (Quest allows up to 7 and Drive allows up to 7). Plan to keep each topic small: 4 to 6 question sets per topic for Quest and 1-2 learning objectives per topic for Drive. This will give players about 15 to 30 minutes of gameplay time and enable you to introduce or reinforce the most essential content.
  • Space play over time. Both Drive and Quest are designed for spaced play. With Quest it is an option. With Drive, it is required for Daily 3 minigame delivery and an option with Custom minigame delivery. With spaced play, your game can have more content within it because players only see a portion of it at a time. A Drive game that uses Daily 3 controls the interaction, limiting it to about 5 minutes per day so your larger question is how many days do you want them to have to play to see all of your game’s content. With Custom minigame delivery, you can space play in a few ways: by date, by score, in sequential order (one game won’t unlock until the previous game has been played), or by context (players must play all contexts of a game before the next unlocks). With Quest, you can space play two ways: a level per day (1 topic and 1 set of questions associated with that topic) or a world per week (all topics and one set of the questions associated with all those topics).
  • Play a Quest, or Drive game with Custom minigame delivery as part of a live event. In this scenario, you are going to specify a certain amount of time be spent in game play. This absolutely dictates the amount of content you can include. You cannot have more questions or minigames within a topic than someone can reasonably complete in the time you are allocating for game play.

Be very aware that learners read and process information at different speeds. Learners spend widely varying amounts of time to complete the same game. Their processing speed depend on reading proficiency, education level, their native language, and their familiarity with the content. Factor these things into your judgment of how much content to include.

Use the links provided below to get specific guidance by game type.

Drive

Drive has two minigame delivery methods: Daily 3 and Custom.

  • The Daily 3 minigame delivery method is approximately 5 minutes and provides players with three different mini-games to play each time. A meaningful Daily 3 minigame delivery experience means that each of the mini-games you create contains sufficient content so that players will encounter unique content in that game over at least three instances (daily games) of play. This ensures you are giving players sufficient “retrieval practice” for every learning objective you have. (Remember – each mini-game you create is associated with a single learning objective.)
  • Custom minigame delivery allows game authors to customize how much content players encounter at one time. With Custom minigame delivery, you can space play in a few ways: by date, by score, in sequential order (one game won’t unlock until the previous game has been played), or by context (players must play all contexts of a game before the next unlocks).

Guidelines for Drive vary by use case.

  • For Drive games played over time, target seven to nine days of game play. This should allow players to play all the games multiple times and equates to about 45 minutes spent with the app over a period of two to three weeks’ time with a goal of playing three times per week.
  • For Drive games meant to be played in a single sitting, target 15-30 minutes of game play. This is a realistic amount of time for most players to spend in one sitting.

There are six unique mini-games you can create within Drive. The guidelines below will help you create games.

Balloon Burst

Balloon Burst enables you to identify a minimum of two categories to as many as six. For each category you include you must create statements that a player can associate with that category. The minimum number of statements required for a category is three. For an optimal game, provide at least six statements for each category if you only have two categories or five statements per category if you have three or more categories.

For additional Balloon Burst best practices, click here.

Fish Finder

Fish Finder, like Balloon Burst, lets players associate facts with categories. The minimum number of categories you can include in a game is two; the maximum is seven (which could create a very large game!). The same guidelines apply: if you have only two categories, make sure each one has at least six statements. If you have three to four categories, make sure each one has four or five statements. If you have more than five categories, then you may want to limit the number of statements per category to three or four.

A single instance of Fish Finder will require players to respond to a minimum of 4 statements and a maximum of 8 statements.

For more details on Fish Finder, click here.

Forest Flight

For an optimal player experience, you will want to create three unique branched scenarios. Each scenario requires that you have at least two branches associated with it; you can have three. Each branch can include up to three choices; you must have at least two.

Branched scenarios take time to write, which is why Drive allows authors to only create two for a valid game. However, if you truly want to provide sufficient practice for a player, you will take the time to create three unique scenarios.

For complete information on how to create a Forest Flight game as well as best practices, click here.

#Happy

Include three contexts/scenarios within a game to provide ample practice. You can create a #Happy game with only one context/scenario, but to maximize practice, try for three.

Consider going beyond six statements for better re-playability of contexts/scenarios. You can reword a good or bad response to encourage the learner to focus on the feedback and to prevent them from doing well on future play-throughs simply because they memorized responses. Here’s an example of two ways to phrase a response that achieves the same aim.

  • Example: “What safety data have you already seen?” (Question) “Here is our safety data.” (Statement)

For additional #Happy best practices, click here.

Knowledge Knight

Games require at least six questions to ensure a minimum of two play-throughs of the game. We recommend creating nine questions. This ensures variety, but keeps the number of playthroughs required for mastery to a reasonable amount.

An ideal series of three questions includes one question that encourages recall of knowledge coupled with two questions that require application of that knowledge in a job context the learner will encounter in the job.

For additional Knowledge Knight best practices, click here.

Safecracker

For an optimal player experience, include at least three needs (aka scenarios), which results in three unique rounds of the game. The maximum number of unique needs is five.

Each time the game is played, it will display two distractors along with the correct responses for each benefit and feature. When you create your game, re-use distractors across benefits and across features to verify that your learners can truly associate correct benefits with needs and correct features with benefits.

For additional Safecracker best practices, click here.

Quest Game Size

Like Drive, Quest is designed to maximize learner retention of content. However, if you overload your game with too much content, you will hurt your players’ ability to remember. Novice authors can go a bit crazy on crafting questions and suddenly find themselves with 8, 9, 10 or even 11 question sets within a single topic. The result is player fatigue and overload. They end up remembering very little.

Quest requires you create a minimum of three topics with a maximum of seven topics. We recommend creating a minimum of three question sets per topic. Consider whether spacing is applied when deciding on the maximum number of questions within a level. Also assume players need 30 to 45 seconds to respond to a question when calculating how long play will take.

Player perspective: If I am playing a level per day, then eight or nine questions doesn’t seem like a big deal. If I play an entire game all at once, then eight or nine questions in a level is too many. In such cases, limit the number of questions within a level to four to six questions and vary the number from level to level.


How to Create and Edit Topics in Drive

To create a valid Drive game, you need at least three topics in your game. The maximum number of topics we recommend is seven.

Quick Steps to Create Topics

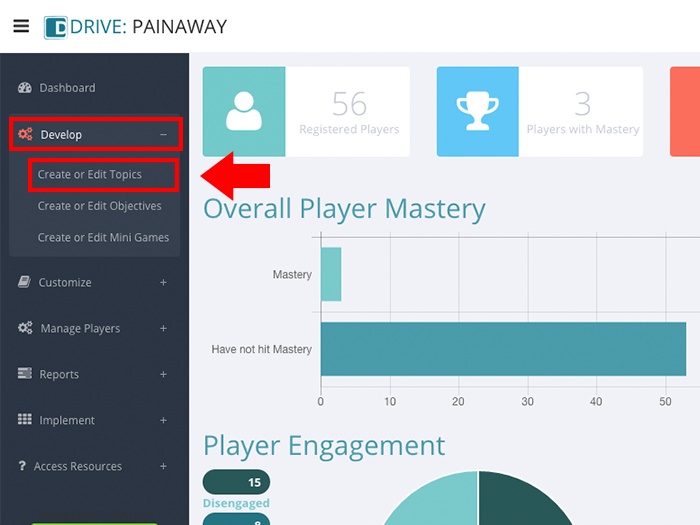
  1. Select Develop from the left-hand navigation pane.
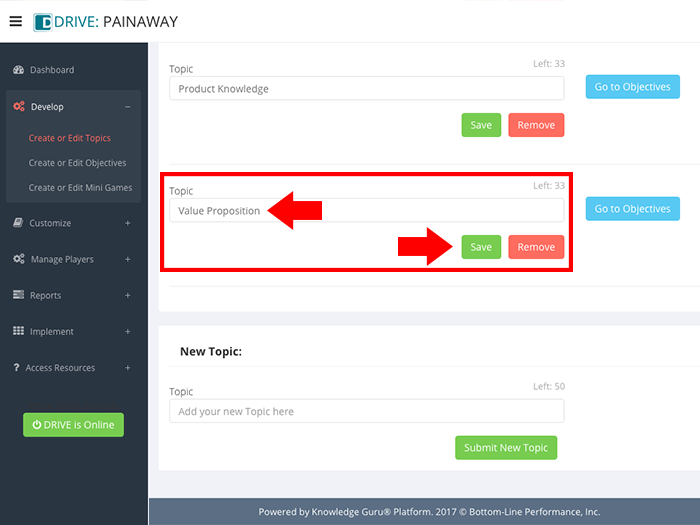
  2. Expand Develop to reveal sub-menu options and select Create or Edit Topics.
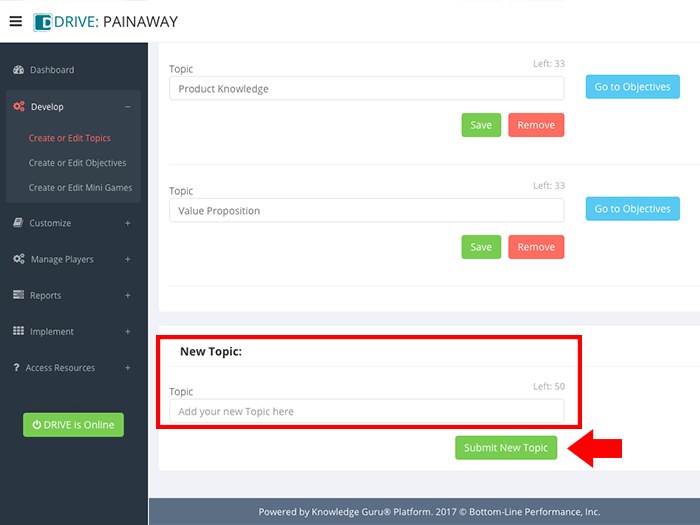
  3. When the wizard appears, enter a topic name in the field labeled Add your new topic here.
  4. Click SUBMIT NEW TOPIC.
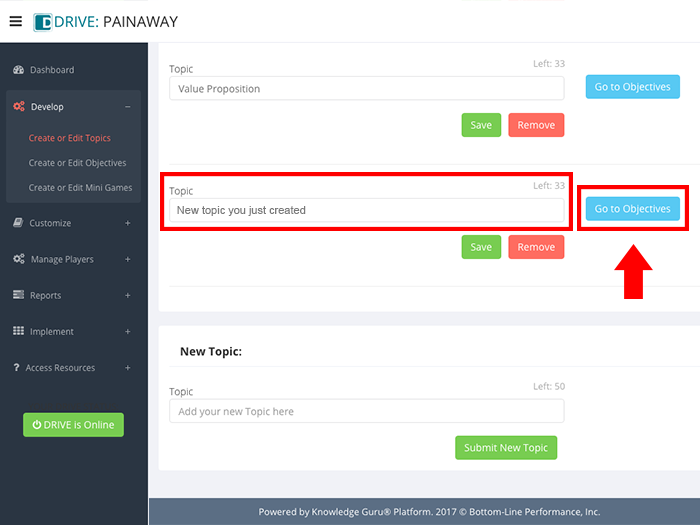
  5. Your new topic will appear. You can do one of two things: 1) Click GO TO OBJECTIVES to create objectives for that specific topic, or 2) Create another game topic using the New Topic field that has been created for you.

Quick Steps to Edit or Remove Topics

  1. Select Develop from the left-hand navigation pane.
  2. Expand Develop to reveal sub-menu options and select Create or Edit Topics.
  3. To edit a topic, simply change the text for that topic and click SAVE.
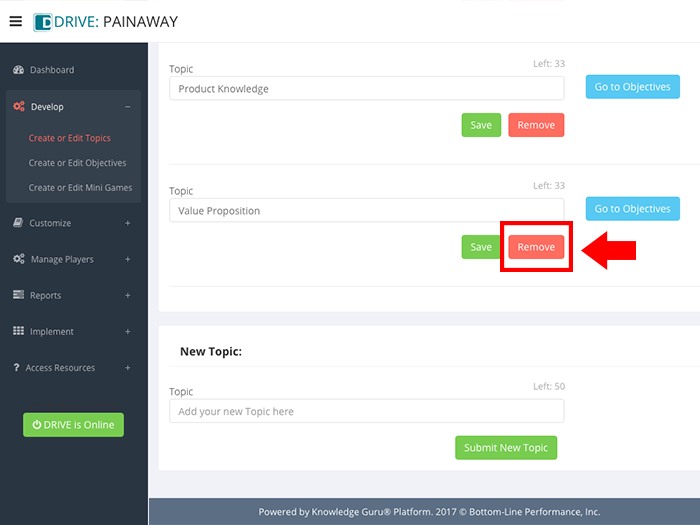
  4. To remove a topic, click REMOVE under the topic you want to delete. Removing a topic will also remove any objectives and mini-games associated with it.
  5. If you’re sure you want to proceed, click REMOVE TOPIC.

How to Create and Edit Objectives in Drive Using Bloom’s Taxonomy

Strong objectives make for a strong Drive game experience for players that is relevant to their needs. Drive’s creation wizard tries to help you create specific, measurable objectives designed to use Bloom’s Taxonomy: a classification system that organizes knowledge by complexity.


Want an in-depth overview on how Bloom’s Taxonomy works? We describe how it works for learning games here:


To create an objective, you must first create a game topic. Once you have a topic in place, follow these steps to create an objective:

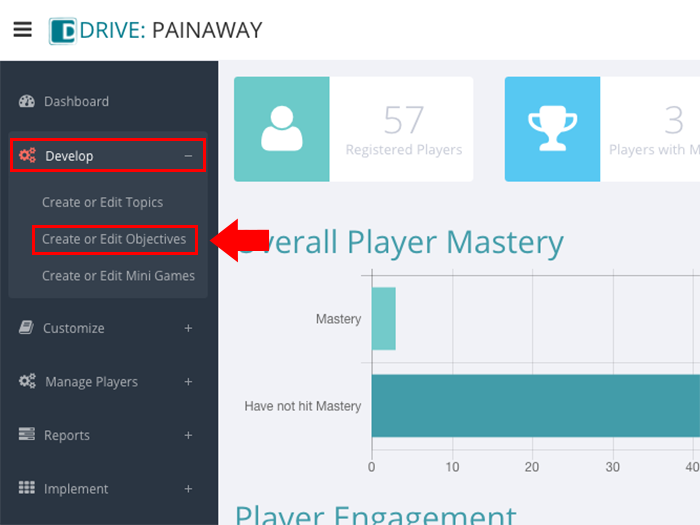
  1. Expand Develop option from left-hand navigation pane, and select Create or Edit Objectives.
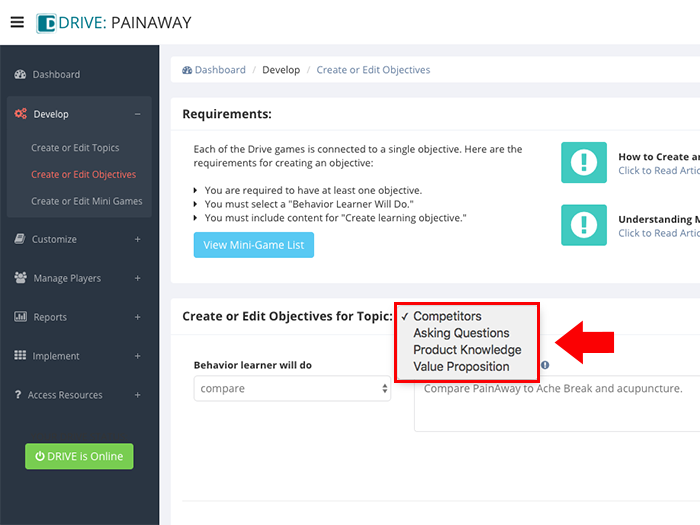
  2. Use the Create or Edit Objectives for Topic drop-down menu to select the topic for which you want to create an objective.
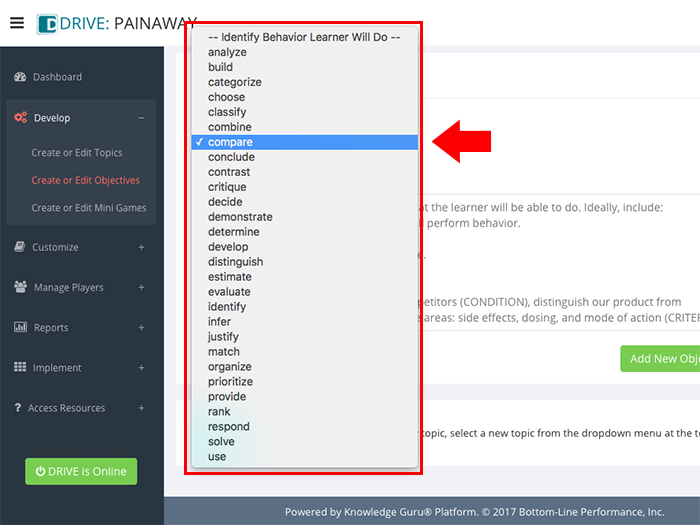
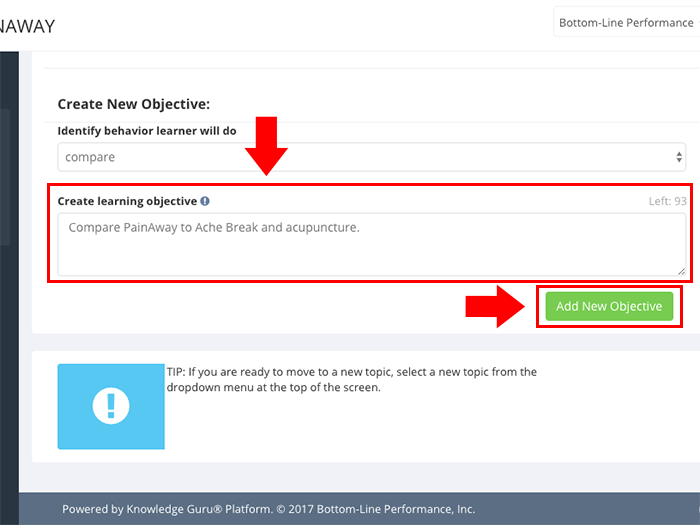
  3. Use the Identify behavior learner will do drop-down menu to specify exactly what behavior you want the learner to demonstrate. This list of verbs describes behaviors associated with Bloom’s Taxonomy of Learning and helps you consider the level of cognitive complexity required to achieve the objective.
  4. Use the Create learning objective field to write the objective.
  5. Click ADD NEW OBJECTIVE.

Click through the slideshow below to see the steps in action.

Here are three examples of behaviors you can choose from and learning objectives that include that behavior in their description.

Behavior Sample learning objective
ask Ask the optimal questions based on knowledge of that customer type.
choose Choose the appropriate benefits and features to highlight based on each specific need.
distinguish Distinguish ACME’s products from those of its top three competitors.

The behavior you choose from the drop-down list affects the mini-games available for you to develop as each mini-game is associated with specific behaviors on Bloom’s Taxonomy. Here are the behaviors each mini-game support:

Mini-Game Bloom’s Levels Targeted Verb Choices Associated with Mini-Game
Balloon Burst Knowledge and Comprehension compare, contrast, distinguish, identify, match, select


Fish Finder Knowledge and Comprehension compare, contrast, distinguish, identify, match, name, recognize, rephrase, select


#Happy Comprehension and Application choose, demonstrate, use


Forest Flight Application, Analysis, Synthesis, Evaluation choose, decide, deduce, determine, evaluate, infer


Knowledge Knight, Sharp Chef, and Fast Facts Application, Analysis, Synthesis, Evaluation analyze, categorize, choose, combine, compare, conclude, critique, decide, demonstrate, determine, distinguish, estimate, evaluate, identify, infer, justify, organize, prioritize, respond, solve, use
Safecracker Application, Analysis, Synthesis, Evaluation build, categorize, choose, classify, develop, identify, match, provide, select

How to Create and Edit Mini-Games

Drive currently has eight mini-games available to you with more mini-games available in future releases. Key things to know or do before authoring a single mini-game:

  • Each of the eight mini-games has unique content requirements that will align with the learning objective you created. Consequently, each wizard provides you with different prompts to follow and fields to complete.
  • Before you can create a mini-game, you need to define a topic and a learning objective associated with that topic.
  • A mini-game can only be associated with a single learning objective. If your topic requires more than one learning objective, you must create a mini-game for EACH learning objective within the topic.
  • Play each mini-game before authoring a Drive game experience. Doing so ensures you understand the player experience and the kind of content you will see within a particular type of mini-game.
  • As you create your game, use the Preview Mini Game functionality within each mini-game authoring wizard to check out your game and verify that it works and looks as you envisioned it would. Do not make your Drive game experience live without previewing all the games you have created.

Creating a New Mini-Game

Assuming you have created a topic and a learning objective, here’s the process for creating a mini-game:

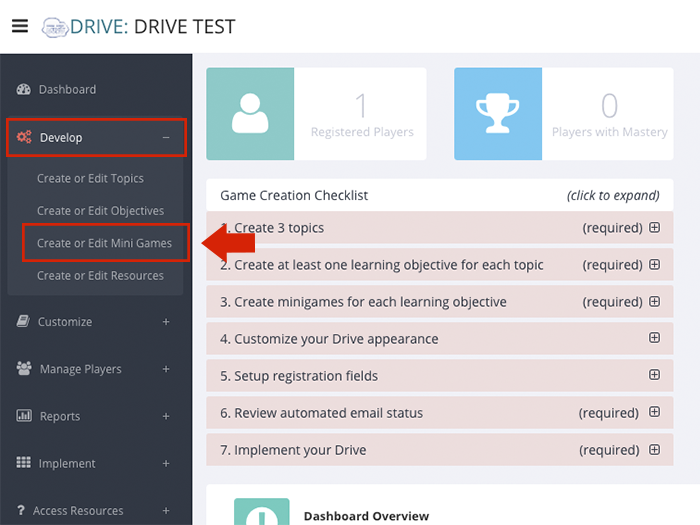
  1. Select Develop from the left-hand navigation pane, expanding this option to reveal sub-menu choices.
  2. Select Create or Edit Mini Games.
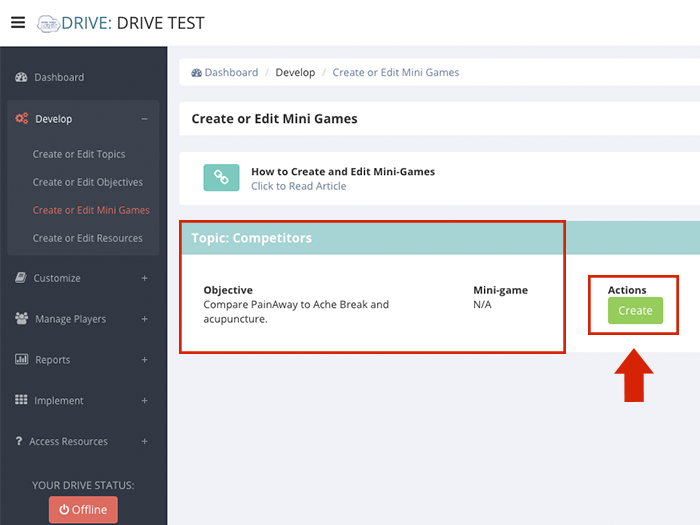
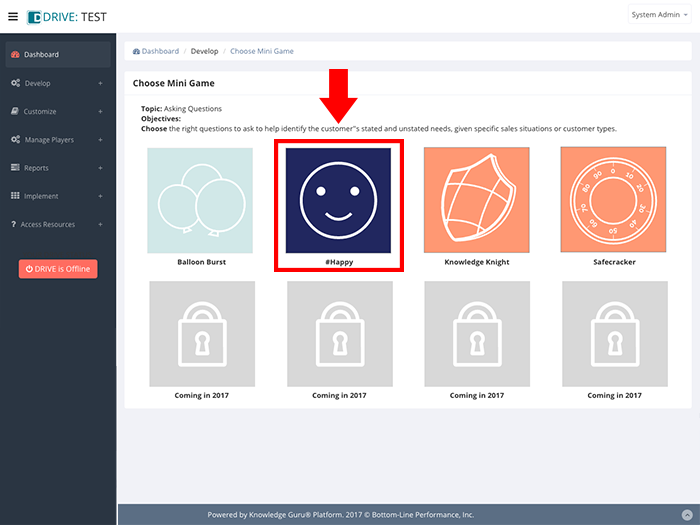
  3. Review the topic and objectives listed on the screen. Click CREATE next to the one for which you want to create a mini-game. A screen labeled Choose Mini Game will appear.
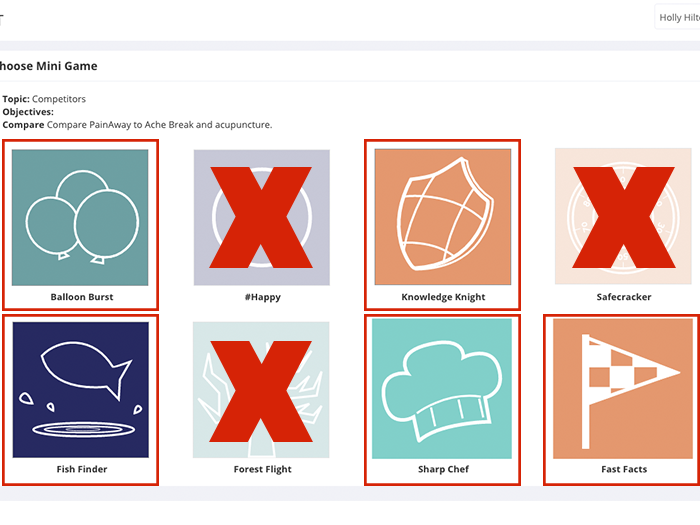
  4. The mini-games available will be highlighted. The choices available depend on the behavior you specified within your learning objective.
  5. From the mini-games available to you, click the one you want. This action opens the wizard for that mini-game.
  6. Proceed to input content, using the wizard associated with the mini-game you selected.

FAQs – Game Creation

  • I chose a mini-game and then realized it wasn’t the one I wanted. How do I change it?
    • Go back to Develop in left-hand navigation, expand it, and then select Create or Edit Mini Games. Choose REMOVE next to the topic/objective combination whose mini-game you want to delete. You will be asked to confirm your decision. Once you do so, you will once again see CREATE. You can then proceed through the process of selecting another mini-game.
  • I only have one mini-game available to me based on the behavior I specified in the objective, and it is not the one I wanted. What do I do?
  • I entered content, but it disappeared. What happened?
    • Because of the logic required within the mini-games, one content entry must be saved before you move to a new field. Failure to use the SAVE button next to each field where one appears is the typical cause of content seeming to get “lost” or failing to be retained. Watch carefully for SAVE buttons and click them wherever you see them to avoid losing content you create.

Edit an Existing Mini-Game

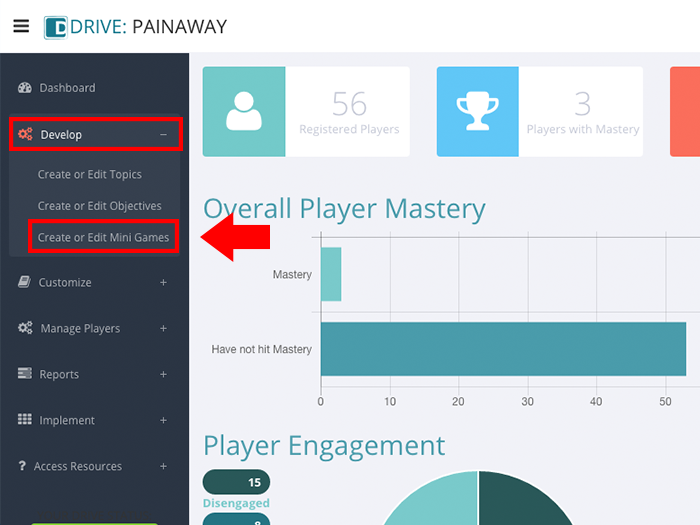
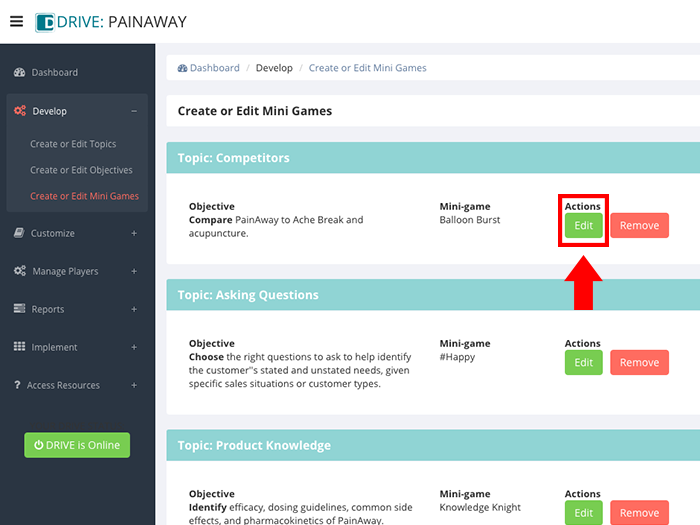
  1. Expand Develop option within left-hand navigation pane, and select Create or Edit Mini Games.
  2. Find the topic, objective, and corresponding mini-game you want to edit.
  3. Click EDIT (listed under Actions column on the screen).
  4. Within the wizard, enter your desired changes, being sure to click SAVE wherever a SAVE button is provided. Failing to do so may result in loss of content changes as many of the fields in the authoring wizards require a SAVE action after each entry.

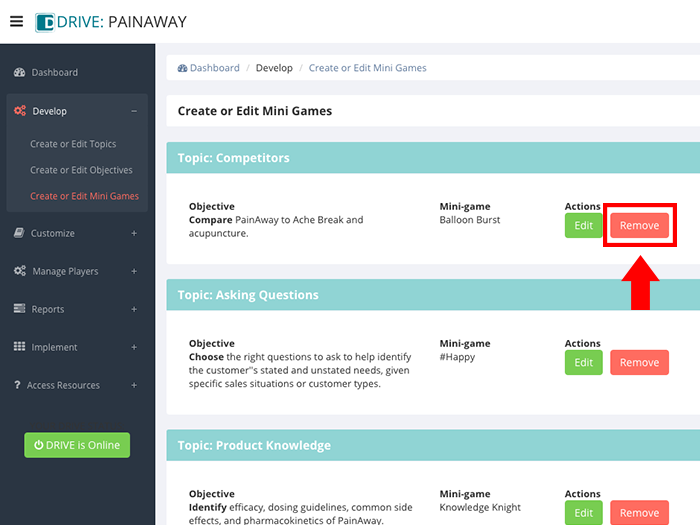
Remove a Mini-Game

  1. Expand Develop option within left-hand navigation pane, and select Create or Edit Mini Games.
  2. Find the topic, objective, and corresponding mini-game you want to remove.
  3. Under Actions, click REMOVE. Be aware that selecting this option removes all content associated with the mini game.

Understanding Mini-Game Options that are Part of Drive

Knowledge Guru Drive currently includes eight different mini-games: Balloon Burst, Fish Finder, #Happy, Forest Flight, Sharp Chef, Fast Facts, Knowledge Knight and Safecracker. Depending on the content of the questions you create, each mini-game can target certain levels of Bloom’s Taxonomy. The six levels are knowledge, comprehension, application, analysis, synthesis, and evaluation.


Want an in-depth overview on how Bloom’s Taxonomy works? We describe how it works for learning games here:


The mini-games you can use will depend on the objectives you create for your topics and where those objectives are classified according to Bloom’s Taxonomy of learning. Please see this blog post for an explanation of creating objectives and the mini-games associated with the different levels of Bloom’s Taxonomy.

The table below summarizes each mini-game.

Game Name Game Goal Game Rules Supported Bloom’s Taxonomy Levels Example Learning Objectives
Balloon Burst

bb

Burst the balloon by correctly responding to statements provided. Each correct response inflates the balloon. Delayed responses or incorrect responses deflate the balloon. A game must include minimum of 2 categories and maximum of 6.

A category must include minimum of 3 statements (we recommend at least 5) and maximum of 20.

Correct responses inflate the balloon.

Incorrect responses deflate the balloon.

Levels 1 and 2 Given a feature, associate the feature with the correct product.

Given a variety of features, compare COMPANY product to its competitors.

Given specific situations and your knowledge of policies, procedures, or guidelines, determine whether to act or not to act.

Fish Finder

Catch 100 pounds of good fish; avoid catching bad fish. Fish Finder enables learners to compare one fixed item or category to up to seven other items or categories in some fashion.

Each instance of a Fish Finder game will include a minimum of four statements for players to consider and a maximum of eight statements, depending on the size of the fish they catch.

Players’ fishing license lets them catch 100 pounds of fish. They gain points for catching ‘good’ fish and lose points for catching ‘bad’ fish.

Players learn about the categories they must distinguish between, then watch the water for splashes. They have 10 seconds to select a splash.

The bigger the splash, the bigger the fish… and the greater the amount of points they will potentially gain or lose.

After tapping or clicking a splash, players see a fact and must select the category it belongs to. A correct response fills up their progress bar with good fish; an incorrect response fills up the progress bar with bad fish.

Levels 1 and 2 Given a feature, associate the feature with the correct product.

Given a variety of features, compare COMPANY product to its competitors.

Given specific situations and your knowledge of policies, procedures, or guidelines, determine whether to act or not to act.

#Happy

happy

Grow happiness in the person you are responding to. This person will always be one specific role (customer, supplier, employee). Once you hit PLAY, you get a “context” that explains an issue, situation, or background on the person you need to make happy.

You then see a statement from the target person you are trying to make happy, along with a panel of six responses. You swipe between panels to see all the responses.

You review each response and decide whether each response is a good one or a poor one to make. If your respond correctly, you grow happiness. If you respond incorrectly, happiness declines.

If the response is a bad one, tapping it causes you to lose a life (e.g. an unhappy face fills in). You see an explanation of why the choice is a bad one.

If you tap a response you shouldn’t, you lose the game. Two inappropriate taps cause you to lose the game.

Level 3 Given a variety of contexts and customer inquiries or statements, choose appropriate responses to make.

Given a specific context and employee inquires or statements, choose appropriate responses to make.

Given a specific customer objection, choose the appropriate response(s) to make.

Knowledge Knight

kk

Scare away the dragon. Each instance of the game consists of three unique questions that allow for multiple-choice, T/F, select all that apply, or answer in order responses.

Correct responses earn players an item that helps empower the knight. Incorrect responses produce items that are not useful.
If players miss two questions, they lose the game. (The dragon frightens the knight away).
 

Levels 3-6 Given background information, identify the appropriate next step in the XYZ process to take.

Explain the XYZ process.

Given data, analyze the data and form a conclusion.

Given a specific customer objection, choose the appropriate response.

Sharp Chef

kk

Cook a delicious dish. Each instance of the game consists of three unique questions that allow for multiple-choice, T/F, select all that apply, or answer in order responses.

Correct responses earn players an item that helps the chef select a good ingredient. Incorrect responses produce ingredients that are not useful.

If players miss two questions, they lose the game. (The chef cooks a not-so-delicious dish).


Levels 3-6 Given background information, identify the appropriate next step in the XYZ process to take.

Explain the XYZ process.

Given data, analyze the data and form a conclusion.

Given a specific customer objection, choose the appropriate response.

Fast Facts

kk

Win the race. Each instance of the game consists of three unique questions that allow for multiple-choice, T/F, select all that apply, or answer in order responses.

Correct responses earn players an item that helps the racer drive a successful lap. Incorrect responses lead to slow laps.

If players miss two questions, they lose the race.


Levels 3-6 Given background information, identify the appropriate next step in the XYZ process to take.

Explain the XYZ process.

Given data, analyze the data and form a conclusion.

Given a specific customer objection, choose the appropriate response.

Safecracker

safe

Unlock the safe before the alarm sounds. Players must choose specific items (benefits) that link to the prompt (aka “need statement”) then link those choices to another set of items (features).

Each decision turns the safe dial and enables player to proceed to next decision.

After decisions are made, the player attempts to open safe.

If all decisions are correct, the safe opens and reveals an appropriate sales message to deliver to customer.

If one or more decisions are incorrect, the player must attempt to correct errors. Correct choices remain locked in when player goes back; only incorrect choices will be flagged.

Player then gets a second attempt to crack the safe. If this attempt fails, the players loses, but will see a summary of the need, appropriate benefits, and correct features.

Levels 3-6 Given a specific customer need, choose the appropriate benefits and associated features to present to the customer.
Forest Flight

Escape the forest before darkness descends. Good decisions are your quickest path to safety. Bad decisions lead to dead ends. Each game must include two scenarios, but three is recommended. Each scenario must include two branches but can have three.

Player reads about a situation, ie
“you are calling on a customer who is skeptical.” Player also reads about their challenge, ie “Get Doctor Jones to make a commitment to try PainAway with appropriate patients.”

Player drags hiker to the trail marker to begin.

At each stop on the journey, player drags the hiker over different path options to reveal possible responses. Player releases the hiker over the path he wants to choose.

Each decision leads to another stop on the journey, where another decision can be made. At any time, player can tap or click the Owl icon to review the situation or challenge.

Eventually, player either gets out of the forest or reaches a dead end depending on what decisions are made. Player receives feedback on the decisions they made and receives a score.

Player can retry the game again in the practice area or wait for another Daily Three.

Levels 3-6 Given a specific sales situation and customer type, choose the right approach to identifying needs and gaining commitment.

For a more detailed description of each mini-game and how to create them, see the articles below:

How to Create and Edit Mini-Games

Guidelines for Creating Balloon Burst

Guidelines for Creating Fish Finder

Guidelines for Creating #Happy

Guidelines for Creating Forest Flight

Guidelines for Creating Knowledge Knight, Sharp Chef, and Fast Facts

Guidelines for Creating Safecracker

Guidelines for Creating the Balloon Burst Minigame

Balloon Burst enables learners to compare one fixed item or category to up to five other items or categories in some fashion. Balloon Burst is a great game for comparing your product to competitor products.

  • Example: You have Product A and you want to compare it to Products B and C. In every game, the player will always compare Product A to either Product B or Product C. Players will not compare B to C.

For you to use Balloon Burst, you must have created a learning objective that includes a behavior where Balloon Burst is a mini-game option. Use of these verbs within your learning objective means Balloon Burst will be available to you as a mini game option:

  • Compare
  • Contrast
  • Distinguish
  • Identify
  • Match
  • Select

Here’s how to create a game.

Steps to Create a Balloon Burst Game

(NOTE: These steps assume you have already created a game topic and an associated learning objective.)

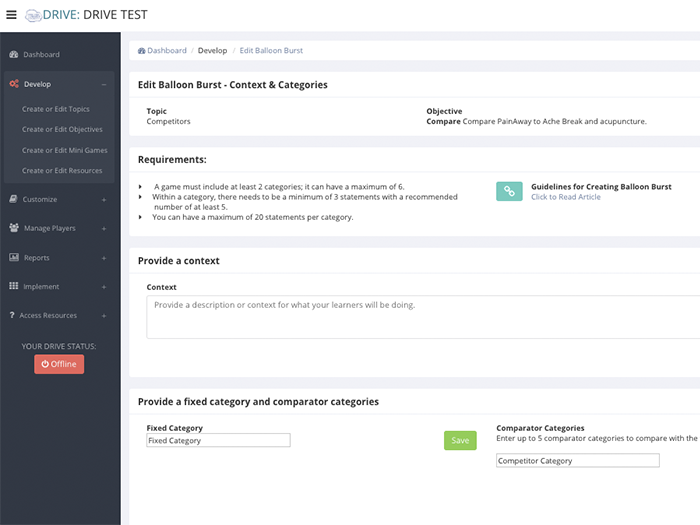
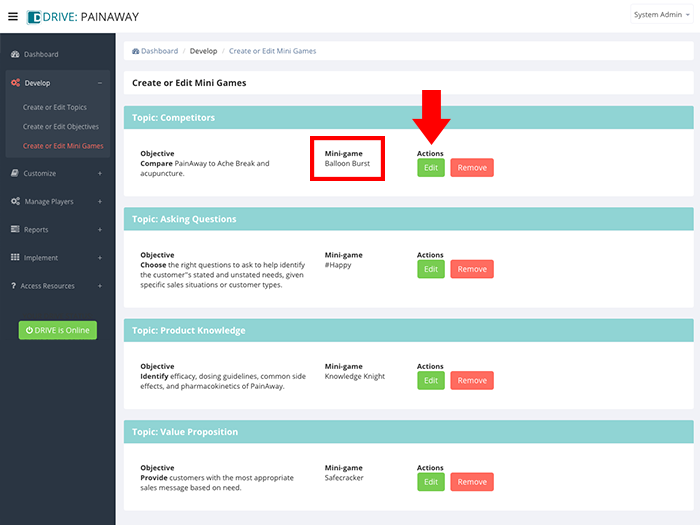
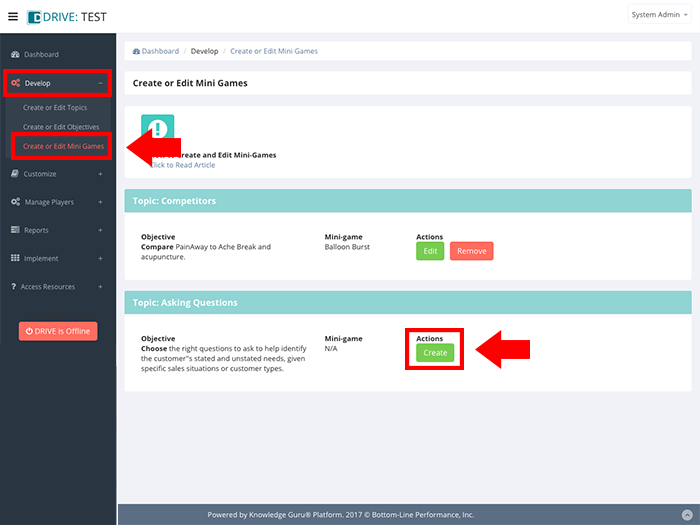
  1. Expand Develop option within left-hand navigation pane, and select the Create or Edit Mini Games.
  2. Find a topic that uses Balloon Burst as its mini-game and click EDIT.
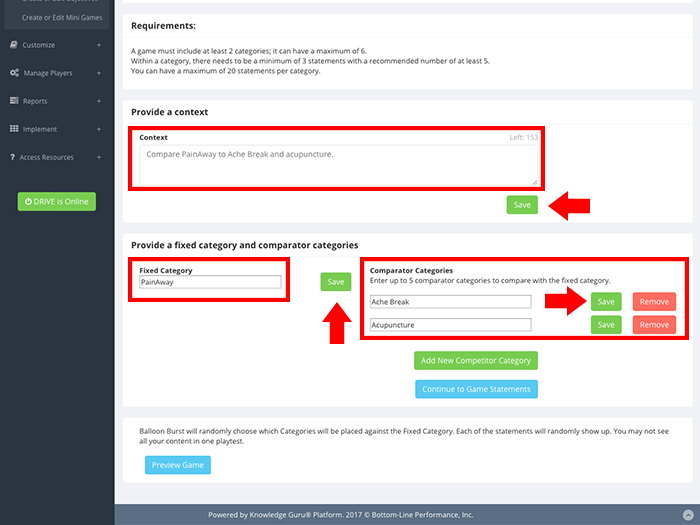
  3. In the Provide a context section, type a description or context for what your learners will be doing. (For example: Compare Product A to Product B.)
  4. Click SAVE. NOTE: It is critical that you click SAVE whenever you see a SAVE button. You will lose content if you proceed without saving it.
  5. In the field labeled Provide a fixed category and comparator categories, enter a Fixed Category and click SAVE. This is what you’re comparing to all other categories. (For example, your fixed category might be your product. Comparator categories might be the names of your competitors’ products.)
  6. Enter a Comparator Category and click SAVE.
  7. To add another Comparator Category, click ADD NEW COMPETITOR CATEGORY.
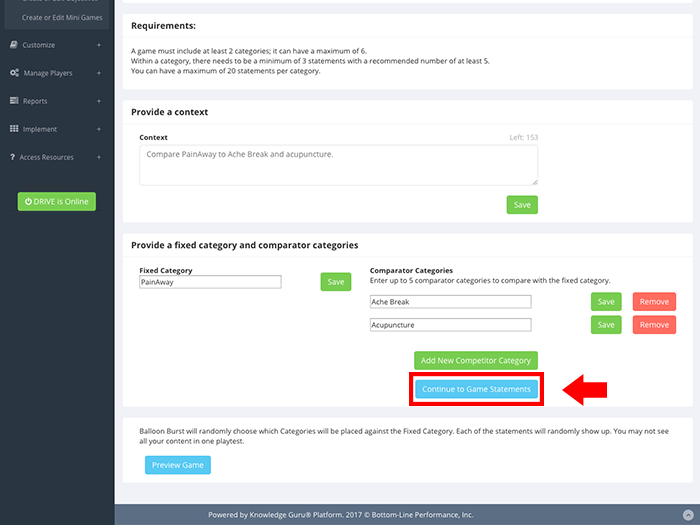
  8. Once you’ve added all your competitor categories, click CONTINUE TO GAME STATEMENTS.
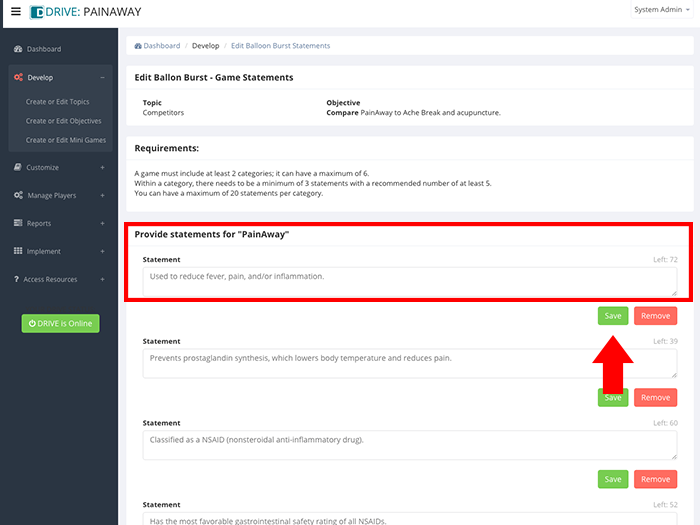
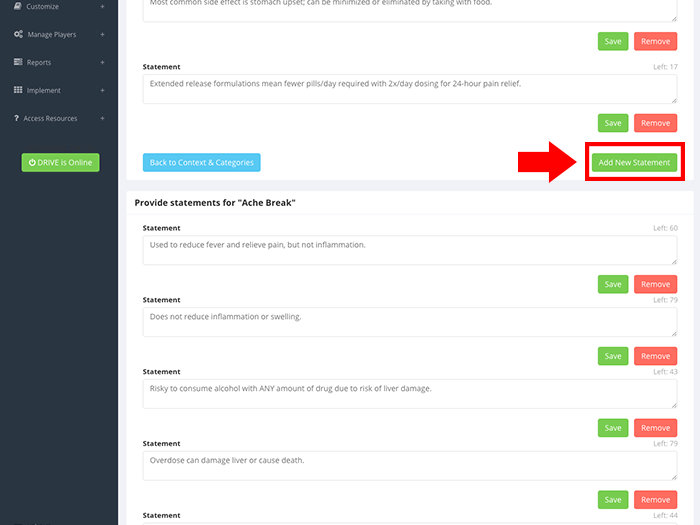
  9. Provide statements for your Fixed Category by typing in true statements that are unique to your Fixed Category where it says Placeholder Statement. You do not want any of the statements to apply to anything other than the Fixed Category.
  10. After you enter each statement, click the SAVE button next to it.
  11. To add additional statements, click ADD NEW STATEMENT.
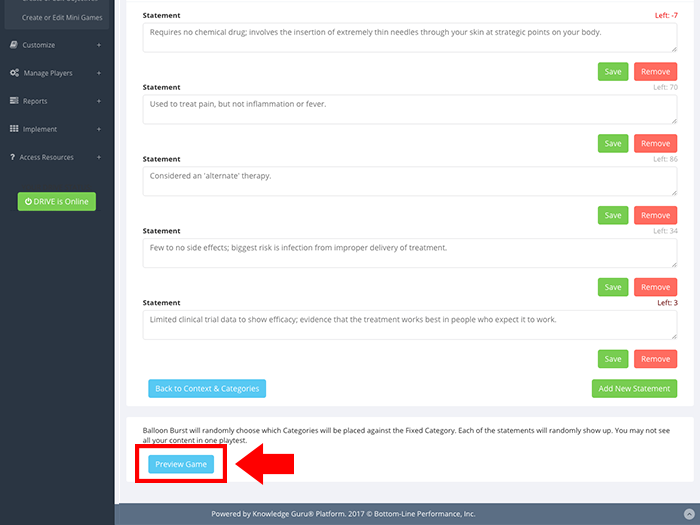
  12. Repeat steps 9-11 for each of your Comparator Categories. The same requirement for your content applies here: the content you include must be unique to the category for which you are creating it.
  13. When you finish adding content, preview what your game by clicking PREVIEW GAME at the bottom left of your screen.

Click through the slideshow below to see the steps in action.

Best Practices

The best games will have sufficient unique content to create multiple play-throughs that let players see some new content on each play-through. Optimally, each category should have at least five statements associated with it so repeat game play ensures players see a mix of statements each time and not the exact same ones repeatedly.

Guidelines for Creating the #Happy Minigame

#Happy is a great game for helping sales reps practice choosing appropriate responses to customer questions that are based on their specific needs OR responding to objections they make. In either type of practice scenario, you will define who the customer is and provide the learner with a specific context.

In a single daily play of a #Happy game, learners will receive one context/scenario to resolve and review six possible responses they can make to that scenario. If you have created multiple contexts/scenarios in your game, then learners will need to play through #Happy three times to see all three scenarios. If you included lots of responses for each scenario, then there will be multiple play-throughs to expose them to all possible response options for every context/scenario you have.

For you to use #Happy, you must have created a learning objective that includes a behavior where #Happy is a mini-game option. Use of these verbs within your learning objective means #Happy will be available to you as a mini-game option:

  • Choose
  • Demonstrate
  • Use

Here’s how to create a game.

Steps to Create a #Happy Game

(NOTE: These steps assume you have already created a game topic and an associated learning objective.)

  1. Expand Develop option within left-hand navigation pane, and select Create or Edit Mini Games.
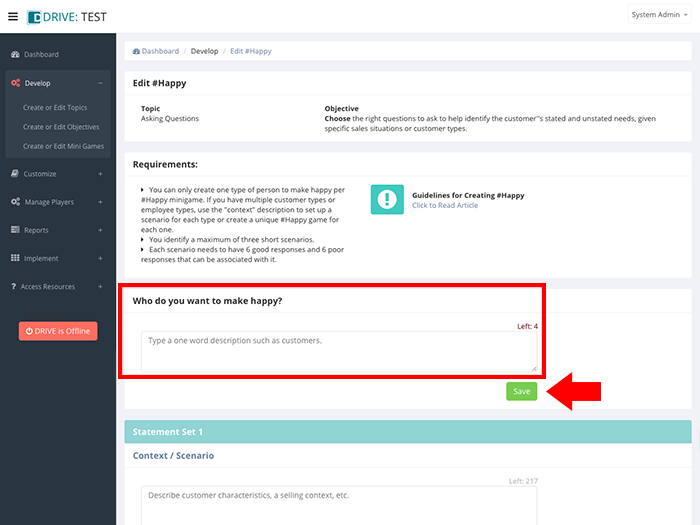
  2. Select the topic and learning objective for which you want to create a #Happy mini-game and click CREATE to launch the #Happy game creation wizard.
  3. In the field labeled Who do you want to make happy?, enter a brief one or two-word description of who the learner needs to influence or make happy.
    Examples: doctors, neurologists, GI specialists, crop dusters, pharmacy directors, hospital administrators, distributors, customers, suppliers, employees, etc.
  4. Click SAVE. You must click SAVE after each step to avoid losing data when you leave this screen. Clicking SAVE elsewhere on the screen does not save data entered into this field.
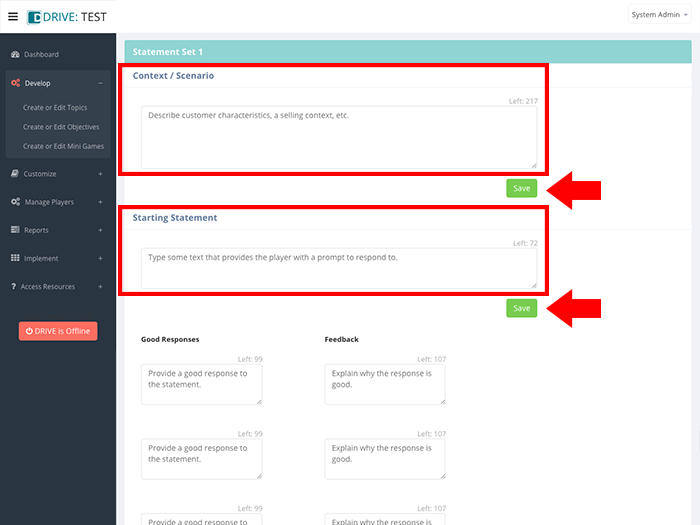
  5. In the field labeled Statement Set 1, enter a specific context or scenario.
    Example: You are meeting with Dr. Jones, a GI specialist. You want to introduce him to bioequivalent biologics as a new therapy option for Crohn’s and IBS that can reduce patient costs for therapy while delivering the same therapeutic benefits as brand biologics.
  6. Click SAVE. (Remember – if you fail to click the appropriate SAVE button, your data will be lost when you leave this screen.)
  7. Enter a Starting Statement that provides learners with a prompt that will guide their decision-making in the game.
    Example: Data on bioequivalency is limited. Your pricing isn’t significantly less than other brands. Why should I consider it?
  8. Click SAVE.
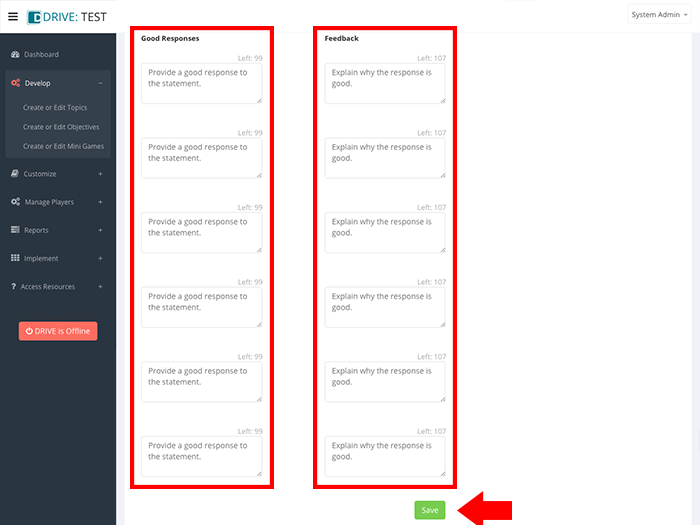
  9. Beneath the heading Good Responses, enter six appropriate responses a learner could make to the Starting Statement. Responses can be in the form of questions or statements.
  10. For each appropriate response, use the fields beneath the Feedback heading to enter an explanation of why each response is a good one.
  11. When all good responses and feedback are entered, click SAVE.
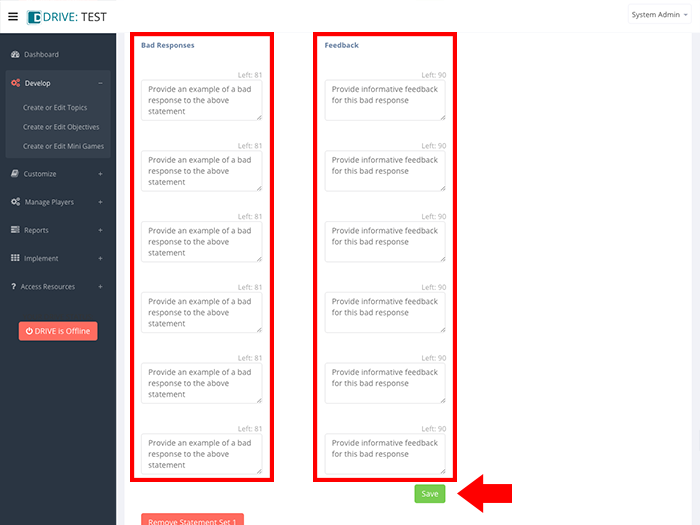
  12. Beneath the heading Bad Responses, enter six inappropriate responses for how players should not respond to the Starting Statement.
  13. For each bad response, use the fields beneath the Feedback heading to enter an explanation of why each response is a bad one.
  14. Click SAVE.
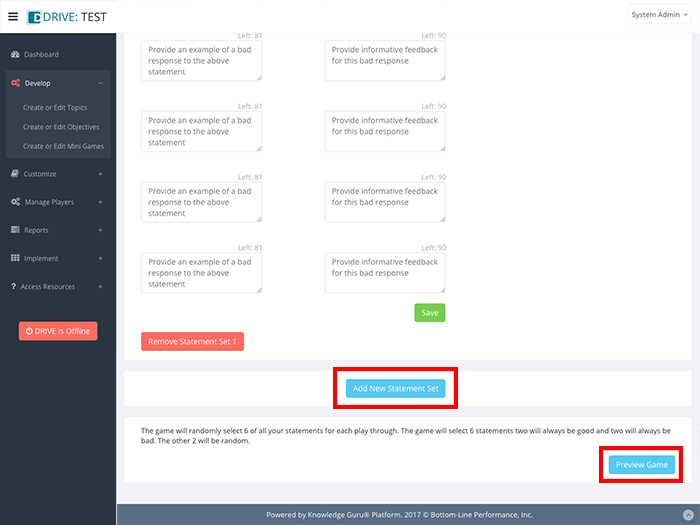
  15. If you want more than the six statements that are the required minimum for the game, click ADD NEW STATEMENT SET at the bottom right of your screen.
  16. When you finish adding content, preview your game by clicking PREVIEW GAME at the bottom right of your screen.

Click through the slideshow below to see the steps in action.

Best Practices

  1. Provide appropriate specificity on the type of person you want players to practice interacting with. (Entered via the Who do you want to make happy field). For example, if a sales rep is selling to GI Specialists, say that as opposed to saying “customers” or “doctors.”
  2. Make sure your context/scenario mirrors the real-world context they have to deal with in their jobs and that it provides cues they need, such as the selling stage they are in or pointers about the status of the relationship with the person they are attempting to influence.
  3. Provide a concise, realistic starting statement.
  4. Include three contexts/scenarios within a game to provide ample practice. You can create a #Happy game with only one context/scenario, but to maximize practice, try for three.
  5. Include some “teach” in your feedback to the good and bad responses. Explain why each one is good or bad.
  6. Consider going beyond six statements for better re-playability of contexts/scenarios. You can re-word a good or bad response to encourage the learner to focus on the feedback and to prevent them from doing well on future play-throughs because they simply memorized responses. Here’s an example of two ways to phrase a response that achieves the same aim.
  • Example: “What safety data have you already seen? (Question) “Here is our safety data.” (Statement)