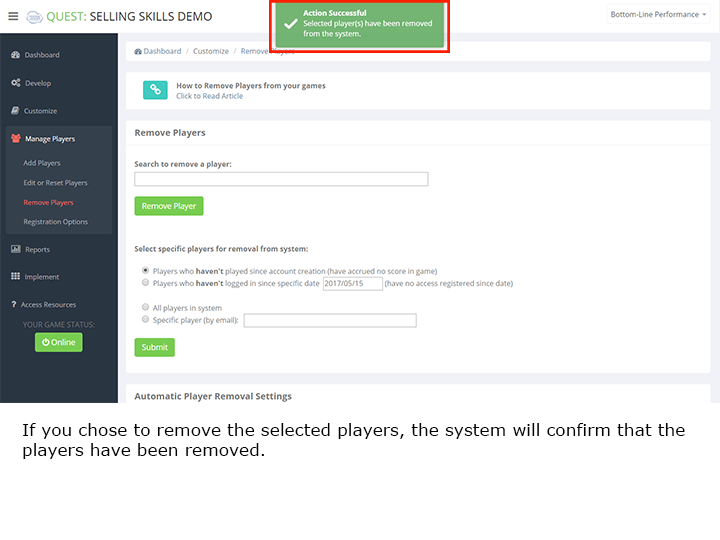
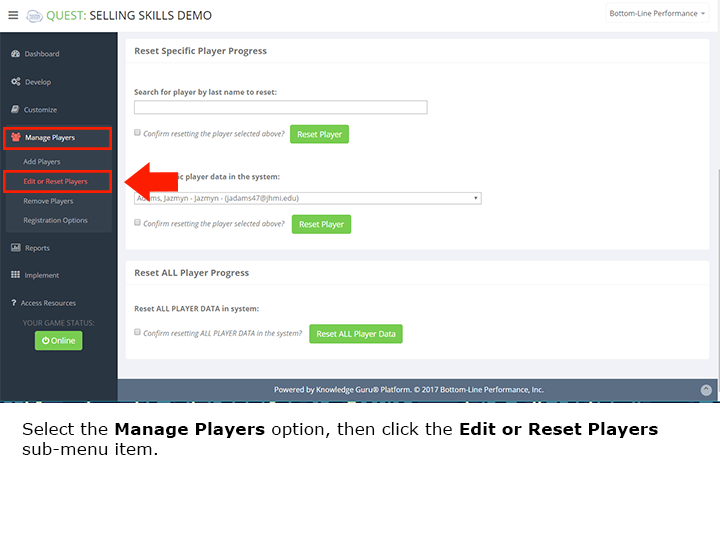
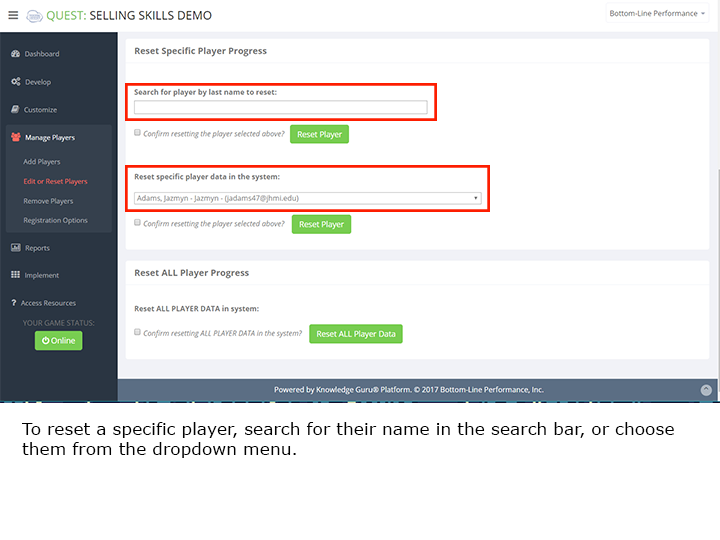
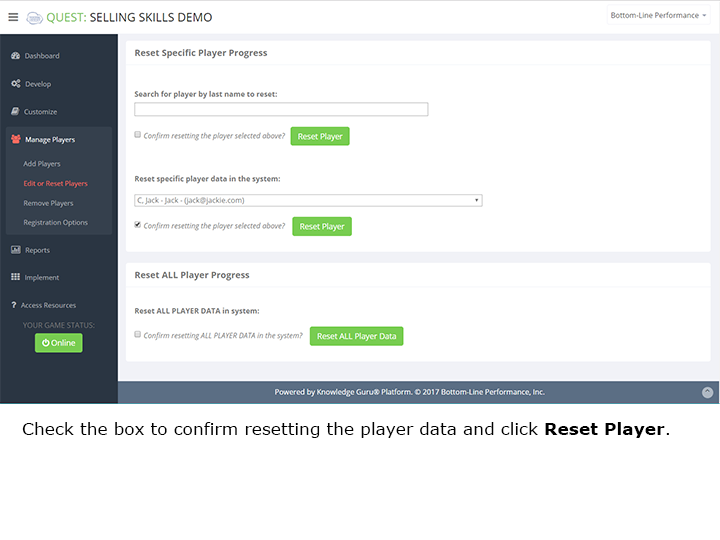
How to Let Learners Log In With Salesforce.com

Knowledge Guru allows your learners to log into their games with their Salesforce.com account. Once learners validate their account credentials, they can log in with Salesforce and see all games registered to their Salesforce email address.

Desktop

From the main login page

  1. Players go to kguru.co/login or theknowledgeguru.com/login and click LOGIN WITH SALESFORCE.
  2. Players enter their Salesforce username and password.
  3. If it is their first time accessing Knowledge Guru from Salesforce, they will authenticate the connection.
  4. After authenticating, players see a list of their assigned games.

From an individual game login page

  1. Players go to their game link (kguru.co/GAMENAME or theknowledgeguru.com/GAMENAME) and click LOGIN WITH SALESFORCE.
  2. Players enter their Salesforce username and password
  3. If it is their first time accessing Knowledge Guru from Salesforce, they will authenticate the connection.
  4. After authenticating, players see a list of their assigned games.

Mobile

From the app login page

  1. Players open the Quest or Drive app
  2. Players tap LOGIN WITH SALESFORCE on the login page.
  3. Players enter their Salesforce username and password
  4. If it is their first time accessing Knowledge Guru from Salesforce, they will authenticate the connection.
  5. After authenticating, players see a list of their assigned games.

How to Invite Learners to Play on Mobile Devices

Are you launching a Knowledge Guru game that learners will play on their smartphones? If so, using these two links will make the process easier: kguru.co/GAMENAME and kguru.co/apps.

1. If players will type the game link into their mobile browser, use the kguru.co short link

All Knowledge Guru games can be accessed using either the full link (Example: theknowledgeguru.com/sellingskills_quest) or the short link (Example: kguru.co/sellingskills_quest). If players must type the link in themselves, sending the send the short link so it is easy for them to do so. This is especially useful when you display the link on a PowerPoint slide in a live event.

The mobile registration pages for Quest and Drive games automatically direct players to download the appropriate app after registering.

2. If you’d like players to download the app BEFORE attending a live event but do not yet want them to register for or log into the game, use the kguru.co/apps page

The mobile-first page kguru.co/apps has links to download the Quest and Drive apps from iOS or Google Play. You can send this link out prior to a live training event so that players have already downloaded the app before they arrive.

If you will pre-register players before they play:
  1. Instruct players to download the appropriate app (Quest or Drive) at kguru.co/apps.
  2. Instruct players to log in with their email address and the default password that you set for them.
If players will self-register:
  1. Instruct players to visit your game URL on their mobile device: kguru.co/GAMENAME.
  2. Players fill out the form to register.
  3. After registration, Knowledge Guru will provide a link to download the appropriate mobile app.
  4. Players download the app, open it and login with their credentials.

For implementation tips tailored to your needs, speak to your Knowledge Guru Specialist.


How to Have Players Self-Register for a Guru Game

Want your players to create their own account for your Knowledge Guru game? Have your players self-register for your game in three easy steps:

Quick Steps for Self-Registration

  1. Send your game link/url to all of your players via email or post it on your LMS.
  2. Explain that players must click the link and fill out the registration form.
  3. Have your players create a username (their email address) and a password.

If you prefer to add players to your Guru game yourself, you can opt to pre-register players. Here’s how to pre-register players for your game.

And for added security, you can restrict access so only email addresses with your company’s domain name can register.

How to Mass Upload Players into a Guru Game

Do you want to spare your players the task of self-registering to play a Guru game? Some organizations do. If email verification is not needed, you can opt to pre-register players for a Guru game. Perhaps you are unveiling a Guru game as part of a conference experience or as part of a live workshop event. In these instances, your goal is to get everyone playing as quickly as possible with as little effort as possible.

If you prefer to let players register themselves for your game, they can do so. Here’s how to let players register themselves.

Mass uploading your players ahead of time may be a perfect solution. You can do this mass import within the MANAGE PLAYERS option in the left-hand menu. You select the Add Players submenu item within it. The Add Multiple Players section is located below the Add a Single Player section.

Two important tips:

  1. Download and use the .CSV template we provide. It tells you exactly what information to include.
  2. Define your user registration fields before you mass import players so that the .CSV file you download includes columns for them.

NOTE: Safari users need to right-click to download the .CSV file.

Click through this slideshow to see a quick tutorial.

Adding and Editing Players in a Knowledge Guru Game

In many cases, you will have players self-register for your game the first time they log in. Other times, you will mass-register players before they play. Sometimes, you may want to add a single player to a game, particularly when you test a game before you release it. For the same reason, editing a player can be helpful. Editing a player’s information is useful, though players do have the ability to self-edit their email address or their name once they register.

Quick Steps for Adding a Player.

  1. Within the MANAGE PLAYERS section, select the Add Players submenu option.
  2. Type in the player information, then click the ADD PLAYER button.

Quick Steps for Editing a Player.

  1. Within the MANAGE PLAYERS section, select the Edit or Reset Players submenu option.
  2. Choose the player you would like to edit from the dropdown menu, or search for a players name. Click the EDIT PLAYER button.
  3. Make your changes to the players’ account information. When you are finished, click the UPDATE PLAYER button.

Click through this slideshow to view a quick visual tutorial.


Removing Players from a Guru Game

All Guru accounts come with a maximum number of players. Periodically, you may want to delete players to help you stay within your limits. You may also simply want to keep your database clean and reuse a game with a new group of players. When you no longer need data associated with players, you can delete them. Here’s what to do:

Quick Steps.

  1. Within the MANAGE PLAYERS section in the left-hand menu, select the Remove Players submenu option.
  2. There are several options for filtering which players will be removed. You may change the Automatic Player Removal Settings if you would like players to be removed after a period of inactivity in your game.
  3. Choose the options that are right for you, then click the SUBMIT button.
  4. You will be given a list of the players that will be removed. You may proceed to removing the players, or cancel and reselect players.
  5. The system will confirm that the selected players have been removed.

Click through this slideshow to view a quick visual tutorial.


How to Reset Player Data

If you need to, you can reset a player’s progress in the game. Here are some times when you might want to do this:

  • You want everyone to replay the game.
  • A single player may request opportunity to replay the game. (Note: In a QUEST game, a player can replay any level without you having to reset the game.)
  • You are testing a game before making it available to all players. (You want to reset your own progress or the progress of testers so they can replay the game.)

Follow these quick steps to learn how to reset player data.

Quick Steps List

  1. Select the MANAGE PLAYERS option in the left-hand menu.
  2. Select Edit or Reset Progress.
  3. To reset a specific player, use Reset Specific Player Progress section located below the Edit Player section. Locate the drop-down menu and select which player’s data you would like to reset, or search for a player to reset.
  4. Once you have selected the specific player, confirm resetting that player by checking the box next to Confirm resetting the player selected above?
  5. Click Reset Player.
  6. To reset all player data, find Reset ALL Player Progress. 
  7. Confirm resetting all player data by checking the box next to Confirm resetting All Player Data in the system?
  8. Click Reset All Player Data.

Click through the slideshow below to see the steps in action.

How to Maximize Game Security

The best way to maximize game security is to control the player registration options. The default setting in Knowledge Guru allows anyone with your game link to play, but you have three options:

  • Public Registration – Players register from the main login page of this Knowledge Guru game. Passwords are set at registration and the player has immediate access. This is the default setting in Guru.
  • Email Verification Required – Players go to the game URL to start the registration process, but must go into their email account to click a verification link to complete the registration and access the game. Players click a link in the email to set their password and then log into the game.
  • Restricted to Domains – Players must have a specific domain name in their email address to gain entrance to the game. With this option, players must also use email verification. The player cannot access the game until they verify their email account, at which time, the player will set their password. Only email addresses from domains listed on the right will be accepted.

Follow these steps to edit the player registration options:

Quick Steps List

  1. Select the MANAGE PLAYERS option in the left-hand menu.
  2. From within MANAGE PLAYERS, select Registration Options.
  3. Select which requirement you prefer, Public Registration, Email Verification Required, or Restricted to Domains. 
  4. If you choose Restricted to Domains, you must specify what domains are acceptable by typing them into the box on the right.
  5. Once you have selected your option, click Update Requirements.

Click through the slideshow below to see the steps in action.