Adding and Editing Players in a Knowledge Guru Game

In many cases, you will have players self-register for your game the first time they log in. Other times, you will mass-register players before they play. Sometimes, you may want to add a single player to a game, particularly when you test a game before you release it. For the same reason, editing a player can be helpful. Editing a player’s information is useful, though players do have the ability to self-edit their email address or their name once they register.

Quick Steps for Adding a Player.

  1. Within the MANAGE PLAYERS section, select the Add Players submenu option.
  2. Type in the player information, then click the ADD PLAYER button.

Quick Steps for Editing a Player.

  1. Within the MANAGE PLAYERS section, select the Edit or Reset Players submenu option.
  2. Choose the player you would like to edit from the dropdown menu, or search for a players name. Click the EDIT PLAYER button.
  3. Make your changes to the players’ account information. When you are finished, click the UPDATE PLAYER button.

Click through this slideshow to view a quick visual tutorial.


Removing Players from a Guru Game

All Guru accounts come with a maximum number of players. Periodically, you may want to delete players to help you stay within your limits. You may also simply want to keep your database clean and reuse a game with a new group of players. When you no longer need data associated with players, you can delete them. Here’s what to do:

Quick Steps.

  1. Within the MANAGE PLAYERS section in the left-hand menu, select the Remove Players submenu option.
  2. There are several options for filtering which players will be removed. You may change the Automatic Player Removal Settings if you would like players to be removed after a period of inactivity in your game.
  3. Choose the options that are right for you, then click the SUBMIT button.
  4. You will be given a list of the players that will be removed. You may proceed to removing the players, or cancel and reselect players.
  5. The system will confirm that the selected players have been removed.

Click through this slideshow to view a quick visual tutorial.


How to Export A SCORM Package

The optimal way to experience a Guru game is via the web application. However, sometimes the organization requires tracking of completion via an LMS. With Guru, you can generate a SCORM package of your game, export it, and provide it to an LMS administrator for upload into your LMS. The game play itself will be the same for players. What will be missing are the leaderboards and any opportunity to see how other players are doing.

On the administrative side, you replace the robust reporting and analytics in Guru with the much more limited reporting typical of an LMS. The game is no longer communicating with the web application database so no reports can be generated from it.

Quick Steps List

  1. Select the IMPLEMENT option in the left-hand menu.
  2. From within IMPLEMENT section, select SCORM Packager.
  3. Make sure your game is ready to export. It must have at least one objective and a question set for each topic you have created.
  4. Click BUILD SCORM 1.2 PACKAGE or BUILD SCORM 2004 PACKAGE.
  5. A link to a zip file will appear. Click the link to download the file.
  6. Once you have the file, you can provide the SCORM package to your LMS administrator for uploading to your LMS.

Be aware

Request a test package from us before trying to load a full game. Use the test package to verify that the game is communicating with the LMS and functioning as expected. Guru is SCORM 1.2 and 2004 conformant. If your LMS requires SCORM, you should always run a test before sending out your course.

Click through the slideshow below to see the steps in action.


How to Use a Legend or Quest Game as Part of a Live Event

Using a Knowledge Guru game as a part of a live event or workshop can enhance the experience. You – or whomever is facilitating the workshop – can display a live leaderboard so players can see their progress – and compete for high point awards. The leaderboard auto-refreshes every 30 seconds throughout game play.

To use a Legend or Quest game in a live event, you need the URL for the live scoreboard. The event facilitator can copy the URL into a browser and project the score board.

Here’s how you locate the scoreboard URL. A live scoreboard is available for both the Quest or Legend game types:

Quick Steps List

  1. In the authoring tool, select the IMPLEMENT option in the left-hand menu.
  2. From within IMPLEMENT, select Live Leaderboards. The URL is located here. Click it to access the Live Leaderboards.

Click through the slideshow below to see the steps in action.


Developing a Quest or Legend Game: Overview of the Steps

A good game is distinguished from a bad game in these ways:

  1. Concise game topics that link to whatever game name you created. (Example: Product Guru should have topics relevant to the products your company sells. Safety Guru should have topics related to safety.)
  2. Measurable, specific topic objectives that link to the topic.
  3. Well-written game questions that assess a learner’s ability to meet the topic objective.

For Quest games, you also need relevant performance challenges that give the learner an opportunity to do something that furthers their learning or builds their skill.

This post outlines the basic process of designing a game, whether you are doing it yourself or involving another subject matter expert (SME) who will help you with game content.

Note: for help developing a Drive game, click here.

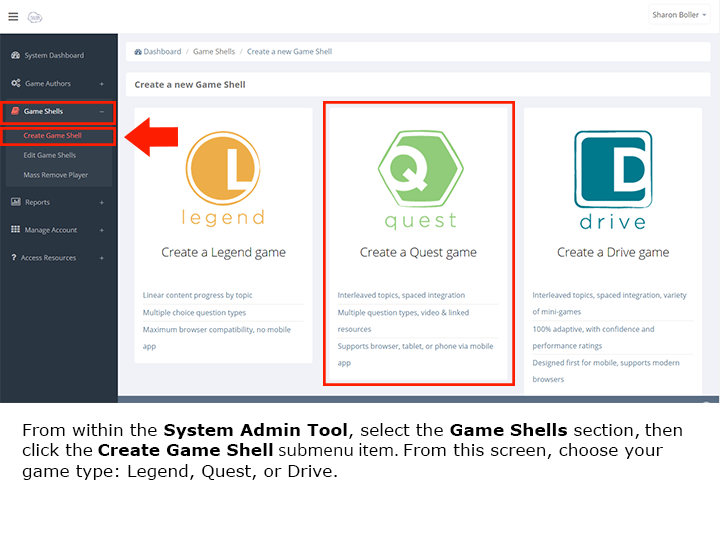
Step 1: Decide which game type is best: Quest, Drive, or Legend

Quest games can have up to 7 topics (but must have at least 3). They typically include “performance challenges” as well as game questions. They are often used as part of a multi-day or multi-week learning initiative. Drive games can have an unlimited number of minigames, but they are designed to be played for 5 minutes at a time.

Legend games can have up to 4 topics. They tend to be played in a single play session, though players can play across several sessions if they want. They leverage leader boards to focus on competing against other teams or individuals.

Let’s assume I decide on a Quest game to go with my product launch of a new pharma product called PainAway.

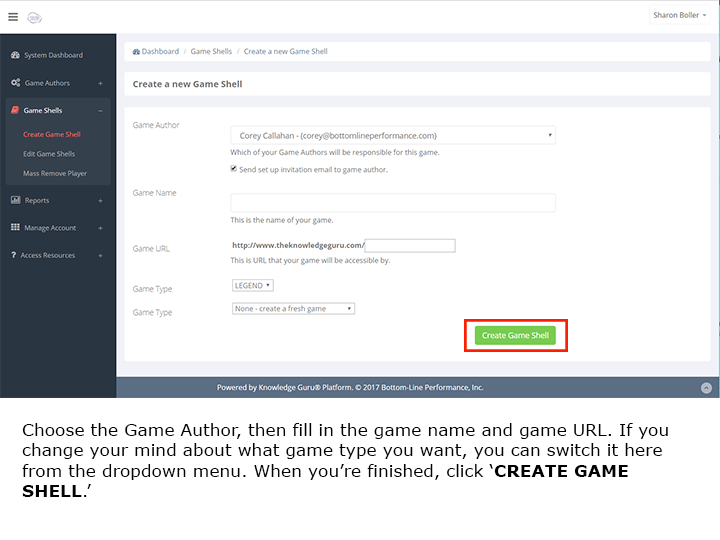
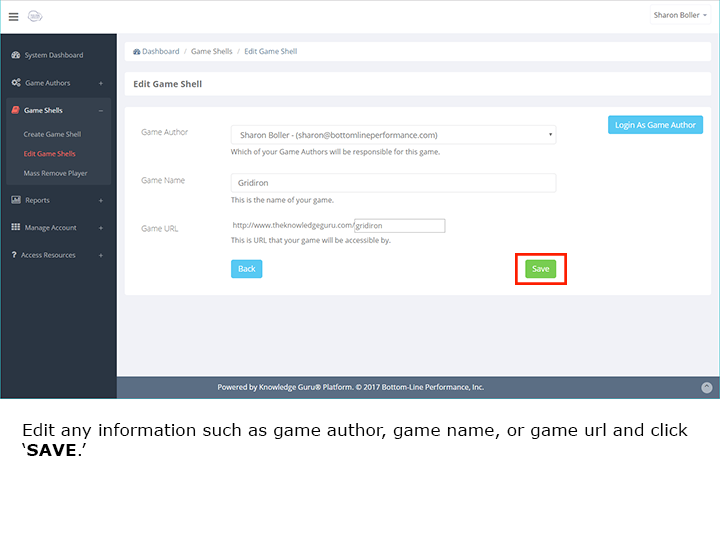
Step 2: Give Your Game a Name.

Decide on an appropriate game title so you can generate a “game shell” to use in creating your game. The game’s title should be a cue to learners as to what they are going to become a Guru on – a product, a process, a concept, a company, etc.

I’m going to call my game PainAway. My players will see it as “PainAway Guru” when they log in to play as the software automatically puts the word “Guru” onto whatever title I give the game.

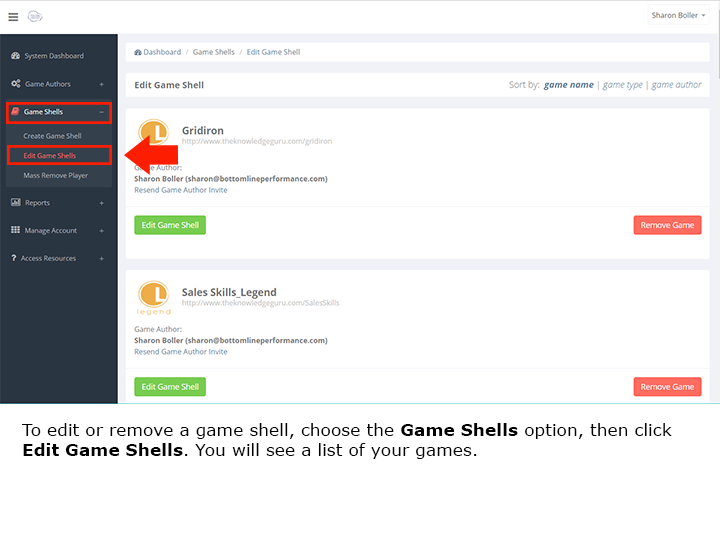
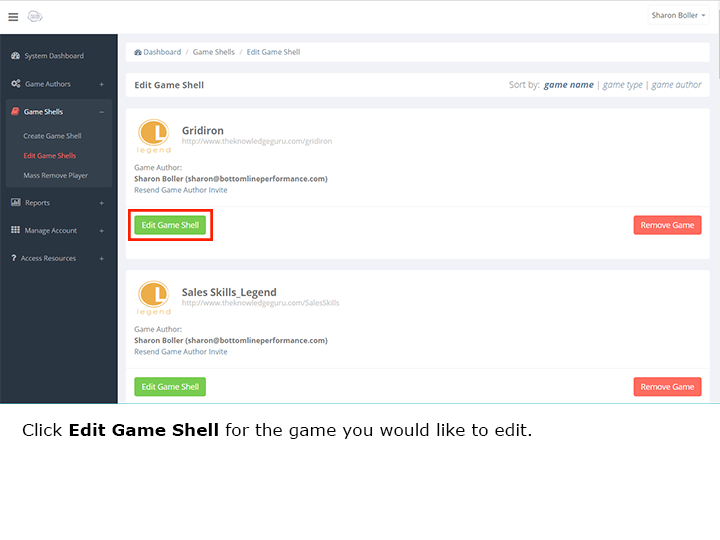
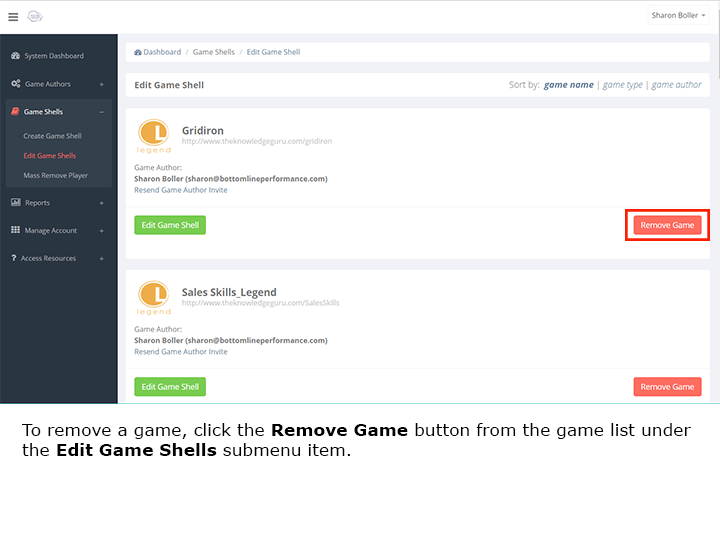
NOTE: The System Administrator is the individual who generates game shells that are used to create a game. If you do not have system administrator privileges you will have to discuss the game name with the system administrator before they create your game shell.

Step 3: Create Your Game Topics

Figure out the topics that should be part of your game. You enter these topics in the Develop menu item within the Create or Edit Topics submenu item. Your topics should be concise and organize the game’s content into categories of knowledge related to the game title.

Brainstorm topics by asking yourself: “What do I need for people to KNOW or DO related to the game’s title (safety, product, process, etc.)?” Categorize your ideas into topic titles. For a Legend game type, you can have up to 4 topics. For a Quest game, you can have up to 7 topics.

Example: For “PainAway Guru” I ask myself what I need for people to know or be able to do related to the product. My target players are the sales reps who will sell this product to doctors. I need sales reps to know: 1) what the product does, 2) the research data that show it works, 3) who the product can benefit, 4) the sales messages for it, and 5) possible customer objections. I want them to practice doing these things: 1) selecting the right sales message for a specific customer type, 2) correctly linking clinical trial data results to a specific product feature or benefit, and 3) choosing the best way to respond to an objection. Based on that list, these become PainAway Guru’s 5 topics: “How It Works,” “Who It Is For,” “Clinical Trial Results,” “Selling Messages and Markets,” and “Objections and Answers.”

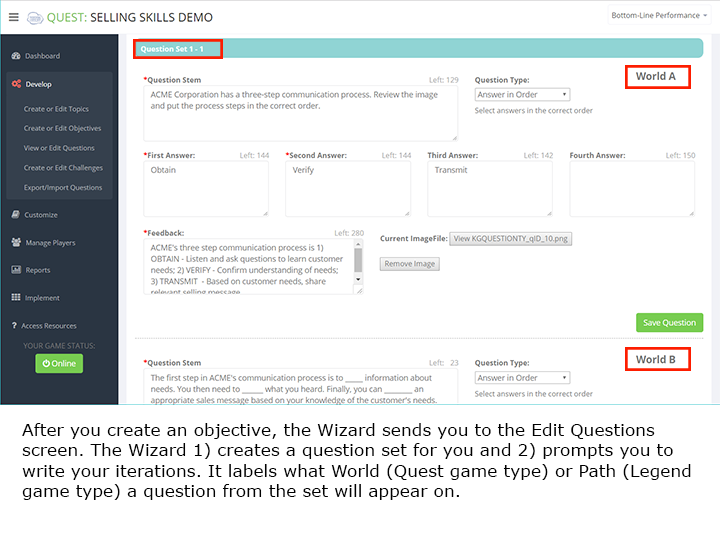
Step 4: Create the objectives for each game topic.

Repeat the exercise you did in Step 2, but this time think more narrowly. Ask yourself: Within a topic…what do learners need to KNOW or DO related to that specific topic? Be very specific. Here’s some examples from PainAway Guru’s final topic, Objections and Answers:

  • Identify the three most common objections doctors may make to PainAway.
  • For each objection, provide an accurate answer to the objection using clinical trial results where appropriate.

To input your topic objectives, go to Develop menu item in the authoring tool and select the Create or Edit Objectives submenu item.  Type in an objective and click Submit New Objective. If you want to re-do an objective, simply type over it and click Save.

Realistically, a game topic should limit itself to 1-5 objectives, depending on how specific you make them. You need at least 1 question set for every objective you create.

Step 5: Create your question set(s) for a given objective in a topic.

For any topic, you want no fewer than 3 question sets in it and no more than 10 question sets in it. Learners become fatigued at game play if you include too many questions in a topic. Their ability for good recall also goes down. If you average 7 question sets per topic, you generally have a reasonable number without making the game too arduous or difficult to complete. Keeping within limits sometimes means eliminating topic objectives or narrowing objectives down. 

After you create an objective for a topic, the authoring tool automatically sends you to a question creation screen. This automation is great for novice game developers since it ensures that you craft at least one question set for each objective you include in a topic. More experienced game developers may prefer to write all the topic’s objectives before writing question sets. To do this, use the left-hand menu to navigate back to the Create or Edit Objectives submenu item under the Develop section.

How many question sets do I write for each objective? 

The answer depends on how specific you made your objective. Sometimes you may use up to 6 question sets to fully meet an objective you wrote. Other times you may only need a single question set.

  • In the PainAway Guru game, I can satisfy the objective of Identify the three most common customer objections with a single question set if I creatively use fill-in-the-blank and other approaches. Within three iterations, I will have learners able to state the three objections customers may make.

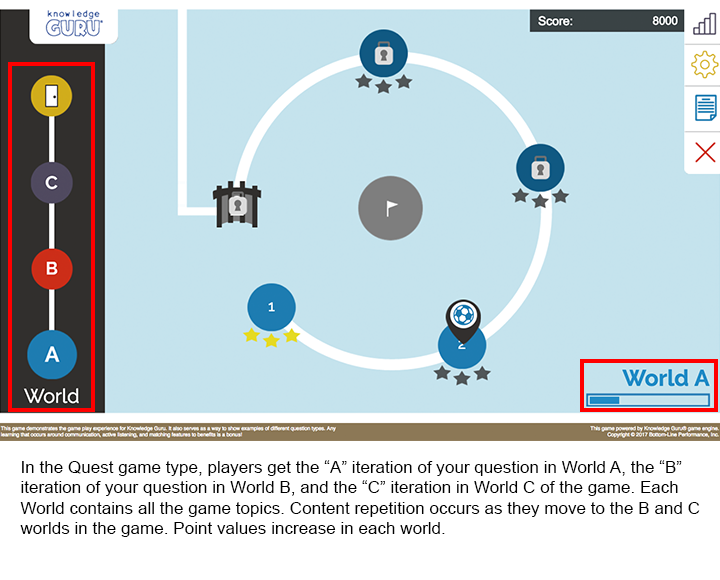
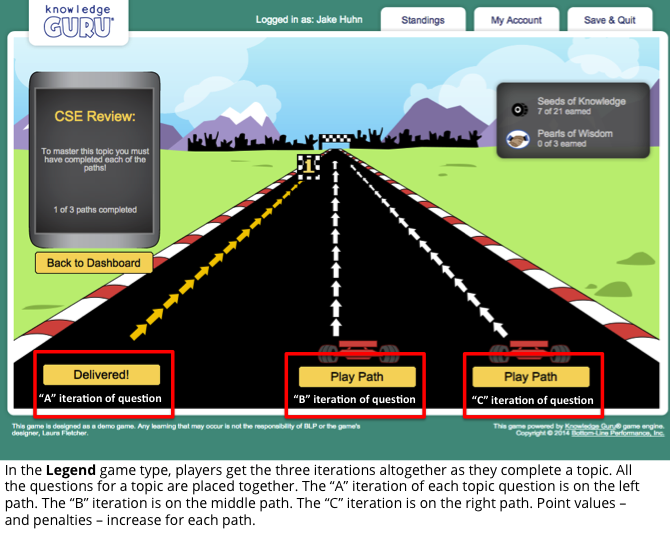
Always remember that your player does not see your three iterations back-to-back. These iterations are spread across paths in a Legend game type and across Worlds in a Quest game type. This repetition is a very good thing for reinforcing content and helping long-term retention of the information.

Step 6: Create Performance Challenges (Quest) or End-of-Topic Questions (Legend).

In a Quest game type, you can include up to six performance challenges in each game World (A, B, C).  Learn How to Create Performance Challenges.

In a Legend game type, players get a fun “End-of-Topic” question after they finish the final path in a game topic. The “End-of-Topic” question is NOT included in the database of all your game questions. Players do not encounter these questions when they play the “Grab Bag” or “Elite Champion” level of game play after they achieve Guru status in your game.

You create “End-of-Topic” questions under the Develop section by selecting the Edit End-of-Topic Questions submenu item.

Step 7: Customize Your Game Shell.

You can change the background color, theme, logos, and footer in your game. You can also add customized registration fields. In a Quest game type, you can also select game spacing options. These customizations are all easy to do within the Customize section of the left-hand menu. This Tutorial Explains the Game Customization Process.

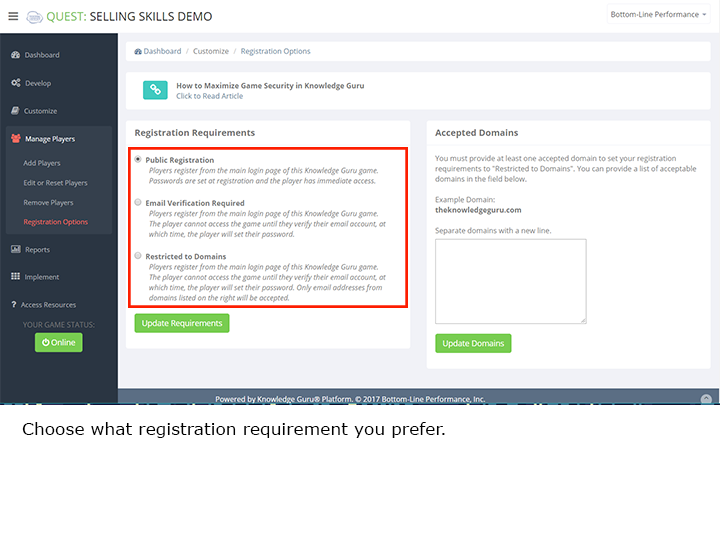
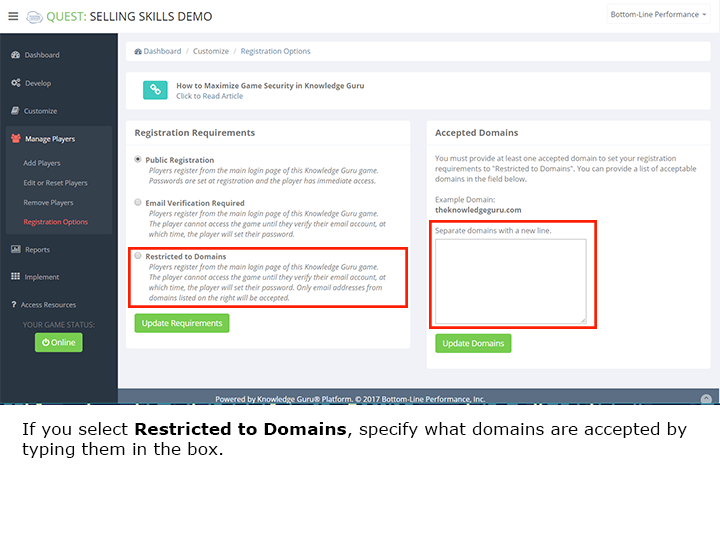
Step 8: Select the Right Security Level.

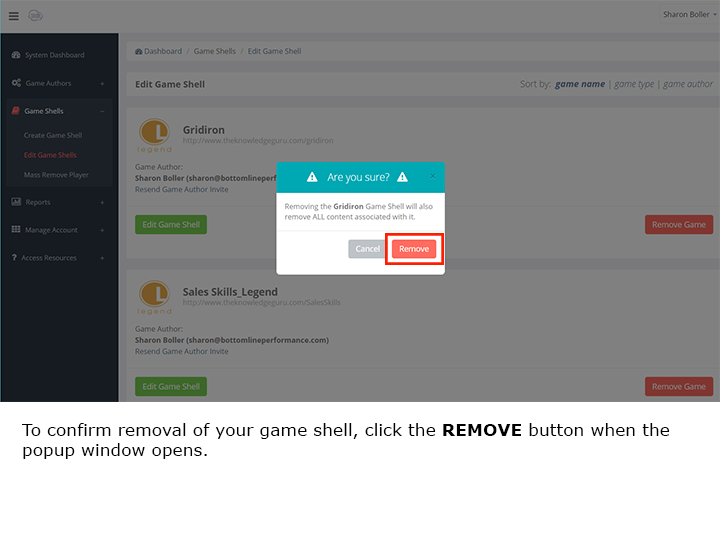
Do you want open registration where anyone who has your game’s URL can play or do you want to restrict access? You can review the security options here and see a tutorial here.

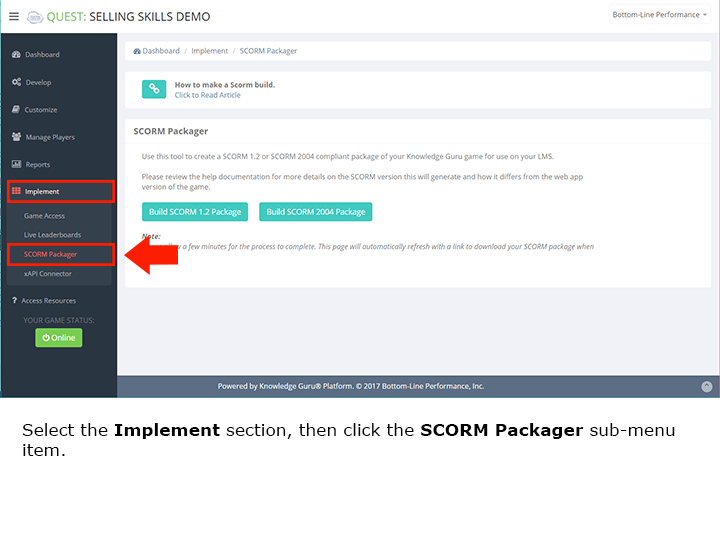
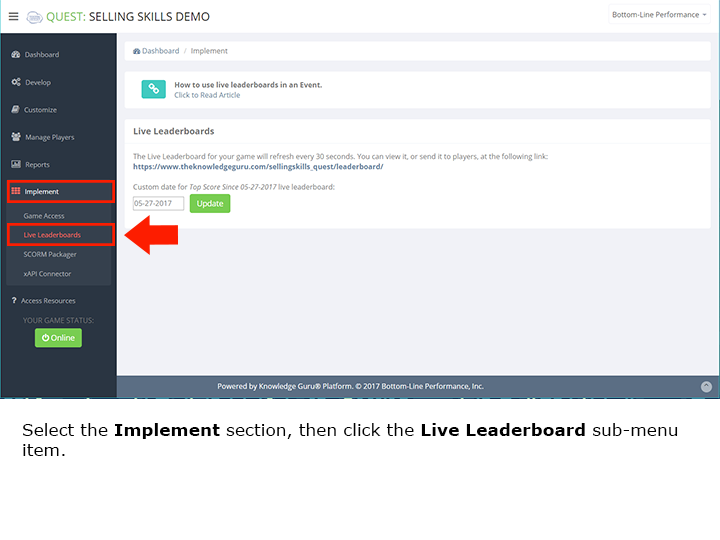
Step 9: Implement Your Game

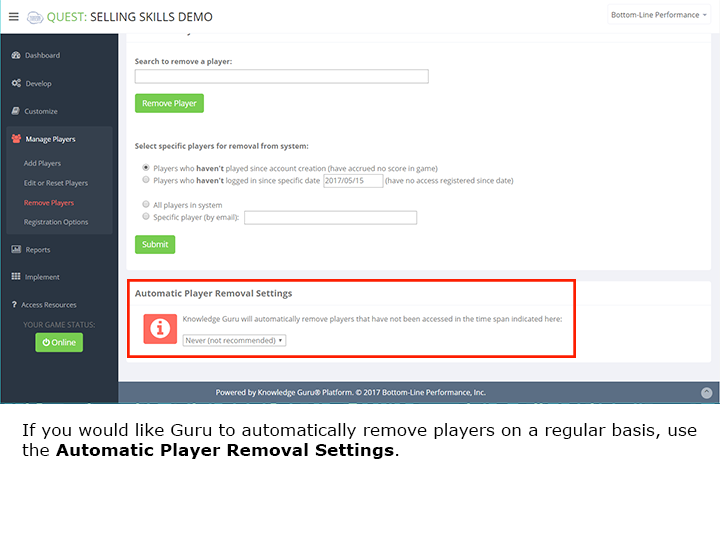
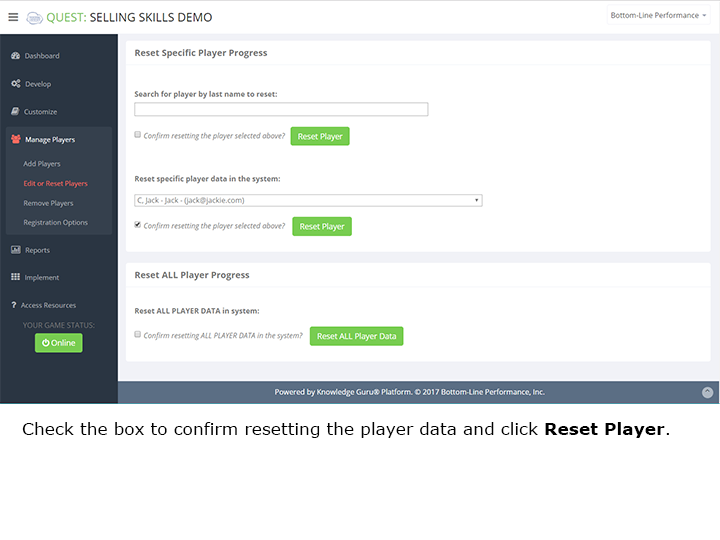
Making a game live is simple. Go to the Implement section and choose the Game Access submenu item, then change your game access to ONLINE. You may also click the Game Status button in the bottom left-hand corner of the screen for quick access.

Understanding Question Iterations & Writing Good Questions

There are three keys to creating a good game in Knowledge Guru:

  1. Clear, relevant game topics that have importance to the learner (e.g. there’s some reason these matter).
  2. Well-written, specific objectives that link to the game topic they are associated with.
  3. Well-written, relevant question sets that assess a player’s ability to meet the topic’s objectives.

This post focuses on number 3.

Understanding the concept of “question sets”

Creating good Guru questions starts with realizing that you need to create “question sets.” For every topic objective, you need at least one “question set,” which includes 3 iterations of your content. The slides below explain what a “question set” is and how each question in a set appears in a Quest game type and a Legend game type.

12 Tips for Writing Good Questions

Once you grasp the concept of the “question set,” you can start crafting good questions. Follow these 12 tips for success.

  1. Use the topic objectives to help you write the questions. The questions you write should directly assess the player’s ability to achieve the objectives.
  2. Keep sentences short. Break a long sentence into two shorter ones. You typically are not assessing reading comprehension so make sentences easy to read and understand.
  3. Spell out your first use of acronyms unless you are 100% positive that every player will know their meaning.
  4. Avoid making the longest response choice the correct one. This is a common mistake. Learners instinctively will want to pick the longest response because odds are high it is the correct one.
  5. Keep response options short when you can. Again, do not make the game about reading comprehension.
  6. Use images when they can be helpful. Often a chart can help you present a series of steps or terms. An image cal also help you create a scenario that can include details that will not fit into a standard Question Stem box. We created a short demo game that uses lots of images so you can see what we mean. You can register for – and play – this game here. We made the content generic, but it draws on concepts we have seen in client games.
  7. Put the players in the question when it makes sense. “You are at a customer site.” “You just saw a safety incident.” “Your customer just told you he likes your competitor’s product better.” Learners want content that feels personal to them and their jobs.
  8. For times you need a “select all that apply” use an image to show case options. You cannot do a “select all that apply” by inserting options in the response fields. See the demo game to get ideas on how to do “select all that apply.”
  9. Make sure your feedback for a missed question is the same or similar for all three iterations (A, B, C) you create in a question set. It is the easiest way to verify that you have written iterative questions. After you write your learning objective, try writing the feedback for a missed question first and then writing the question itself. This helps verify that you are writing a question that links to your objective – and that your objective is specific enough. You can then copy/paste the feedback into the “B” and “C” feedback fields and write your “B” and “C” questions to match this feedback. You may tweak feedback across iterations, but the core message should be the same.
  10. Do not use a big word or phrase when a smaller one will do. “Use” is better than “utilize.” “To” is better than “in order to,” etc.
  11. Incorporate scenarios. People use factual information in context on their jobs so make the questions contextual as well. Instead of “Review the chart. Which behaviors show active listening?” try “You just finished a meeting with Dr. X. Review the image to get a description of your meeting. How effective were you at active listening?”
  12. Avoid “all of the above” or – even worse “none of the above” as response choices. Do not make a game about figuring out what does not belong. This is a different skill set entirely than figuring out what should be part of something.

Creating Good Topics & Objectives for Quest & Legend Games

There are three keys to a successful Knowledge Guru game:

  1. Relevant topics
  2. Strong, specific objectives that relate to the game topics.
  3. Well-written, relevant questions that link to the objectives.

This post focuses on the objectives you create for a Legend or Quest game, and gives you tips on creating good ones…and avoiding bad ones. Click here for help on creating Objectives in a Drive game.

A well-written objective links tightly to the topic it is associated with. It is also actionable and specific: it focuses on what you want the learner to know or be able to do related to the topic. Check out the image below. The objectives on the left are not good, but frequently mirror what we see game creators use. The ones on the right are much better. Can you figure out the difference?

GoodVsBadObjectives2

The bad objectives tend to use verbs that are impossible to measure or quantify such as “know” or “understand.” (How do you know that someone “knows” a subject? Typically you say someone “knows” something if they can explain, describe, distinguish, analyze, etc….). Know is a very big word. It can mean lots of things.

The good objectives are very specific. They are clear about what the learner should be able to do after playing the game. They limit what the objective covers (define and explain five mobile market terms as opposed to a vague “know mobile marketing terminology.”)

Why does this matter?

The objectives should tie directly to the question sets you create in the game. Your game questions should assess someone’s ability to perform the objectives you have written.

You can easily write 5 question sets related to “define and explain 5 mobile marketing terms: mobile originating messages, mobile terminating messages, SMS, MTA, key word, and FTEU.” It’s far harder to know how many questions you need to write to cover the objective “know mobile marketing terminology.”

If you write a clear, specific objective, you will find it very easy to write corresponding question sets. If you write weak objectives, you will struggle or you will have questions that do not really link to your objective. They are almost random questions and are less about what you want learners to do and more about what you want to tell learners about a topic.

If you need ideas on how to come up with better verbs to use in writing your objectives, check out Bloom’s taxonomy. It will help you think about the cognitive skill you want learners to do and provide verb choices that match.

But do learners ever see the objectives I write?

Yes, they do! In a Legend game type, these objectives are the “Pearls of Wisdom” that players earn on the third path of each topic when they successfully respond to the final question associated with an objective. In a Quest game type, learners get a game summary report  that lists out the objectives they achieved in playing the game.

  1. Use verbs that clarify what the learner is supposed to do: explain, describe, identify, compare, distinguish, choose, etc. (See Bloom’s taxonomy for ideas.)
  2. When appropriate, specify a condition for performance: “Given a selling scenario,…” “Given a specific objection by a customer,…”
  3. Always be specific in stating what the learner has to do. This helps you formulate good questions and set reasonable limits. Examples:
    1. List five steps” rather than “List all the steps.”
    2. Name the three biggest benefits of Product X” rather than “Know all the benefits of Product X.”

How to Reset Player Data

If you need to, you can reset a player’s progress in the game. Here are some times when you might want to do this:

  • You want everyone to replay the game.
  • A single player may request opportunity to replay the game. (Note: In a QUEST game, a player can replay any level without you having to reset the game.)
  • You are testing a game before making it available to all players. (You want to reset your own progress or the progress of testers so they can replay the game.)

Follow these quick steps to learn how to reset player data.

Quick Steps List

  1. Select the MANAGE PLAYERS option in the left-hand menu.
  2. Select Edit or Reset Progress.
  3. To reset a specific player, use Reset Specific Player Progress section located below the Edit Player section. Locate the drop-down menu and select which player’s data you would like to reset, or search for a player to reset.
  4. Once you have selected the specific player, confirm resetting that player by checking the box next to Confirm resetting the player selected above?
  5. Click Reset Player.
  6. To reset all player data, find Reset ALL Player Progress. 
  7. Confirm resetting all player data by checking the box next to Confirm resetting All Player Data in the system?
  8. Click Reset All Player Data.

Click through the slideshow below to see the steps in action.

How To Add, Edit, or Remove Game Shells

As a System Admin, you have the power to add, edit, or remove game shells. A game shell is a game that does not yet have content in it and hasn’t been made “live.” Every game starts out as an empty shell that an author has to populate and then convert from offline status to online status. The Game Author will determine if the game shell should be for a Quest game, or for a Legend game.

Follow these steps to add, edit, or remove game shells.

Steps for Creating a Game Shell:

  1. In the System Admin tool, locate the GAME MANAGEMENT area.
  2. Click Create New Game Shell.
  3. First, Select the game author from the drop-down menu.
  4. Create a game name and URL.
  5. Choose a game type: Legend or Quest.
  6. Lastly, click ‘CREATE GAME.’

Steps for Editing or Removing a Game Shell:

  1. In the System Admin tool, located the GAME MANAGEMENT area.
  2. Click Edit Game Shells.
  3. Click through the slide show below to see the steps in action.
  4. Choose which game to edit by selecting a game in the drop-down menu.
  5. In the Edit Game Shell section, change the game author, name, or URL.
  6. Click ‘UPDATE GAME.’
  7. To remove the game, locate the checkbox under Remove this game?
  8. Click ‘REMOVE GAME.’
  9. Click ‘YES I AM SURE.’

Click through the slide show below to see the steps in action.

How to Maximize Game Security

The best way to maximize game security is to control the player registration options. The default setting in Knowledge Guru allows anyone with your game link to play, but you have three options:

  • Public Registration – Players register from the main login page of this Knowledge Guru game. Passwords are set at registration and the player has immediate access. This is the default setting in Guru.
  • Email Verification Required – Players go to the game URL to start the registration process, but must go into their email account to click a verification link to complete the registration and access the game. Players click a link in the email to set their password and then log into the game.
  • Restricted to Domains – Players must have a specific domain name in their email address to gain entrance to the game. With this option, players must also use email verification. The player cannot access the game until they verify their email account, at which time, the player will set their password. Only email addresses from domains listed on the right will be accepted.

Follow these steps to edit the player registration options:

Quick Steps List

  1. Select the MANAGE PLAYERS option in the left-hand menu.
  2. From within MANAGE PLAYERS, select Registration Options.
  3. Select which requirement you prefer, Public Registration, Email Verification Required, or Restricted to Domains. 
  4. If you choose Restricted to Domains, you must specify what domains are acceptable by typing them into the box on the right.
  5. Once you have selected your option, click Update Requirements.

Click through the slideshow below to see the steps in action.