How to Create a Drive Game for Languages Other Than English

Want to launch a Drive game to a global audience? No problem. Drive games can be created in seven languages besides English:

  • Chinese
  • French
  • German
  • Italian
  • Japanese
  • Portugese
  • Spanish

The authoring tool is in English, but content can be input in the language of choice. All player-facing game text will appear in the language you select when you preview or publish your game.

How to choose an alternate language:

  1. Expand the Customize option within left-hand navigation pane, and choose Drive Appearance.
  2. Scroll to Choose Your Game Language.
  3. Use the drop-down menu to select the language in which you want your game to appear to players.
  4. Click SAVE.

Click through the slideshow below to see the steps in action.

How Big Should a Knowledge Guru Game Be?

Customers frequently ask us, “How big should my Knowledge Guru game be?”

We respond back with “It depends.” Game “size” really means the number of topics you include in the game and the amount of content you include in terms of learning objectives, questions (Quest) or content for each mini-game (Drive).  The biggest two factors influencing game size are: 1) the way you intend for players to interact with the game, 2) the number of learning objectives you intend for the game to support.

There are three possible ways you can plan for learners to interact with your game:

  • Play through the entire game in a single session at a time of their choosing. This scenario automatically means you are using a Quest or Drive (with Custom minigame delivery enabled) game type. It should also trigger you to design a shorter game with a maximum of five topics (Quest allows up to 7 and Drive allows up to 7). Plan to keep each topic small: 4 to 6 question sets per topic for Quest and 1-2 learning objectives per topic for Drive. This will give players about 15 to 30 minutes of gameplay time and enable you to introduce or reinforce the most essential content.
  • Space play over time. Both Drive and Quest are designed for spaced play. With Quest it is an option. With Drive, it is required for Daily 3 minigame delivery and an option with Custom minigame delivery. With spaced play, your game can have more content within it because players only see a portion of it at a time. A Drive game that uses Daily 3 controls the interaction, limiting it to about 5 minutes per day so your larger question is how many days do you want them to have to play to see all of your game’s content. With Custom minigame delivery, you can space play in a few ways: by date, by score, in sequential order (one game won’t unlock until the previous game has been played), or by context (players must play all contexts of a game before the next unlocks). With Quest, you can space play two ways: a level per day (1 topic and 1 set of questions associated with that topic) or a world per week (all topics and one set of the questions associated with all those topics).
  • Play a Quest, or Drive game with Custom minigame delivery as part of a live event. In this scenario, you are going to specify a certain amount of time be spent in game play. This absolutely dictates the amount of content you can include. You cannot have more questions or minigames within a topic than someone can reasonably complete in the time you are allocating for game play.

Be very aware that learners read and process information at different speeds. Learners spend widely varying amounts of time to complete the same game. Their processing speed depend on reading proficiency, education level, their native language, and their familiarity with the content. Factor these things into your judgment of how much content to include.

Use the links provided below to get specific guidance by game type.
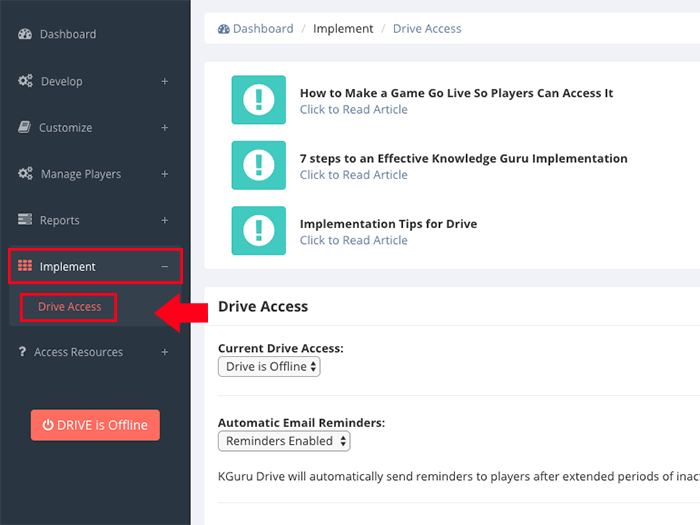
Drive

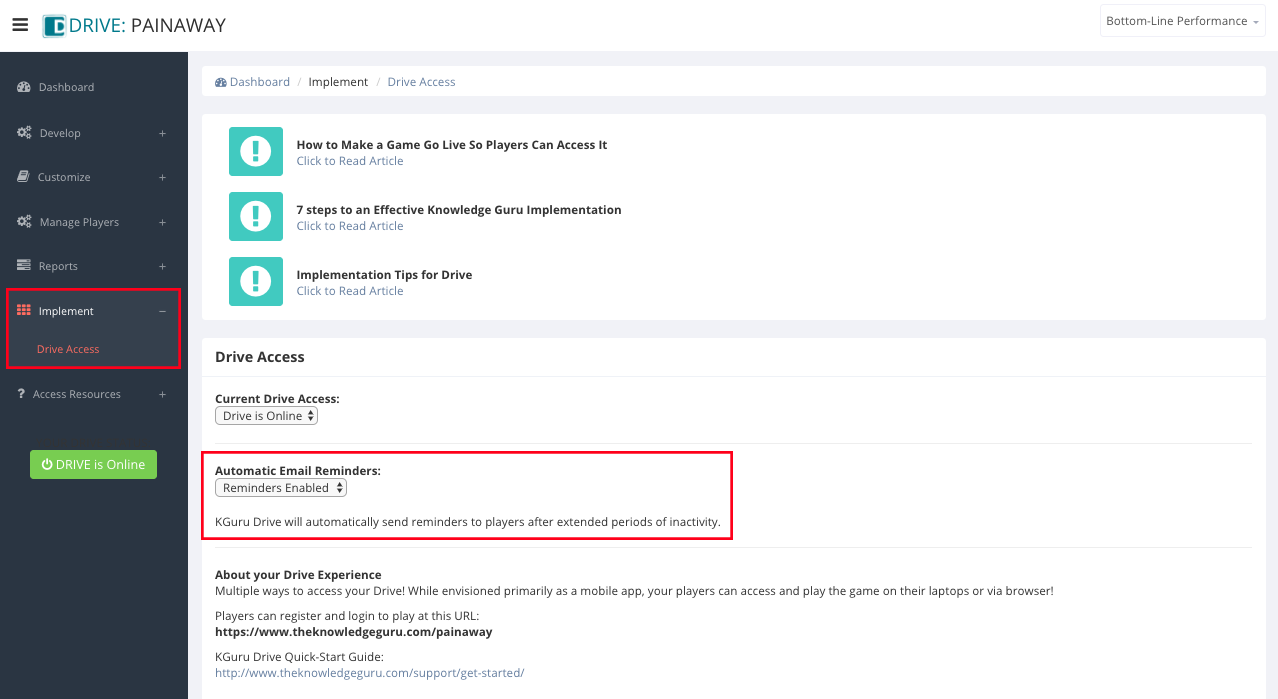
Drive has two minigame delivery methods: Daily 3 and Custom.

  • The Daily 3 minigame delivery method is approximately 5 minutes and provides players with three different mini-games to play each time. A meaningful Daily 3 minigame delivery experience means that each of the mini-games you create contains sufficient content so that players will encounter unique content in that game over at least three instances (daily games) of play. This ensures you are giving players sufficient “retrieval practice” for every learning objective you have. (Remember – each mini-game you create is associated with a single learning objective.)
  • Custom minigame delivery allows game authors to customize how much content players encounter at one time. With Custom minigame delivery, you can space play in a few ways: by date, by score, in sequential order (one game won’t unlock until the previous game has been played), or by context (players must play all contexts of a game before the next unlocks).

Guidelines for Drive vary by use case.

  • For Drive games played over time, target seven to nine days of game play. This should allow players to play all the games multiple times and equates to about 45 minutes spent with the app over a period of two to three weeks’ time with a goal of playing three times per week.
  • For Drive games meant to be played in a single sitting, target 15-30 minutes of game play. This is a realistic amount of time for most players to spend in one sitting.

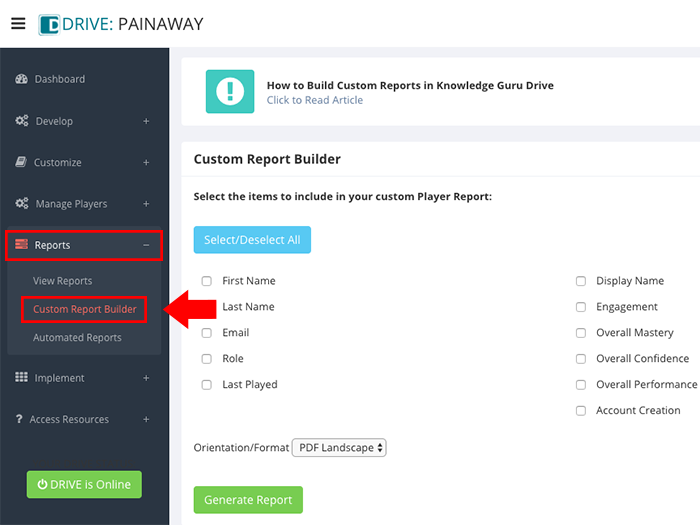
There are six unique mini-games you can create within Drive. The guidelines below will help you create games.

Balloon Burst

Balloon Burst enables you to identify a minimum of two categories to as many as six. For each category you include you must create statements that a player can associate with that category. The minimum number of statements required for a category is three. For an optimal game, provide at least six statements for each category if you only have two categories or five statements per category if you have three or more categories.

For additional Balloon Burst best practices, click here.

Fish Finder

Fish Finder, like Balloon Burst, lets players associate facts with categories. The minimum number of categories you can include in a game is two; the maximum is seven (which could create a very large game!). The same guidelines apply: if you have only two categories, make sure each one has at least six statements. If you have three to four categories, make sure each one has four or five statements. If you have more than five categories, then you may want to limit the number of statements per category to three or four.

A single instance of Fish Finder will require players to respond to a minimum of 4 statements and a maximum of 8 statements.

For more details on Fish Finder, click here.

Forest Flight

For an optimal player experience, you will want to create three unique branched scenarios. Each scenario requires that you have at least two branches associated with it; you can have three. Each branch can include up to three choices; you must have at least two.

Branched scenarios take time to write, which is why Drive allows authors to only create two for a valid game. However, if you truly want to provide sufficient practice for a player, you will take the time to create three unique scenarios.

For complete information on how to create a Forest Flight game as well as best practices, click here.

#Happy

Include three contexts/scenarios within a game to provide ample practice. You can create a #Happy game with only one context/scenario, but to maximize practice, try for three.

Consider going beyond six statements for better re-playability of contexts/scenarios. You can reword a good or bad response to encourage the learner to focus on the feedback and to prevent them from doing well on future play-throughs simply because they memorized responses. Here’s an example of two ways to phrase a response that achieves the same aim.

  • Example: “What safety data have you already seen?” (Question) “Here is our safety data.” (Statement)

For additional #Happy best practices, click here.

Knowledge Knight

Games require at least six questions to ensure a minimum of two play-throughs of the game. We recommend creating nine questions. This ensures variety, but keeps the number of playthroughs required for mastery to a reasonable amount.

An ideal series of three questions includes one question that encourages recall of knowledge coupled with two questions that require application of that knowledge in a job context the learner will encounter in the job.

For additional Knowledge Knight best practices, click here.

Safecracker

For an optimal player experience, include at least three needs (aka scenarios), which results in three unique rounds of the game. The maximum number of unique needs is five.

Each time the game is played, it will display two distractors along with the correct responses for each benefit and feature. When you create your game, re-use distractors across benefits and across features to verify that your learners can truly associate correct benefits with needs and correct features with benefits.

For additional Safecracker best practices, click here.

Quest Game Size

Like Drive, Quest is designed to maximize learner retention of content. However, if you overload your game with too much content, you will hurt your players’ ability to remember. Novice authors can go a bit crazy on crafting questions and suddenly find themselves with 8, 9, 10 or even 11 question sets within a single topic. The result is player fatigue and overload. They end up remembering very little.

Quest requires you create a minimum of three topics with a maximum of seven topics. We recommend creating a minimum of three question sets per topic. Consider whether spacing is applied when deciding on the maximum number of questions within a level. Also assume players need 30 to 45 seconds to respond to a question when calculating how long play will take.

Player perspective: If I am playing a level per day, then eight or nine questions doesn’t seem like a big deal. If I play an entire game all at once, then eight or nine questions in a level is too many. In such cases, limit the number of questions within a level to four to six questions and vary the number from level to level.


Monitoring and Analyzing Player Mastery, Confidence and Engagement in Drive

Drive monitors and reports on three critical player attributes that work together to provide you with information that influence a player’s performance in Drive: confidence, engagement, and mastery. Mastery and engagement can be monitored from the author’s dashboard, as shown in Figure 1, as well as within various reports available from the Reports section of the authoring site. Confidence and mastery are shown on a variety of reports related to topics and learning objectives. (Figure 2) All three attributes are showcased on the player progress report. (Figure 3)

drivekb-mastery2-1

Figure 1. Player mastery and Player Engagement can easily be monitored from author’s dashboard.

drivekb-mastery2-2

Figure 2. A variety of Drive reports available via the Reports section of the authoring site showcase confidence and mastery levels, enabling you to see where learners are performing well and where they need additional support or more time in Drive.

drivekb-mastery2-3

Figure 3. The Player Progress report shows you engagement, mastery, and confidence for every registered player.

The three attributes are interrelated so understanding each of them can help a manager coach employees or a game author to coach the managers whose employees are participating in the Drive game. Let’s look at each one.

Mastery

Mastery ratings indicate how well players can perform the learning objectives specified in a Drive game. Players always start with a “low” mastery rating. The speed with which they move to a “high” rating depends on how well they perform within the mini-games. They need to successfully master all the content within the games, which typically requires 3 to 5 plays of each mini-game at a minimum. (Exact number will depend on how many mistakes they make and how much content your games include.)

  • Because Drive, like all the Knowledge Guru apps, is designed to provided learners with spaced repetition/retrieval practice, the goal is for them to acquire mastery over time – a span of a few weeks rather than within a single session or two. Players’ performance mastery rating will adjust based on their most recent scores on any game they play.

What to analyze related to mastery

A learner’s manager can look at these mastery ratings and gauge how well a learner can perform essential skills or demonstrate essential knowledge in his or her role.

  • Mastery ratings that are low indicate that the player has not achieved any of the learning objectives within the game.
  • Mastery ratings that are moderate indicate that progress toward achievement is underway. By looking at a player’s report, the manager can see which objectives the player is closest to mastering and which ones the player needs to spend more time with.
  • Mastery ratings that are high indicate the learner has successfully achieved all the learning objectives.

Confidence

Mastery is only one part of the performance picture. A learner can have high mastery over content but feel low confidence in using this knowledge or demonstrating a skill. Conversely, a learner can be overly-confident and believe their skill and knowledge set is higher than it actually is. The confidence rating within Drive is designed to help learners and their managers spot discrepancies between confidence and mastery.

Drive has learners self-assess their confidence levels on each learning objective that is part of the Drive game. They rate themselves on a scale of 0 (no confidence) to 9 (high confidence). As learners play the various mini-games that are part of a Drive game, Drive compares their performance to their confidence ratings. If they perform better or worse than their confidence rating would warrant, Drive prompts learners to re-rate themselves to a more accurate place.

A player’s confidence ratings, as well as their actual performance within the games, influences the game content that player sees on each login to the game. Drive prioritizes games and content within games in this order:

  1. Low confidence, low performance
  2. High confidence, low performance
  3. Low confidence, high performance

What to analyze related to confidence

  • Is confidence significantly higher or lower than mastery over learning objectives? If there is a mismatch is it due to lack of mastery (which could be addressed by more game play) or is it due to over-confidence with actual mastery lower than the desired target level? When confidence is too high, a conversation needs to occur with that learner to get better alignment between perceived skills and actual skills.
  • Is confidence increasing over time? Can you see a desirable uptick in confidence levels as mastery gains occur?
  • Does any individual or group have low confidence but high mastery? If yes, a manager may want to have a conversation about what is keeping confidence ratings low.

Engagement

Engagement ratings tell you how frequently your learners are interacting with Drive. There are four categories of engagement. Here’s what each category means:

  • Highly Engaged = Accessing 3x/week (total of 15 minutes’ time)
  • Moderately Engaged = Accessing 1x/week (total of 5 minutes’ time)
  • Minimally Engaged = Accessing 1x/two weeks
  • No Engagement = No access for more than 2 weeks’ time

Once players achieve mastery, most are not likely to continue interacting with the game. After a player’s mastery level peaks, that player’s engagement will likely fall to “no engagement.” Your focus is to monitor engagement right after you release a Drive game and make sure it stays in the “moderate” to “high” categories.

What to analyze related to engagement

  • Is your engagement level matching mastery levels? Ideally, if mastery is low to mid-level, you want engagement levels to be high or at least moderate.
  • If engagement and mastery are both low, what do you need to do to encourage play? What might be hindering participation and execution? Are players finding value in the Drive experience? If not, why not?

Helpful Tip

Make sure automatic email reminders are enabled. To check, go to Implement in the left-hand navigation pane. Select Drive Access. The drop down menu under Automatic Email Reminders should say “Reminders Enabled.” With the auto emails enabled, Knowledge Guru will automatically send reminders to players after extended periods of inactivity.

drivekb-mastery2-4

When is a game “done?”

Learners and their managers can consider a Drive game complete for a learner when the learner’s performance mastery AND confidence are both high. A typical learner can achieve high ratings on both metrics after encountering all the game content, which should require several instances of play. Depending on the number of performance objectives in the overall game experience and the content included within a single mini-game, this should require 45 to 60 minutes of total playing time, which translates into 9 to 12 separate days of logging into the game (5 minutes per day). Users can continue to access the experience after achieving high mastery. They are never cut off from using it as long as a valid subscription exists.

How to Build Custom Reports in Knowledge Guru Drive

Each Knowledge Guru app allows you to customize your reports to include the information you want and filter out what you don’t.

Quick Steps for Building a Custom Report in Drive

  1. Expand the Reports option within left-hand navigation pane, and select Custom Report Builder.
  2. Select all the items you would like to include in your custom player report.
  3. Choose the orientation/format for your report from the drop-down menu.
  4. Click GENERATE REPORT.

Click through the slideshow below to see the steps in action.

If you want to track something specific besides the default fields already in the custom report builder, you can customize unique fields. For example, maybe you want to track high scores by job title or compare performance across different departments. To do this, you can change the field that you run reports on by creating custom fields. You can create up to three different custom fields.

Quick Steps for Creating Custom Fields

  1. Expand the Customize option within left-hand navigation pane, and select Registration Fields.
  2. Type in the Field Names you would like to report on (i.e. location, job title, department, etc.)
  3. Insert the appropriate Field Values below each Field Name.
  4. Click SAVE VALUES.
  5. Expand the Reports option within left-hand navigation pane, and select Custom Report Builder.
  6. You will now see your new Custom Field Names you can use to run customized reports.

Once you’ve finalized the items you want to include in your custom report, you can download your report as either a PDF or CSV file.

Click through the slideshow below to see the steps in action.

How to Track Player Progress in Knowledge Guru Drive

Knowledge Guru Drive includes a variety of reports you can use to track player progress. The authoring tool describes your report options, so this article will not detail all options. Instead, we will focus on the types of information you might want to gather – and which report is the right one to use.

  • Log into your game's admin tool at kguru.co/login. Use your email address and password.

Reports Available for Drive 

  1. If you want to verify that people are staying engaged and mastering the content, access the Drive Overview report. Here you can verify the number of players you have in the game and what their progress is within the game. You can also see quick stats and charts on players’ confidence and engagement levels. This is a useful report to showcase to managers and stakeholders who want to see how a game is going at a glance.
  2. If you want to know how a specific player is performing in the game, access the Player Progress Report.
  3. If you want to see overall player performance across topics (how well are people doing as a big group), access the Topics and Objectives Report.
  4. If you want to compare performance across groups, you can access up to three different reports. Each of these reports will mirror whatever name you created for your first, second, and third custom user registration fields. Example: The default name for Field 1 is Location. So if you did not change this field name and you set up multiple location options, then you can pull a report called Location Performance vs Overall that lets you see how people performed in specific locations. For more information on creating custom user registration fields, click here.
  5. The Inactive Players Report provides a list of players who have become disengaged based on time away from playing. (Note: This report does not include players who have achieved Mastery.)
  6. The Players with Mastery Report provides a list of players who have achieved Mastery status in the game. The ultimate goal is for all players to achieve Mastery.

PDF or CSV? 

Each report can be downloaded as a PDF or as a CSV file. You can click EXPORT next to the report you want to export on the View Reports screen, or click EXPORT REPORT on the top right of your screen when you’re viewing a report. Choose the CSV option if you think you might want to do further manipulation of the data. By downloading as a CSV, you can then re-save the report as an Excel spreadsheet, reformat it to your taste, and then sort the data to suit your needs.

Custom Report Builder Option

You may have a need for some very specific data – and not care about other data. You can use the Custom Report Builder to choose what information you include/exclude from a report.

Send Automatic Reports

You can send reports to your stakeholders automatically with the Auto Report Sender. Learn how here.

How to Send Automatic Reports in Knowledge Guru Drive

Need instructions for a Legend or Quest game?


Let managers know how their players are doing by scheduling automatic reports that can be sent directly to their inbox. You choose which reports you want to send and how often you want to send them. You also decide what information is included in the reports each recipient receives.

Quick Steps for Sending Automatic Reports

  1. Expand the REPORTS option within left-hand navigation pane, and select AUTOMATED REPORTS.
  2. Click CREATE NEW REPORT.
  3. Type a report name in the NAME OF REPORT box.
  4. Check the box next to each report you would like to automatically send.
  5. Use the FILTER dropdown(s) next to each registration field you created to only send reports for a specific group of players.
  6. Use the FREQUENCY drop-down to decide how often reports will be automatically sent.
  7. (Optional) select an expiration date for your automatic report. Format: mm/dd/yyyy.
  8. Type the email addresses of the report recipient(s) into the RECIPIENTS box. Separate each email with a comma.
  9. Click CREATE REPORT.

If you no longer want to send your automatic report, click the red REMOVE button next to the report you wish to cancel.

Click through the slideshow below to see the steps in action.

7 Steps to an Effective Knowledge Guru Drive Implementation

Our implementation pack includes timelines, tips, templates and images you can use to implement and promote your game.

You already developed and customized your Knowledge Guru Drive game. Now you need a plan to launch it, promote it, and measure it.

Consider these tips for a successful implementation:

1. Make it mandatory… and integrate into an existing workflow.

Your employees’ time is limited, and most of them only have the energy to focus on the activities that are truly essential to their jobs. Our experience shows us that the organizations that are most successful require that their employees play Drive AND integrate the game into an existing workflow. For example, if your organization uses the Salesforce CRM, you can encourage reps to log in with their Salesforce credentials. You also might include links to the game and to the native app within an existing training portal or intranet.

If you are unable to make your game mandatory, plan a series of communications that promote the game and remind players to play. Offer incentives, recognition and/or prizes. And make sure it is integrated into learners’ workflows.

2. Blend into a curriculum: use as part of a learning solution.

Organizations have the most success when Drive is part of a larger blended curriculum or strategy. Make sure your Drive game works with the other solutions in your curriculum to drive your learning objectives. It is best used as a reinforcement tool (see step 3).

3. Use Drive as a reinforcement tool.

Furthermore, we find that Drive works especially well as a reinforcement tool. Send your game out to learners after they have completed an eLearning course or instructor-led session to help them remember content covered in the training. If you want to use Knowledge Guru as pre-work or a live event training activity, the Quest and Legend apps are better options.

4. Offer incentives and/or provide sufficient motivation. 

We recommend providing prizes and rewards to your employees for completing your Drive game. Encouragement from senior leadership can be even more effective.

5. Create a communications strategy around the game.

Incorporate some sort of multi-part communications strategy to get the word out about your new Drive game. This could include many things, such as a series of emails or even a collection of advertisements placed throughout your company intranet site. Make sure you explain to players how they will download the app and register. Learn more about how to register players in this tutorial.

6. Use reporting and adapt the training.

Identify a specific learning objective that your learners are missing as a group, then adjust your Drive game to better focus on the weak process step. Pay close attention to how confidence compares to performance for each topic and learning objective. Take advantage of the data you gather from your learners and act quickly to adapt their training and processes. Learn more about how to use reports in this tutorial.

7. Gather insights via surveys.

Consider surveying your learners after they complete your Drive game. Surveys can reveal many valuable insights that impact future games you create.

Here are a few more implementation tips for Knowledge Guru Drive.

How to Make a Game Live So Players Can Access It

Once you have created the topics, objectives, mini-games, and decided your preference for automatic email reminders for your Drive game, you are ready to make it live.

Follow these steps to make your game live so players can access it, and enable or disable email reminders:

Quick Steps List

  1. Expand the Implement option within left-hand navigation pane, and select Drive Access.
  2. Under Current Drive Access, select Drive is Online from the drop-down menu.
  3. You will see a confirmation message that your game is live. You will also see your game’s URL.
  4. OR you can click the red power button labeled DRIVE is Offline in the left-hand navigation pane.
  5. You will see a confirmation message that your game is live. The power button in the left-hand navigation pane will turn green and say DRIVE is Online.

Click through the slideshow below to see the steps in action.

How to Add Players to a Drive Game

Have Players Self-Register

Want your players to create their own account for your Knowledge Guru Drive game? Have your players self-register for your game in four easy steps:

Quick Steps for Self-Registration

  1. Send your Drive game link/URL to all players via email or post it on your LMS.
  2. Explain that players must click the link and fill out the registration form.
  3. Have your players create a username (their email address) and a password.
  4. After registering, your players will be automatically directed to a link where they can download the mobile app to their phone, desktop or tablet.

For added security, you can restrict access so only email addresses with your company’s domain name can register.

Manually Add Single or Multiple Players

Usually you will have players self-register for your game the first time they log in. Occasionally, you may want to add a single player to a game, particularly when you test a game before you release it.

Quick Steps for Adding a Single Player

  1. Expand the Manage Players option within left-hand navigation pane, and select Add Players.
  2. Type the player information in the available fields under Add a Single Player.
  3. Click ADD PLAYER.

Pre-Register Players

Do you want to spare your players the task of self-registering to play a Knowledge Guru game? Some organizations do. If email verification is not needed, you can opt to pre-register players for a Knowledge Guru game. Perhaps you are unveiling a Knowledge Guru game as part of a conference experience or as part of a live workshop event. In these instances, your goal is to get everyone playing as quickly as possible with as little effort as possible.

Mass uploading your players ahead of time may be a perfect solution.

Quick Steps for Adding Multiple Players

  1. Expand Manage Players option within left-hand navigation pane, and select Add Players.
  2. In the field labeled Add Multiple Players, under Step 1, click DOWNLOAD EXPORT FILE to download the .CSV template we provide. It tells you exactly what information to include. (NOTE: Define your user registration fields before you mass import players so that the .CSV file you download includes columns for them.)
  3. Step 2: Add players to the .CSV file. Add as many players as you need. Take care to follow the format presented in the .CSV template. Existing players will retain their current passwords.
  4. To import your player file, click CHOOSE FILE under Step 3.
  5. Click UPLOAD.

NOTE: Safari users need to right-click to download the .CSV file.

Click through this slideshow to see a quick tutorial.

How to Edit or Reset Player Data from a Drive Game

Edit Player Data

Editing a player’s information is useful, though players can self-edit their email address or their name once they register. To edit a player’s information, follow these steps: 

Quick Steps for Editing a Player in Knowledge Guru Drive

  1. Expand Manage Players option within left-hand navigation pane, and select Edit or Reset Players.
  2. Search for the player you want to edit one of two ways: 1) Search player’s last name under Search by last name field or choose a player from the dropdown menu under Choose a player to edit.
  3. Click EDIT PLAYER.
  4. Make your changes to the player’s account information.
  5. Click UPDATE PLAYER.

Click through this slideshow to view a quick visual tutorial.

Reset Player Data

If you need to, you can also reset a player’s progress in the game. Here are some times when you might want to do this:

  • You want everyone to replay the game.
  • A single player may request opportunity to replay the game.
  • You are testing a game before making it available to all players. (You want to reset your own progress or the progress of testers so they can replay the game.)

Follow these steps to reset player data.

Quick Steps for Resetting Player Data

  1. Expand Manage Players option within left-hand navigation pane, and select Edit or Reset Players.
  2. To reset a specific player, locate the field labeled Reset Specific Player Progress. You can search for the player you want to reset one of two ways: 1) Search player’s last name under Search for player by last name to reset or choose a player from the dropdown menu under Reset specific player data in the system.
  3. Once you select a player, confirm resetting that player by checking the box next to Confirm resetting the player selected above?
  4. Click RESET PLAYER.
  5. To reset all player data, locate the field labeled Reset ALL Player Progress.
  6. Confirm resetting all player data by checking the box next to Confirm resetting ALL PLAYER DATA in the system?
  7. Click RESET ALL PLAYER DATA.

Click through the slideshow below to see the steps in action.